-
Notifications
You must be signed in to change notification settings - Fork 5
Raspberry Pi Initial setup
The Raspberry Pi initial setup requires you to create populate the micro SD card with the raspbian operating system and then on the first boot you need to configure the Raspberry Pi networking to meet your requirements. There are many different paths to get to the required end result depending on how you want to initially access the Pi and your local network environment.
There is a new version of Raspbian, called stretch, which you need to use. All instructions on this wiki will assume Raspbian Stretch is being used. The image is available from here
There are 2 options for flashing the SD card.
One is using a boot environment called NOOBs (New Out Of the Box Software), which walks you through the options to setup the micro SD card. However, using NOOBS requires you to be working directly on the Pi, with it connected to a TV or monitor with an HDMI cable and have a USB keyboard and mouse attached. The process is described here. You should select to install the full version of Raspbian when offered the list of available operating systems. Once Raspbian boots you are ready to configure the networking and then performing the necessary updates, described below.
The other option is to directly flash Raspbian onto the micro-SD card, using a flashing application such as Etcher. Instructions for installing Raspbian to the micro-SD card can be found here, but be sure to install the full version with Desktop, not the lite version. Installing Raspbian to the micro-SD card can enable you to access the Raspberry Pi without needing a monitor, keyboard and mouse to be attached to the Pi. Details can be found in this video.
If installing Raspbian without a keyboard, mouse and monitor you need to create a file on the SD file after flashing it. You need to create an empty file in the root of the boot partition called ssh. This will automatically enable remote access via SSH, without this file SSH is disabled by default, so you will not be able to access to raspberry pi remotely. Once Etcher has flashed the SD card it will automatically be disconnected, so you need to remove and reinsert the SD card and ensure it is mounted on your computer.
To create the file open a terminal or command window and change the the directory where the boot partition of the SD card is located, then enter the command:
macOS : touch ssh
linux : touch ssh
windows : type NUL >> ssh
I find that a direct Ethernet cable connection between my laptop and the Raspberry Pi is the most reliable option. Note, Microsoft Windows users will need to install additional software to enable local name resolution between Windows and Raspbian. A terminal application is also needed on Windows, such as putty.
If you are not able to connect via an Ethernet cable it is possible to get your Raspberry Pi to automatically connect to a WiFi network, so long as the WiFi network doesn't require you to launch a browser to be able to authenticate to the network. To enable your Raspberry Pi to automatically connect to a WiFi network you need to create an additional file in the root of the boot partition of the SD card (same place as the ssh file). The file needs to be called wpa_supplicant.conf and should contain the following:
ctrl_interface=DIR=/var/run/wpa_supplicant GROUP=netdev
update_config=1
country=GB

network={
    ssid="YOUR_SSID"
    psk="YOUR_PASSWORD"
    key_mgmt=WPA-PSK
}
replacing YOUR_SSID and YOUR_PASSWORD with the appropriate details for the WiFi network the Pi should connect to. If the network is open, without a password, then omit the psk= line and set key_mgmt=NONE.
You can now eject the SD card and insert it into the Pi and connect power to the Pi.
The setup process requires you to be able to access the graphical user interface of the Raspberry Pi, so if you are not using an HDMI connected TV or monitor, then you should install a VNC application on your laptop to remotely access the graphical user interface of the Raspberry Pi. Details of VNC access can be found here.
When you first boot your pi you need to do some initial configuration. To do this you need to access a command line.
If working directly on the Pi with keyboard, mouse and monitor there is a GUI version of the configuration application available from the menu:
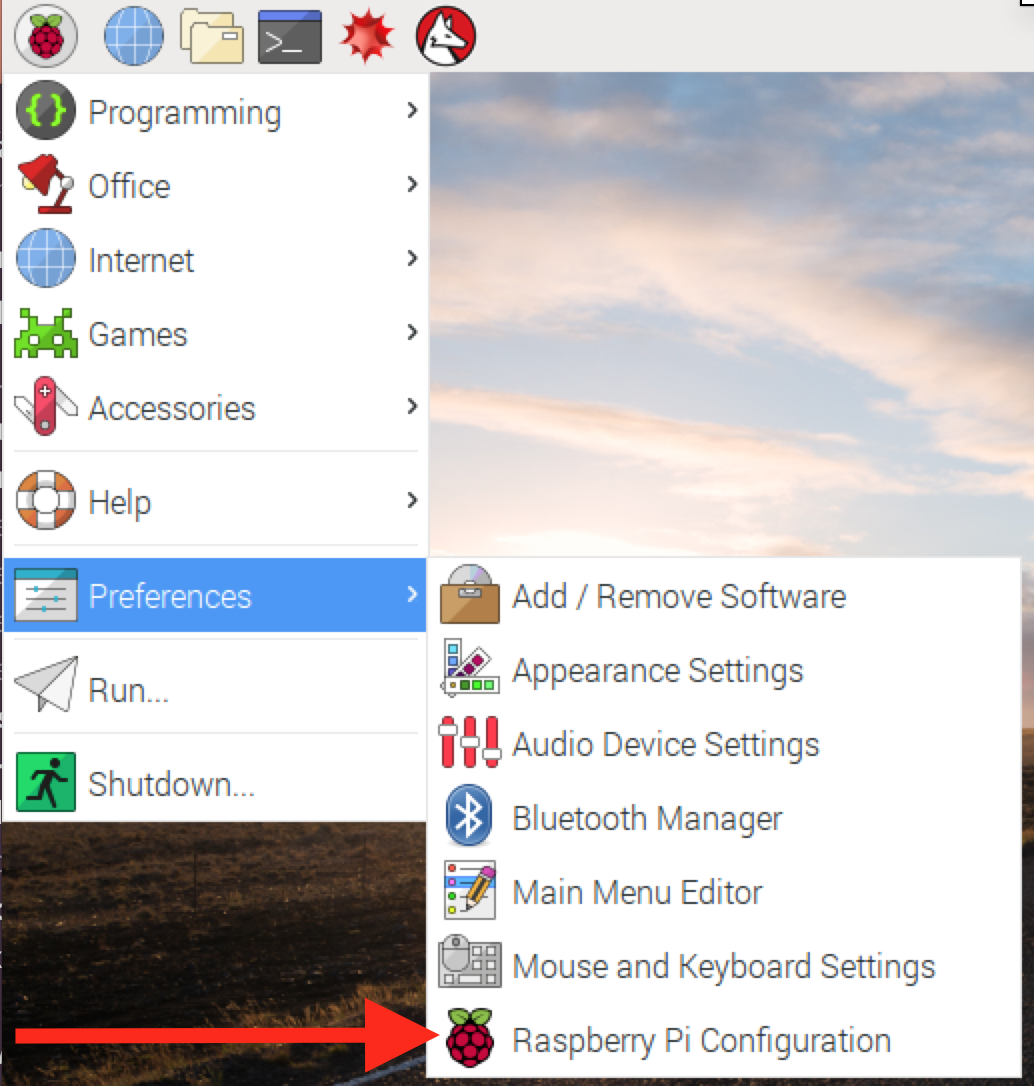
Selecting the link will open up the configuration tool:

If accessing remotely you need to establish a connection to the pi using ssh. On Windows you can use an application, such as putty. On Linux and MacOS you can use the terminal application and the ssh command. You need to connect using the following details:
- Host : raspberrypi.local
- Name : pi
- Password : raspberry
so in a terminal window on linux or MacOS the command is:
ssh [email protected]
you should then be promoted for the password, which is raspberry.
When you have command line access to your pi you need to enter the command:
sudo raspi-config
then you should see the config utility:
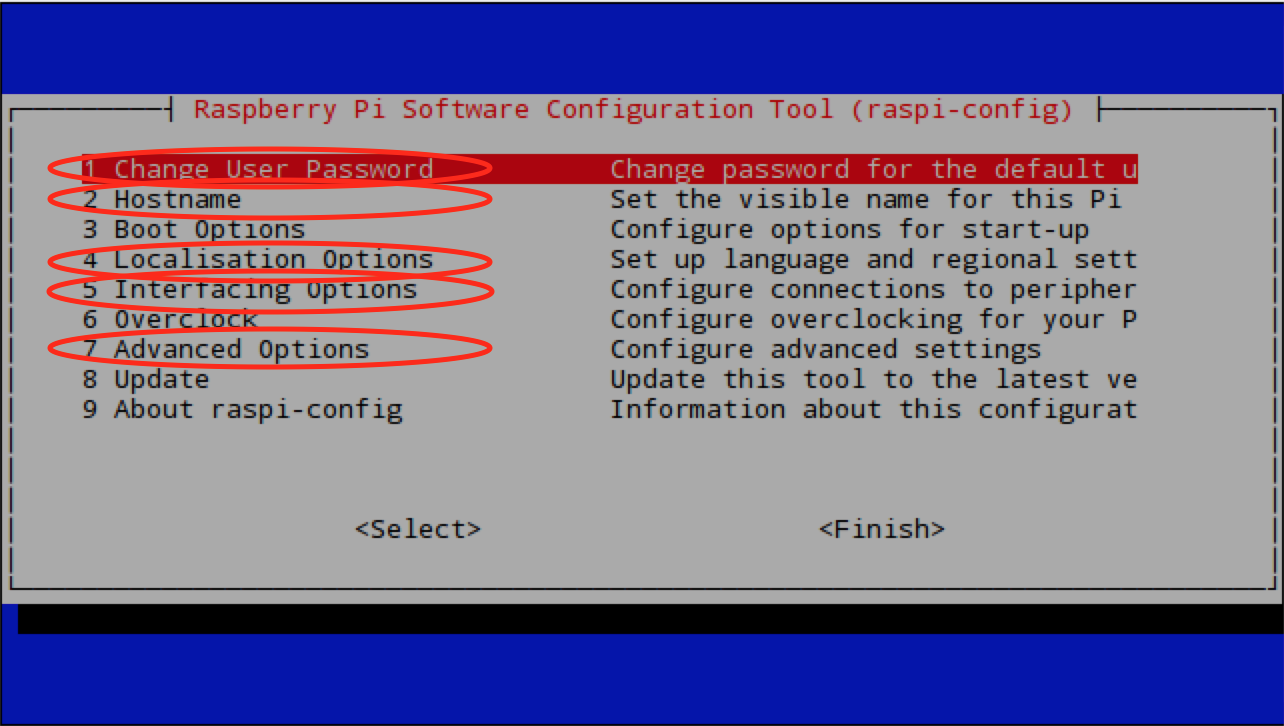
Use the arrow keys to move between menu items and the tab key to jump between sections in the interface. The enter key selects the currently highlighted option.
In the configuration tool you need to:
- Change the password for the standard user pi. The default is
raspberry, but you should change this to prevent unauthorised access to your raspberry pi. - Change the hostname, if needed. The default is
raspberrypiand you should change it if you are likely to run your pi on a network containing other Raspberry pis. - Set the location details for timezone, locale, WiFi region and keyboard layout
- Set the VNC resolution, I advise this to be set to 1280x720 or higher.
- Enable the following interfaces: Camera, SSH, VNC, I2C
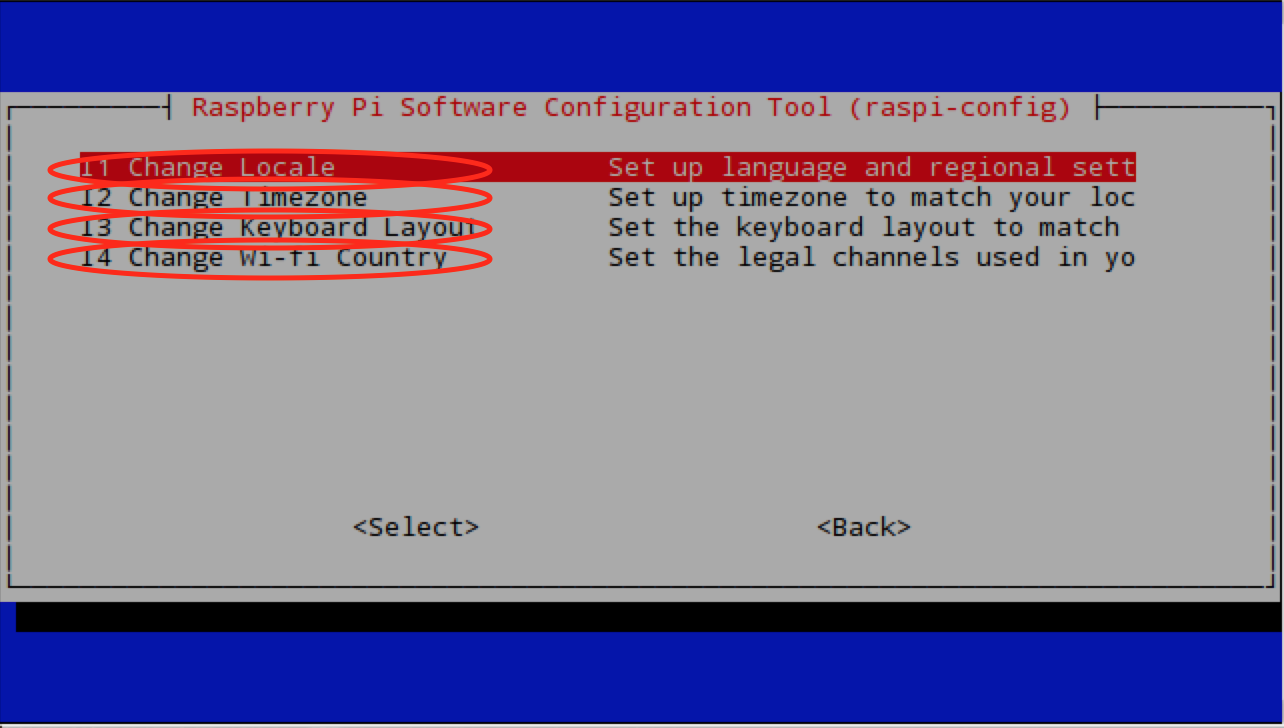
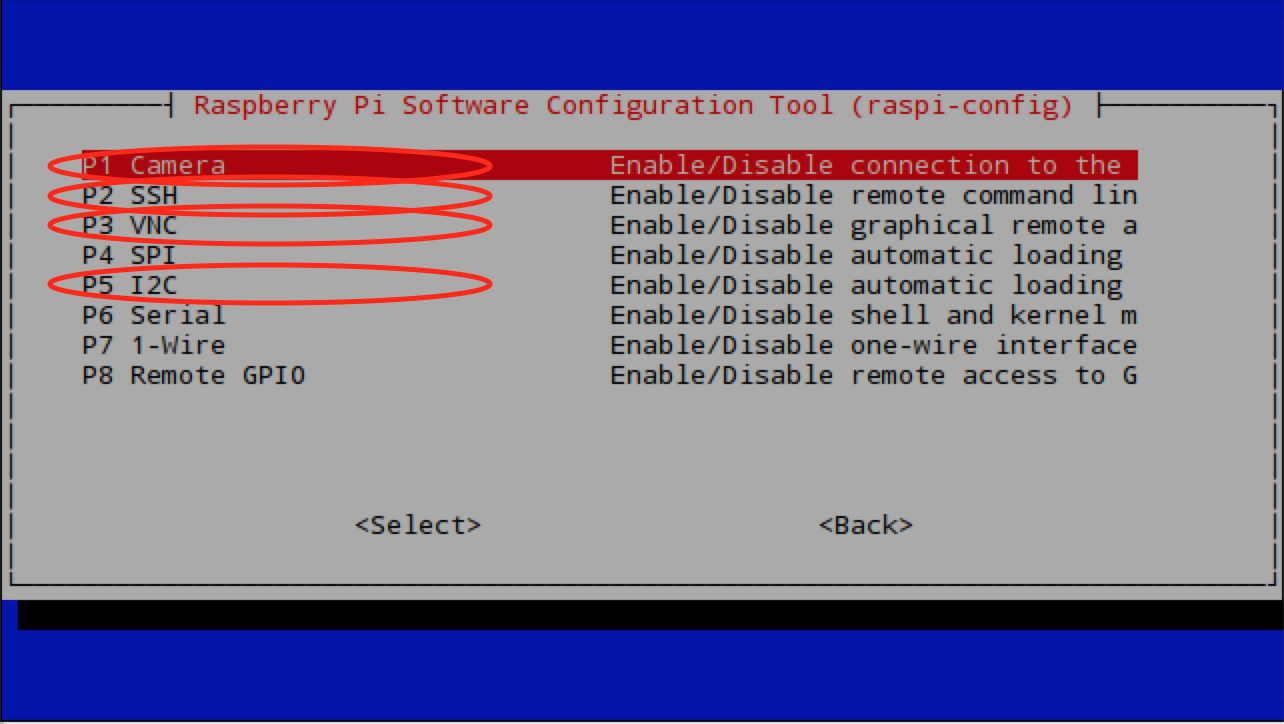
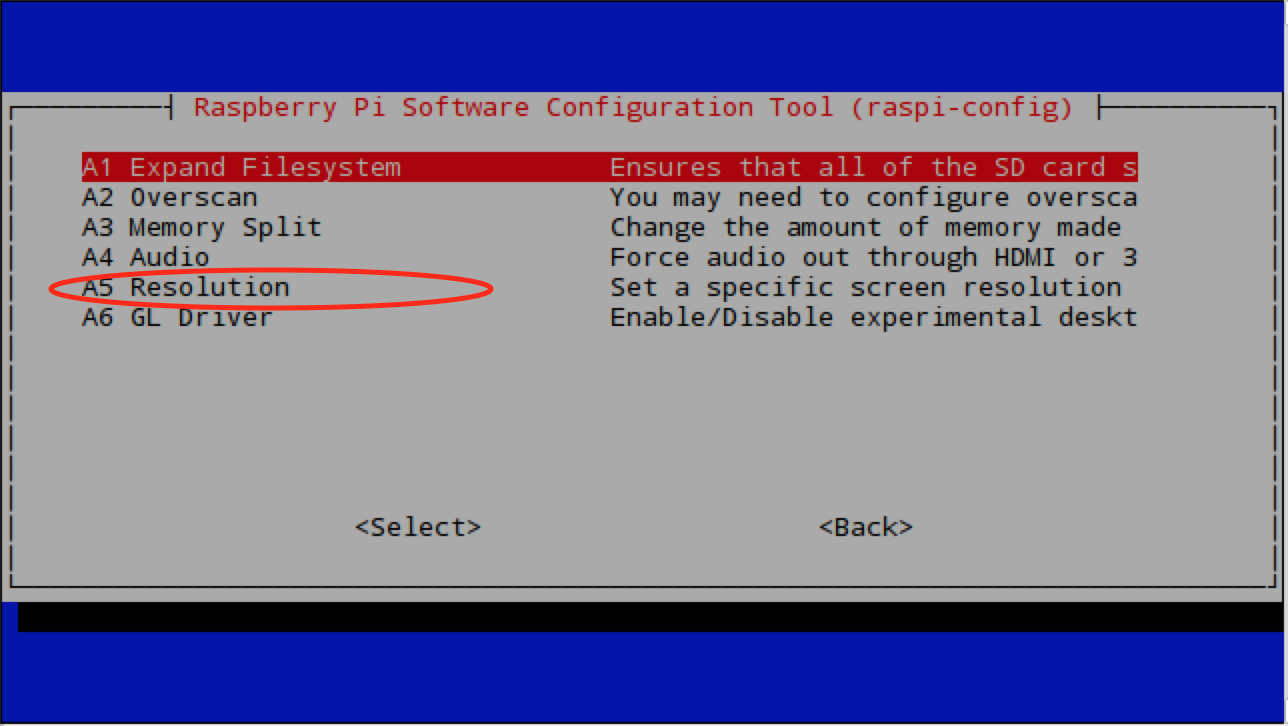
After the updates have been made you can quite the configuration tool and select to reboot the raspberry pi.
When you reconnect to the pi the hostname will be what you set in the configuration tool followed by .local and the password for the pi user will be what you set on the configuration tool. You should now be able to connect using VNC to get remote access to the graphical user interface.
Unless you are going to use a wired Ethernet connection you will need to configure the Raspberry Pi to use WiFi. You can configure a wifi connection from the command line, instructions can be found here, but it is easier to use the graphical user interface. If not working directly on the pi then you will need to access the desktop remotely using VNC.
Simply click the WiFi icon at the top of the screen:

then select your network and provide the security information to connect to the network.
Once your Raspberry Pi is online you are ready to update the preinstalled software
