-
Notifications
You must be signed in to change notification settings - Fork 5
Getting Sound to work on the Raspberry Pi
Sound can be a little challenging on the Raspberry Pi when also connecting certain hardware. The Raspberry Pi has no dedicated sound hardware, but uses the 2 available PWM (Pulse Width Modulation) channels to generate an audio signal for the 3.5mm audio output socket. However, if one of the PWM channels is needed to drive other attached hardware, then there is a conflict and the audio output will usually no longer work.
TobyJnr needs a PWM channel to drive the RGB LED (see here), so cannot provide audio via the 3.5mm audio output socket.
There are 2 options for sound with TobyJnr:
- Bluetooth audio
-
USB connected sound card
Note: some speakers use a USB connection for sound, but still require the audio signal via the 3.5mm audio output - these speakers will not work. The USB connected audio hardware you choose needs to support the audio signal via the USB cable.
These instructions assume you are using a USB microphone connected to TobyJnr.
Note: The Bluetooth audio software and configuration in Raspbian changed when Raspbian Stretch was released, so the instructions here will not work with earlier versions of Raspbian, such as Raspbian Jessie.
There are many Bluetooth speakers on the market that use a Bluetooth connection for the audio signal. The easiest way to connect a Bluetooth speaker is to use the Raspberry Pi Graphical User Interface (GUI) to pair the speaker then configure the sound to use the speaker (I usually use a VNC connection to access the GUI).
Turn on your speaker and make sure it is discoverable and not connected to any other device you have. Then click the Bluetooth icon in the top toolbar of the Raspberry Pi graphical user interface (I connect via VNC).
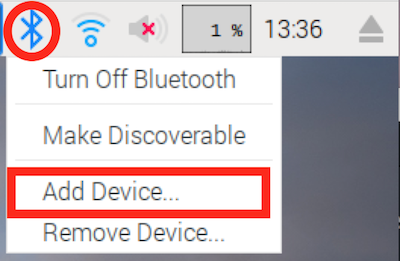
Select to Add Device... then select the speaker from the list of found devices then press pair. 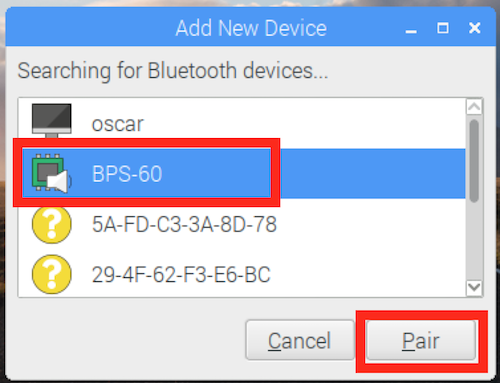
After a short while your speaker should be paired with the Raspberry Pi. You now need to select the speaker as the output device. Right click the speaker icon in the top toolbar and you should see your Bluetooth speaker as an option. Select the Bluetooth speaker.
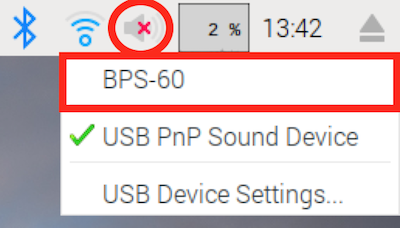
The speaker should then be connected and you should hear any connection tone your speaker makes. The speaker is now connected to your Raspberry Pi and is the default output sound device. You should now be able to play audio from the browser, select a favourite radio station or YouTube clip to test audio output is working.
Note: When you power on your TobyJnr you should make sure that the speaker is powered on an is waiting for a connection before powering on TobyJnr, as this should ensure that speaker automatically connects and will be the default audio out device so you won't need to manually connect to the speaker.
Now the audio out is working just a few settings to check for the audio input, using the USB microphone. Right-click the speaker icon in the top toolbar and select USB Device Settings...
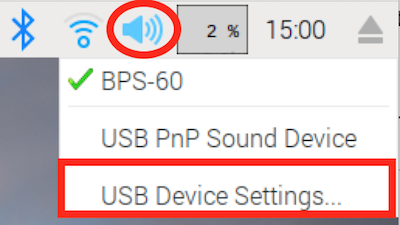
Press the Select Controls... button and ensure that the Microphone and Auto Gain Control are both selected. 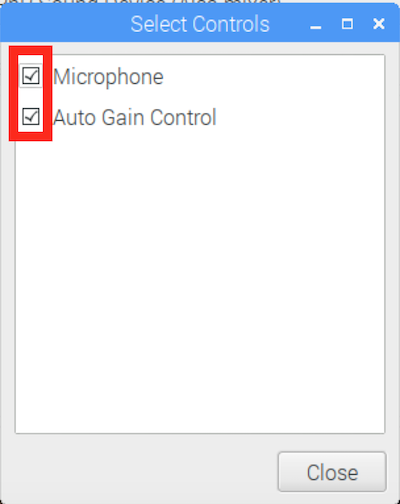
Then in the Capture setting ensure the Microphone is enabled and the volume control is set to high. 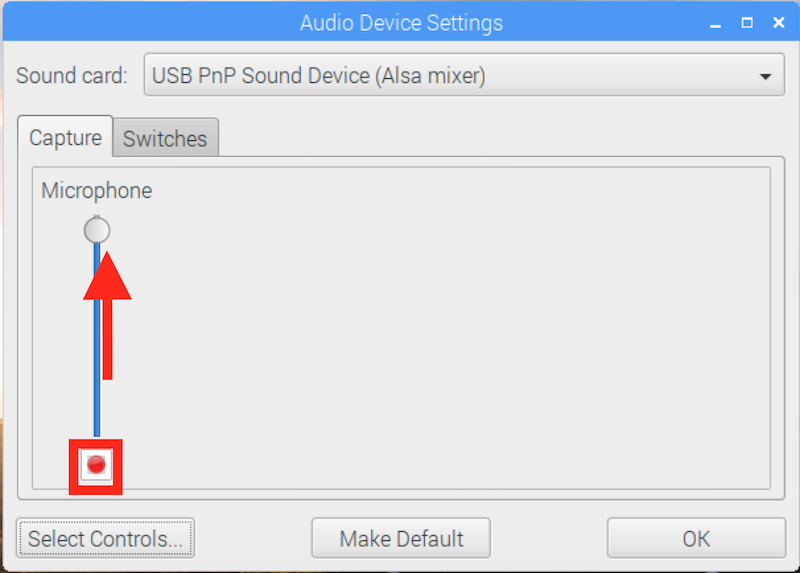
Then move to the Switches tab and ensure that Auto Gain Control is selected
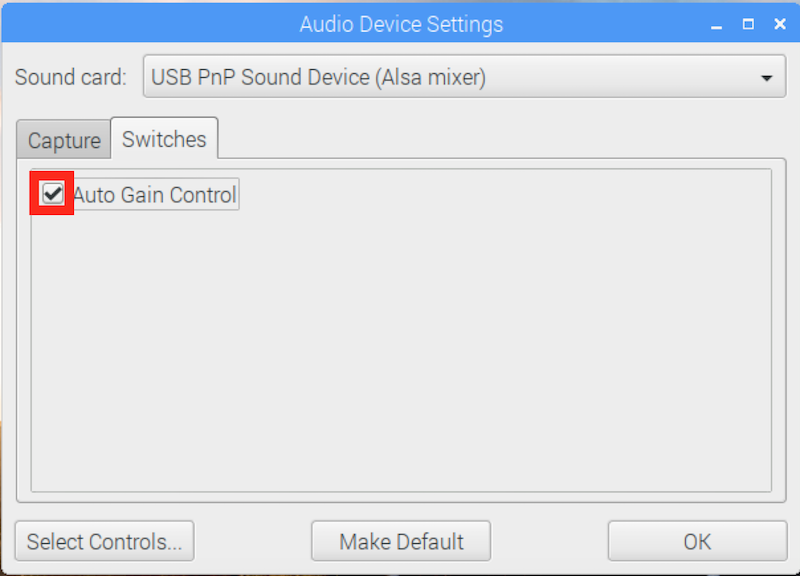
Then select OK to close the settings dialog. You should now have audio working. Test the sound configuration by following instruction at the bottom of the page
Configuring USB audio is a little more tricky than Bluetooth.
You should connect the USB speaker and the USB microphone (or USB sound card) then power on your system. Using hot-plug for the USB sound can be a little unreliable as the sound configuration needs to refer to a specific USB device, so plugging in USB devices in a different order can break the configuration.
You need to verify the USB sound devices, so in a terminal window connected to the Pi inside TobyJnr (either using VNC to connect to the desktop or using an ssh session) enter the command aplay -l. This will produce output similar what is shown below:
**** List of PLAYBACK Hardware Devices ****
card 0: Device_1 [USB2.0 Device], device 0: USB Audio [USB Audio]
Subdevices: 1/1
Subdevice #0: subdevice #0
From this output I can see the audio USB device is on card 0, device 0. Your output may differ if you have different USB hardware.
If I connect a different USB device, a USB sound card, the output is:
**** List of PLAYBACK Hardware Devices ****
card 1: Audio [USB Audio], device 0: USB Audio [USB Audio]
Subdevices: 1/1
Subdevice #0: subdevice #0
here you can see the USB audio device is on card 1, device 0.
Once you have identified the USB card and device numbers you can configure the sound card using the Raspberry Pi GUI via VNC. Right click the speaker icon then select USB Device Settings. Depending on what USB sound hardware you have there may be 1 or 2 entries in the settings dialog (1 speaker and 1 mic) or you may just have a single device (if using a USB sound card with connections for both speaker and mic). Select each of the devices in turn then hit the 'Select Controls..' button and select all available controls. Repeat if you have another USB audio device - you should have enabled controls for Playback and Capture. Ensure that both the speaker and microphone are enabled and the volume is set to an appropriate level.
Unfortunately this is not the end of the configuration, as the default configuration assumes that the audio devices are able to automatically handle all audio types and the driver will make the necessary conversions, which is usually not the case, so you need to go and manually change the configuration that has been set to enable a plugin which will ensure that the correct audio format is sent to the hardware. The plugin cannot be enabled using the GUI, you need to open a terminal (either within the GUI or via ssh) and edit the file ~/.asoundrc
nano ~/.asoundrc
and you will have a file content that looks similar to:
pcm.!default {
type hw
card 1
}
ctl.!default {
type hw
card 1
}
you need to change the pcm entry to:
pcm.!default {
type plug
slave {
pcm "hw:1,0"
}
}
where the hw:1,0 (hw::) is the card number and device number from the aplay -l command you ran earlier (here card 1 and device 0). The ctl entry will not need modifying.
Note: If you right click the speaker icon and make changes you may reset the .asoundrc file, so will need to make the plugin change again.
You can test you have working audio settings by running the commands below. You should hear audio when running both commands:
aplay /usr/share/sounds/alsa/Front_Center.wav
aplay /usr/lib/libreoffice/share/gallery/sounds/cow.wav
The test audio files will be on your raspberry Pi if you have followed the standard setup of Raspbian. If you do not hear audio output then go back and verify all the settings in the instructions above.