-
Notifications
You must be signed in to change notification settings - Fork 47
layer2_configuration
You can define one or more layer-2 networks inside every AS.
You can do this through three configuration files that describe these layer-2 networks.
These configuration files are applied on one or more ASes, according to the AS_config.txt file.
In the following, we explain each configuration file and give an example.
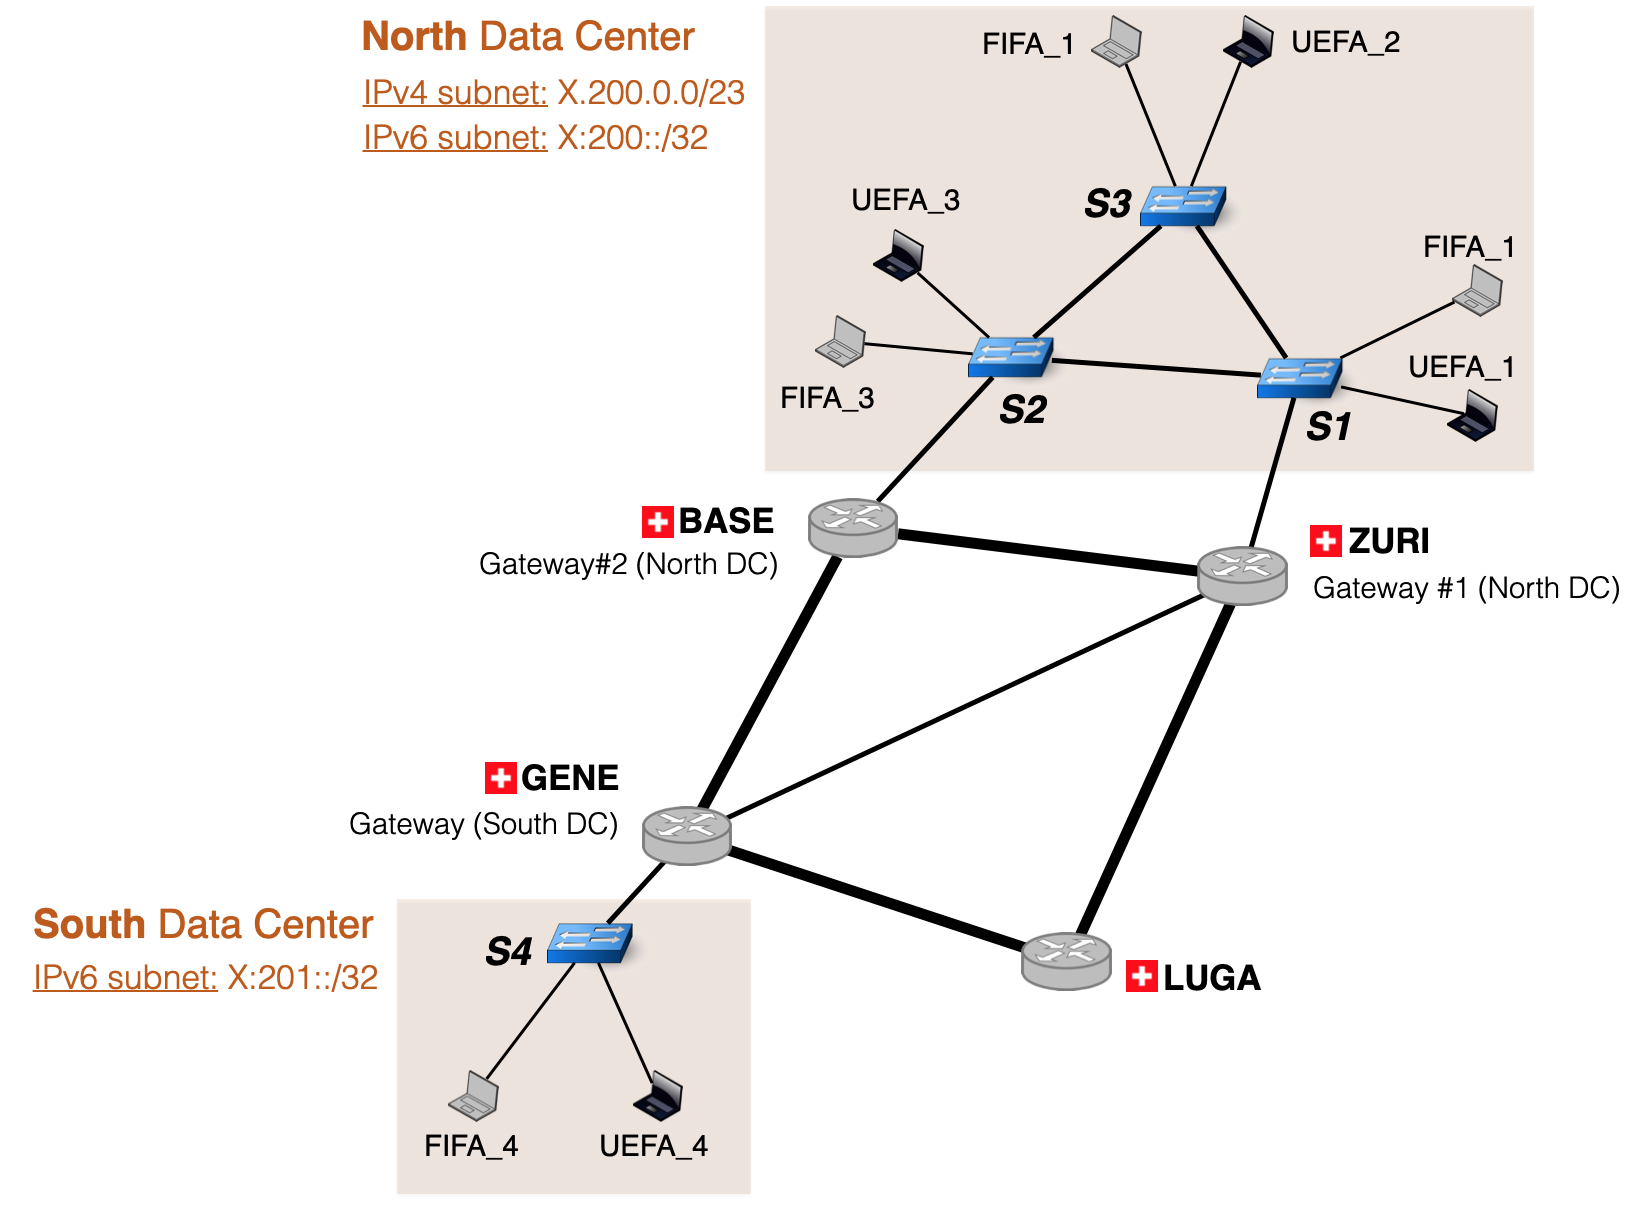
The default configuration files depicted below build the following L2 network:

ℹ️ In case you do not want to have a layer-2 network in your mini-Internet, just make the following configuration files empty.
This file lists the switches in the layer-2 networks included in an AS. The following table shows an example of this configuration file.
C1     C2     C3           C4          C5
------------------------------------------
DCN    S1    ZURI   11:11:11:11:11:11   1
DCN    S2    BASE   22:22:22:22:22:22   2
DCN    S3    N/A    33:33:33:33:33:33   3
DCS    S4    GENE   44:44:44:44:44:44   4
Below is the description of each column:
- C1: Name of the layer-2 network the switch belongs to. Here DCN (resp. DCS) means Data Center North (resp. South).
- C2: Name of the layer-2 switch.
- C3: Router to which the layer-2 switch is connected to (or N/A if the switch is not connected to a router).
-
C4: The MAC address to use for a switch which will serve as an
ID. - C5: The bridge ID for the switch which is used for the spanning tree computation.
Note that a router can only be connected to one L2 network, but a layer 2 network can be connected to one or more routers.
ℹ️ When a switch is connected to a router, it must also be indicated in the third column of the l3_router.txt configuration file,
which lists the L3 routers. In the l3_router.txt configuration file, the name of the L2 network must always be preceded by L2-.
This file lists the hosts that are in the layer 2 network along with their parameters. The following table shows an example of such a configuration file.
C1                   C2         C3    C4     C5      C6     C7
---------------------------------------------------------------
FIFA_1   miniinterneteth/d_host DCN   S1    10000   1000    10
UEFA_1   miniinterneteth/d_host DCN   S1    10000   1000    20
vpn_1    miniinterneteth/d_host DCN   S1    10000   1000    30
FIFA_2   miniinterneteth/d_host DCN   S2    10000   1000    10
UEFA_2   miniinterneteth/d_host DCN   S2    10000   1000    20
vpn_2    miniinterneteth/d_host DCN   S2    10000   1000    30
FIFA_3   miniinterneteth/d_host	DCN   S3    10000   1000    10
UEFA_3   miniinterneteth/d_host DCN   S3    10000   1000    20
vpn_3    miniinterneteth/d_host DCN   S3    10000   1000    30
FIFA_4   miniinterneteth/d_host DCS   S4    10000   1000    10
UEFA_4   miniinterneteth/d_host DCS   S4    10000   1000    20
Below is the description of each column:
- C1: Name of the host.
- C2: Docker image to use for this host.
- C3: The name of the L2 network the host belongs to.
- C4: The name of the switch to which the host is connected.
- C5: The throughput of the link between the host and the switch (in Kbps).
- C6: The delay of the link between the host and the switch (in ms).
- C7: The VLAN to which the host belongs to.
ℹ️ Observe that a host can be a VPN server, in which case its name must start with vpn_.
In the example above, there are three VPNs (vpn_1, vpn_2 and vpn_3), all in DCN.
The last file describes the layer-2 topologies. Each line corresponds to a link between two switches.
The following table shows an example of such a configuration file.
C1    C2    C3   C4     C5     C6
------------------------------------------
DCN   S1   DCN   S2   10000   1000
DCN   S1   DCN   S3   10000   1000
DCN   S2   DCN   S3   10000   1000
Below is the description of each column:
- C1: Name of the L2 network where the first switch of the link is located.
- C2: The name of the first switch of the link.
- C3: Name of the L2 network where the second switch of the link is located.
- C4: The name of the second switch of the link.
- C5: The throughput of the link between the host and the switch (in Kbps).
- C6: The delay of the link between the host and the switch (in ms).
ℹ️ The names of the layer-2 networks should be identical for the two switches since it is not possible to connect two switches that are in two different L2 networks.
-
Configure the mini-Internet
-
Operate the mini-Internet
-
Use the mini-Internet
-
Built-in services
-
Additional tools and features