-
Notifications
You must be signed in to change notification settings - Fork 0
Home

The communication between emulation clients and emulation server is defined by an MSDL (see MSDL Specification). If you want to extend the functionality, you can extend the emulation.msdl located in the folder Emulation/GWTEmulationServer/src/META-INF.
The script syntax is defined in the XMLEmulationScript.xsd located in the folder Emulation/GWTEmulationServer/src/script-utils. You can use this schema to create your own test scripts. Examples can also be found in that folder.
The main functions of the script are listed below:
You can define a variable for one test-client with the instance-function or a group of clients with the instanceGroup-function. These variables are used by other functions to define the destination of the commands.
<instance varName="CLIENT" appNS="test.client.package" instanceId="1"/>
<instanceGroup varName="CLIENT_GROUP" appNS="test.client.package" firstInstanceId="1" instanceCount="8"/>
You can handle the start and stop of the emulation with the following functions.
<start instance="CLIENT" />
<stop instance="CLIENT_GROUP" />
AppCommands are used to define emulation commands. Optionally you can add parameters to the command.
<appCommand instance="CLIENT_GROUP" methodName="testMethod" async="true">
  <parameter>
    <string>test_string</string>
    <boolean>true</boolean>
    <int>42</int>
    <double>42.0</double>
  </parameter>
</appcommand>
The server waits for the client to acknowledge an AppCommand. By setting the async flag, you control if the client sends the acknowledgment right after receiving or after execution of the command. If set to true the client immediately sends it, otherwise the client sends it after execution of the command. Default is false.
Make sure to provide the parameters in exactly the same order as they appear in your method signatures. Otherwise it is not possible for the framework to match commands and methods.
That command sets the time in milliseconds the server waits before executing the next command.
<wait time="15000" />
At the moment, the only control structure is the for-loop. You can use any function in that loop.
<for times="6">
  <appCommand instance="CLIENT" methodName="testMethod" />
</for>>
The server- and client-side beans can be generated with the MSDL2JavaServer.xslt and MSDL2JavaClient.xslt located in the folder Emulation/GWTEmulationServer/xslt. See Mobilis Service Generation and Development for information about generating the beans.
In order to run the emulation server you have to configure the xmpp and the database connection. After that you have to build and deploy the server.
The xmpp connection is configured in the file EmulationConnection.java in the folder Emulation/GWTEmulationServer/src/de/tudresden/inf/rn/mobilis/gwtemulationserver/server/utils. (In future releases this should be in a configuration file)
The database connection is configured in the file persistence.xml in the folder Emulation/GWTEmulationServer/src/META-INF.
If you configured this you can use the build-script in folder Emulation/GWTEmulationServer to compile the sources and pack the war-file. Now you can deploy the war-file in your Tomcat Server (tested with version 7).
Note: To build the server the GWT SDK must be installed. (download here)
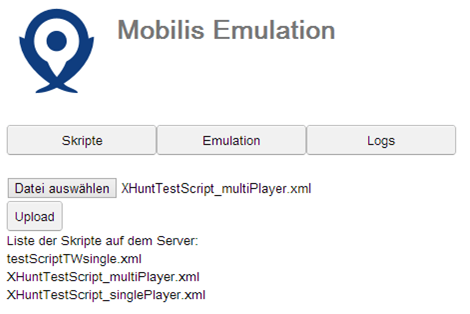
At first you have to upload your script under the tab Skripte. Here you can see all uploaded scripts.

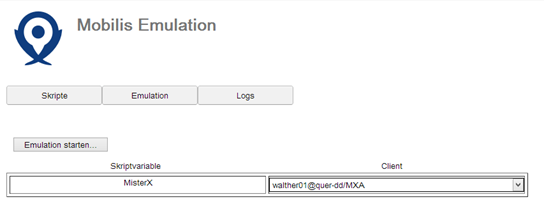
Next step is to start the emulation under the tab Emulation. The first thing here is to select your script and connect your devices. You can see how many devices are connected and how many devices are defined in the seleceted script.

After that you assign the the script variables to the connected devices.

In the end you can see your emulation run under the tab Logs.


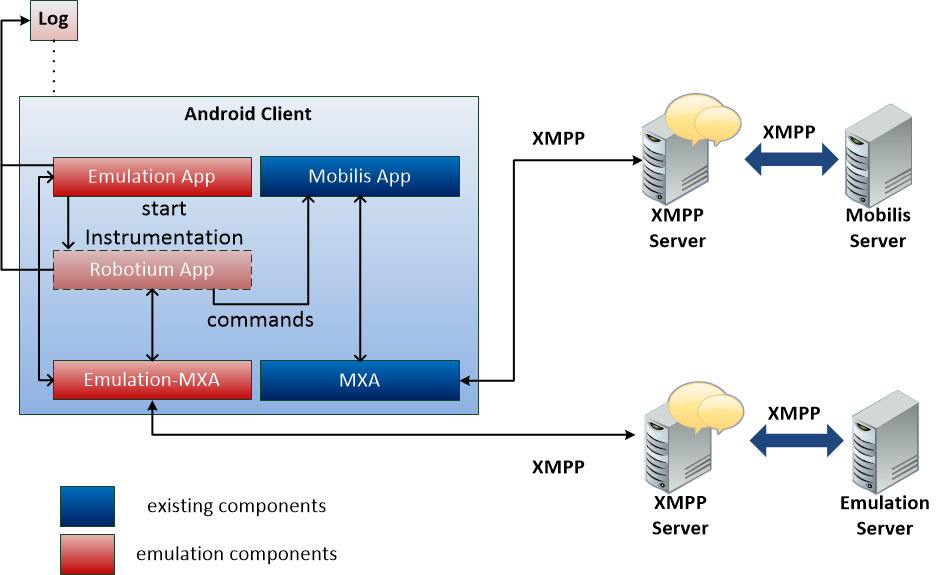
As you can see the Android part is separated in two components. The Emulation App (later called Mobilis Emulation Starter) and the Robotium App. For now there is only one MXA component, but in future the emulation connection should be separated from the app connection.
The Emulation Starter is used to connect the device to the server and to receive the start command. For that an installed MXA (see MXA) should be on your device. In the settings you have to configure the JID of the emulation server. There are no other prerequisites.
The Robotium app, like the name says, uses https://code.google.com/p/robotium/Robotium to handle the control of the app under test. Because robotium is build on top of the Android Instrumentation Framework, this part must run in the same context as your app under test and you have to ensure that it is signed with the same keystore as your app.
The Robotium app receives the command from your script and handles the execution. You can see examples in the file MainTest.java in the folder MobilisXHunt/MobilisXHunt_Android_Emulation/MobilisXHunt_Android_Emulation/src/de/tudresden/inf/rn/mobilis/android/xhunt/emulation.

If you want to use the Mobilis Emulation framework with pure Java applications you can the TestNodeModule together with TestNodeClientApplications.
The TestNodeModule takes care of all TestNodeClientApplications on a physical or virtual system. TestNodeClientApplications register themselves at the TestNodeModule via RMI and eventually receive all commands sent by the EmulationServer which are adressed to them. Of course you can run multiple instances of each TestNodeClientApplication side by side. The TestNodeModule will handle all the command routing stuff for you.
To set up a TestNodeModule checkout the appropriate Eclipse project and export it as a runnable JAR. You can configure the TestNodeModule by using the TestNodeModule.properties.template file. Remove the .template suffix from the file name and edit the file appropriately. Most settings are self-explanatory, but some are special:
-
serverless [boolean] - If
trueyou can provide a test script via the serverpath property. The TestNodeModule will then attempt to pass the script and execute it locally. This is quite useful for testing purposes when you don't want to upload the script to the server each and every time you change something. -
scriptpath [String] - the absolute path to the script to be executed if serverless is
true. - app mappings - app mappings are used by the TestNodeModule to determine which application (as defined in the test script) is located where on the local system. A mapping may look like this:
com.my.app=/users/xyz/bin/myApp/app.jar. The namespace corresponds with theappNSattribute of theinstance/instanceGrouptest script elements. The TestNodeModule will start/stop the specified application instance as soon as it receives thestart/stopcommand from the Emulation server.
TestNodeModule class from the TestNodeApplication project. There are just two methods which you have to implement:
-
String getLogFilePath()- this method shall return the absolute path to the log file so that it can be uploaded to the server after shutdown -
void exit()- this method gets called by the TestNodeModule via RMI as soon as it receives thestopcommand for this application instance from the Emulation server. Use it to flush log data to the log file and perform a clean shutdown of your application (normally by somehow callingSystem.exit()).
command elements with the appropriate method information. Again: make sure that you specify the parameters of the command elements in exactly the same order as in the method signature, otherwise method matching will fail. Normally you use these methods to perform some functionalities in your application.
To ensure the proper set up and tear down of your application within your Emulation setup you have to call some of the methods provided by TestNodeModule at certain times of your application lifecycle.
-
void initTestNodeClient()- You should call this method as soon as your application starts to setup everything for communication with the TestNodeModule. The constructor of yourTestNodeModuleimplementation may be a good point. -
void notifyStart()- You should call this method as soon as your application has finished its starting sequence and is ready to receive commands from the TestNodeModule. It should always be called afterinitTestNodeClient(). -
void notifyStop()- You should call this method as soon as your application has nearly finished its shutdown sequence (that is especially after the log data has been flushed to the file specified in the implementation ofgetLogFilePath()). In general the call should be done as late as possible in your application lifecycle to ensure that really all log messages are flushed and all commands have been executed at this point in time. After this call the TestNodeModule will attempt to read the log file and send it to the Emulation server. Eventually the application will be not reachable via RMI any more.
You can see a demonstration of an emulated XHunt run here.