Chapter 4
Let's make grunge and rust!
In the previous chapter, we explored how Materials can be used to simulate various substances during render. There is a minor problem with these simple Materials in this context - Factorio sprites tend to have a bit of grit and grunge to them. By using Blender's Shader Graph, we can easily create a reusable procedural Materials that automatically adds the appearance of grit, grime, and grunge to our Meshes.
In this chapter, I will explain:
- How to add things to a Scene from another Blender file
- Procedural Materials
- Concavity Detection using Shaders
- Edge Detection using Shaders
Once again, we will require a testing Mesh in order to develop our new, procedural Material. I've prepared a Blender file with lighting and a few testing Meshes ready to go, just click here.
Note
If you'd prefer to use Blender's built-in testing Mesh instead, simply add it to your Scene via Menu Bar → Add → Monkey Head, or the keyboard shortcut [Shift]+[A] → Monkey Head.
One might find themselves in the situation where they have a Scene already configured just the way that they like it, but would like to add a Mesh or other Object from another Blender file. But Blender's Import menu, accessed via the Menu Bar → File → Import seems to be missing the option to import from Blender itself!
Note
This section is optional and presented as potentially useful information. If you already have a Blender Mesh you'd like to add an improved Material to, simply proceed to the next section.

This is because Blender instead offers special options for "importing" from another Blender file: Link and Append - these options are located in the same place: Menu Bar → File → Link (and/or) Append.

- Linking creates a reference to a thing in another Blender file, so when the file is read again in the future, it will also read from any Linked files to obtain the data again. If the Linked thing is changed inside the original file, then when the file containing the Link is reopened, it will reflect the changes. This also means that if the file containing the Linked thing is moved, Blender may ask for your help in finding it again.
- Appending works closer to how one would expect "importing" to work, in that it copies the data from the indicated Blender file into the current file. In this case, if the original file is altered or move, no change will happen in the file that has been Appended, since the data that was Appended was already copied.
When Linking or Appending from another Blender file, Blender allows the user to browse within the other file as if it were a directory - this allows Linking or Appending very specific things from another file, such as an individual Mesh or Material. Thus, to Link or Append a specific Object, one would go to Menu Bar → File → Link (or) Append, then find the target Blender file, then double click into it, and once again in the Object virtual directory inside. Naturally, there are virtual directories for everything that can be Linked or Appended.
Note
When Linking an Object or a Collection, by default Blender will also import all of the Data Blocks that those things depend on - so if an Object uses Materials, those Materials will be Linked or Appended as well.
In the previous chapter, the Shading Workspace was very briefly introduced. The bottom half of this workspace is occupied by the Shader Editor. One might have noticed, whilst creating the simple metallic Material, a flow-chart like structure within. With our target Object selected and in the Shading Workspace, let us now turn our attention to the Shader Editor.
Depending on whether one's Blender file contains previous work, they will see something akin to the following at the top center of the Shader Editor:

- If the Selected Object already has a Material it will be displayed as a flowchart-like structure in the main area of the
Shader Editor - If the Selected Object does not have a Material, but a Material exists elsewhere in the Blender file, it can be assigned one from the dropdown menu (1)
- If the neither the Selected Object nor the Blender file have any Materials available, a new one can be created and assigned via the
Newbutton (2)
With the desired Mesh being Selected, and after creating a new Material (or assigning an existing one), the area of the Shader Area should look something like the following:

Navigating this space might feel somewhat familiar - it's possible to move around using middle-mouse click and zoom using the scroll wheel (or on macOS, a single-touch scroll gesture to move, and add [Control/Command] to zoom), just like in the Main Viewport.
The contents of this peculiar flowchart may also be familiar: one may have recognized all of the options of the Principled BSDF as those from the Material tab of the Properties Panel while creating a Material in Chapter 3. This is no coincidence, and it is possible to intuit what is happening here: The Principled BSDF box in the flow chart seems to be wired into the Surface plug of the Material Output box. One can manipulate the parameters of the Principled BSDF box in the same way as in Material Properties; so is this flowchart a representation of how the Material is functioning?
That is indeed what the Shader Editor is all about: constructing a flowchart of how the Material should function. Thinking back to Chapter 2, one might recall the analogy applied to Modifiers: an assembly line of individual functions that operate on data and hand the result off to the next step. The same analogy applies to the Shader Graph: the user is creating an assembly line out of Shader Nodes, with each Shader Node in the Shader Graph performing its work and handing it to the next.
Let us test this analogy by adding a new Shader Node to the Shader Graph of this Material.
Adding new Shader Nodes to the Shader Graph of a Material works just like adding things to a Scene: From the Menu Bar of the Shader Editor (not of the Viewport!), go to Add, or use the keyboard shortcut [Shift]+[A]. As an experiment, let's add a new Wireframe Shader Node to the canvas of the Shader Editor. This Shader Node can be found at Add → Input → Wireframe.

The new Shader Node will momentarily attach to the cursor, and after left-clicking to add it to the canvas...

... we see that nothing has changed. First, let us double-check that we are in the correct Viewport Shading mode by ensuring it is set to Rendered - the right-most icon at the very top-right of the Viewport. The other modes are not necessarily an accurate preview of what the Material looks like.

If you're thinking that the problem is we added the Wireframe node to the canvas but didn't actually connect it to anything, you are correct. Modifiers are applied linearly, in a stack, thus the connections between them are implied (and automatic). Shader Nodes operate as a network, and must be manually connected in order to provide any useful function.
The little circles on the edges of the Shader Node boxes are the input and output sockets; inputs are located on the left side, and outputs are located on the right. To connect two Shader Nodes together, click and drag between an input and an output (or from an output to an input).
Thus, if we connect the Fac (short for "Factor") output to the Base Color input of the Principled BSDF node:

Tip
The colors of the input and output sockets provide a hint as to what kind of data they provide or expect: gray roughly means "a single floating-point value", indigo means "a vector", yellow means "a color", and Green means "it's complicated". It's possible to connect sockets of different color, and Blender will try to convert the values.
If an input socket is not controlled by the output of another Shader Node, then it will be controlled by a parameter field or set to a default value.
So what's going on here? We've built a little flowchart: The Wireframe node is feeding some kind of value into the Base Color parameter of the Principled BSDF, which is then providing an output to the endpoint - the Surface parameter of the Material Output.
This is nifty, but probably not what we want, so with the Wireframe node Selected, let's remove it by either right-clicking it and choosing Delete, or by pressing the keyboard shortcut [X].
The Material Shader Graph is a very powerful and flexible system, but it can be challenging to know where to begin. There are quite a few nodes available, so how does one know which to use? Since the desired appearance of a particular Material comes down to personal taste, there is no single correct answer. However, the process of finding that answer comes down to identifying the goals, and then identifying the means to achieve those goals. Blender offers a large toolbox, and it is up to us to determine which tools to use.
For the purposes of this chapter, we're interested in creating some kind of grungy or corroded metal texture. Therefore, it shouldn't be a single uniform color, and the surface should have some roughness it. The parts that are corroded definitely need to be rougher and a different color, probably brown. Finally, it would be nice if we could somehow replicate the unique sheen that Factorio plates have.
From this simple design spec, we can identify a number of goals. Next, it is time to identify our tools.
Of all the types of Shader Node, there are two classes that we absolutely need to have:
- Input Nodes, which provide input variables to the Material. These tools can answer the question, "What kind of data do I have to work with?";
- Output Nodes, which route the output of a Shader Graph to a particular location. For our purpose, we are concerned with only one: the Material Output since we are defining the surface of an Object.
The remaining types of Shader Node either generate a value, or transform some number of inputs into some number of outputs. These tools all can answer the question "How can I transform the data into the form that I need?"
- Shader Nodes, which take multiple inputs and inform the renderer how light interacts with the surface of an Object;
- Texture Nodes, which provide or generate a texture;
- Color Nodes, which provide color-specific transformations;
- Vector Nodes, which provide vector-specific transformations;
- Converter Nodes, which are a grab-bag of mathematical and utility functions.
Due to the number and sophistication of options available, this cannot possibly be an exhaustive explanation of every Shader Node. Instead, I will attempt to explain how to accomplish the specific goals set forth above to at least give a taste for what is possible.
A Noise Texture is a kind of procedurally-generated randomized texture generated by an algorithm that is partially fed with pseudorandom data. The characteristics of the resulting texture depend on what kind of algorithm is used to generate the noise, and the parameters fed to those algorithms. Blender offers several kinds of Noise Texture related Shader Nodes. To begin, let's use add the standard Noise Texture node to our Material, connecting it to the Base Color of the Principled BSDF. The Noise Texture node has two outputs, a Color and a Factor, so let's try both:

This clearly isn't what we want, but it seems to be a step in the right direction. It definitely demonstrates "non-uniform color" but probably not the correct colors. If there is a way to convert the cloudy blotches provided by the Noise Texture into blotches of the appropriate color (or range of colors), we would be on a better track. Such a Node exists: the Color Ramp Node. A Color Ramp Node maps a single floating-point value from 0 to 1 onto a gradient, returning the color at that point. We've seen that the Noise Texture can output values from 0 to 1 (the Fac output - dark to light values as depicted above above), so let's give it a try.
The Color Ramp node is a Converter, so let's find it by navigating to Add → Converter → Color Ramp from either the Menu Bar of the Shader Editor or via the keyboard shortcut [Shift]+[A]. But this time, instead of dropping it onto an empty spot on the Shader Editor canvas, let's ask Blender to perform the rewiring for us by dropping it onto the existing connection between the Noise Texture and the Principled BSDF. (If after doing so the input of the Color Ramp is not wired to the Fac output of the Noise Texture, take a moment to do so before proceeding).

Once again, it might not be obvious that anything has changed, so let's take a moment to examine the newly-added Color Ramp node. There are several parts that bear further explanation:

- A group of buttons for manipulating colors on the gradient, via Color Stops
- A specific Color Stop, which is a draggable control defining both a color and a point on the gradient
- A color selector, for choosing which color to apply to the Color Stop that is currently Selected.
Since a Color Ramp is a Converter that uses a gradient as a lookup function for a floating point value, it makes sense that most of the controls are for defining this gradient. The gradient is produced by one or more Color Stops defining specific colors at specific points from 0 to 1, with the Color Ramp Node automatically interpolating between them. Thus, to turn our clouds of black and white on the surface of our Meshes into blobs of brown and gray (say, for rusty steel), we could set one of the Color Stops to a brown color and the other to a gray color, relocating the position of the Color Stops to taste.

So what's happening here? By tracing a route from our first Input Node (the Noise Texture) to our Shader Node (the Principled BSDF), it's possible to work it out:
- The Noise Texture is outputting a cloudy random texture, with bright parts and dark parts.
- The Color Ramp receives the incoming Noise Texture, and interprets it as a value from 0 to 1, with 0 being the darkest part and 1 being the brightest, performing a lookup on its gradient and outputs the color at that point. For instance, if it interprets an incoming value of 0.5, it will return the color in the exact middle of the gradient (since 0.5 is the middle value of 0.0 and 1.0).
- The Principled BSDF receives the color as calculated from the Color Ramp, and uses this information to define the
Base Colorof the surface.
Note
Shader evaluations aren't exactly performed in aggregate as described above. Technically, they are performed each time the Render Engine attempts to bounce a simulated ray off of the surface, for each ray and for exactly that point of impact. Blender's Cycles Render Engine performs many of these interactions per pixel of rendering, so this operation could potentially be performed many, many times per pixel of the image.
We've got the "non-uniform color" goal met well enough for now, so let's turn our attention to adding roughness to the surface.
Corrosion in metal leads to surface imperfections, and these surface imperfections mean that light reflects off of these parts differently than smooth parts. In Blender (and in most 3D graphics), lighting calculations depend on angles between the light source, the viewer and the surface. Thus, the concept of the Normal of a surface becomes important: since the Normal of a surface is the direction that is perpendicular to it (as discussed in previous chapter), these Normals effectively govern how a surface appears to be contoured.
A Bump Mapping refers to the technique of modifying the Normals of a surface based on a special kind of texture: the light parts of the texture being considered as the "high points", and the dark parts of the texture being considered the "low points" (or vice-versa). The technique essentially asks the Rendering Engine to pretend that the Normals of a surface are different in accordance with this scheme, giving the appearance of adding tiny surface imperfections without actually adding any new geometry to the Mesh.
In Blender, this is accomplished through the Bump node. It interprets an incoming value as well as a Normal, and perturbs the incoming Normal such that it would be if the surface imperfection implied by the provided value existed on the Mesh. In our case, we'd like these imperfections to align with the color splotches we've created, so it only seems logical to attach the Bump node to our existing Noise Texture node. First, add a new Bump node by navigating to Add → Vector → Bump via either the Menu Bar of the Shader Editor or the keyboard shortcut [Shift]+[A]. Then, connect the Height input of the Bump node to the Fac output of the Noise Texture node, and the output of the Bump node to the Normal input of our Principled BSDF.

Tip
A Shader Node's input can each be connected to only one output, but an output can connect to many inputs.
But something is clearly wrong!

It would seem that the Bump node is producing surface imperfections across the entire surface of the Mesh, and not only in the areas we've colored brown! The problem is that Blender is doing exactly what we told it to, and not what we wanted it to. The Noise Texture is producing an entire range of values across the entire surface, but we want to only manipulate the surface where it's brown. If we look carefully at our Color Ramp, we observe that the bottom half of the gradient is brownish, meaning that for all incoming values (from the Noise Texture) less than 0.5 are going to be some shade of brown. We can use this knowledge to correct the problem with our material: we need to only modify the Normals of the Material at spots where an incoming value from the Noise Texture is less than 0.5.
The Math node has a Minimum mode which returns the minimum of two values: If we put a Math node in Minimum mode between the Noise Texture and the Bump node, and moreover set one of the values to 0.5, then only incoming values less than 0.5 will be visibly affected. Let's test our hypothesis by adding a Math node, using Add → Vector → Bump via either the Menu Bar of the Shader Editor, or the keyboard shortcut [Shift]+[A].

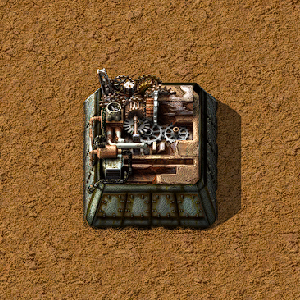
The iron and copper plates in Factorio have a unique sheen to them, bands of shininess that emanate from the center. While I believe that Wube is using pre-painted textures for some of their models, this effect is known as Surface Anisotropy (meaning that the surface reacts differently to light depending on angle), and actually has its own slider in the Principled BSDF shader: under Specular, find Anisotropic and Anisotropic Rotation. Adjust these to taste and it is done!

(The preceding image was made from a new metallic Principled BSDF shader specifically to showcase Surface Anisotropy of 1.0 - notice the sheen on the plate!)
Adding all we've discovered together, we have something in the neighborhood of what we set out to accomplish.

At this point, it is a matter of adjusting the parameters of the various Shader Nodes, or adding further complexity by adding or connecting more Nodes to the desired input parameters. For instance, it doesn't really make physical sense that the corroded parts have the same levels of Roughness and Metallic as the shinier parts - in real life, rust is rough and not as reflective as clean metal! There's a lot of room for improvement, to be certain, but this is merely an introduction to the Shader Graph and procedural Materials.
As can no doubt be seen, the system for generating procedural Materials in Blender is quite sophisticated. It can be difficult to know where to begin, and unfortunately there may not be a better solution than to set goals and experiment (or consult other tutorials online).
However, Materials can be as complex or as simple as their designer desires them to be, and at a certain point "good enough" just has to be ... good enough. Hopefully this chapter provided at least a cursory insight as to how the Shader Graph system functions, and provided the knowledge necessary to better search for more.
This concludes Chapter 4. Hopefully we've created a very basic procedural Material. While there is certainly much room for improvement, it may not seem straightforward as to how to proceed. Gaining an intuition about how to construct a particular procedural Material will come with time and practice, and there are many, many tutorials on the internet that cover this topic (or demonstrate exactly how to achieve a particular effect).
Note
If you'd like to download the Blender file I made for this chapter, click here.