This project was developed as part of the “Edge AI Earth Guardians” competition. Being an integral part of it.
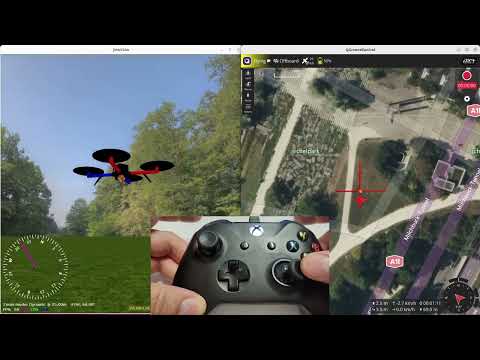
This tutorial explains how to integrate ROS2 and PX4 to control a simulated UAV using velocity. An XBOX controller is used for user controls. The UAV system is simulated with either Gazebo or JMAVSim.
The primary objective is to develop a Python example that anyone can follow, understand, and utilize comprehensively, based on ROS2 and PX4.
To demonstrate the project's functionality and provide some gentle guidance, a short video was published on YouTube. You can find the link below:
Essentially, the entire project consists of two nodes.
The first node controls the PX4 autopilot through the Micro XRCE-DDS bridge. Commands are sent using speed information, but the code for position control also exists in the application and can be used as is.
The second node receives information from the XBOX controller via the Python pygame library. Communication between nodes occurs through two topics: /offboard_velocity_cmd (of Twist type – used for sending velocity commands) and /action_message (of UInt8 data type).
In the xbox.py file (used to interface with Xbox controller), the variable m3_vs_m2 sets the mode mapping of the Xbox’s joysticks. If m3_vs_m2 = 0, Mode 2 is active. In the case of m3_vs_m2 = 1, Mode 3 is active. See the following figures.


This repo is based on:
- ROS2 Humble
- PX4 Autopilot (the application was tested on the latest version 1.16.0 at the moment of writing this text, September 6, 2025)
- Micro XRCE-DDS Agent
- px4_msgs
- Ubuntu 22.04
- Python - tested on 3.10
All the steps needed to install and configure the various components required to support this application are outlined as follows:
You only need to install PX4 if you require the simulator, as we do in this guide. If you're working on a real UAV system, the PX4 autopilot is already installed on your drone. Set up a PX4 development environment on Ubuntu like this:
$ git clone https://github.com/PX4/PX4-Autopilot.git --recursive
$ cd PX4-Autopilot/

$ bash ./PX4-Autopilot/Tools/setup/ubuntu.sh
Please be advised that the aforementioned commands will also install the recommended simulators corresponding to your version of Ubuntu.
Install ROS2 and its dependencies:
sudo apt update && sudo apt install locales
sudo locale-gen en_US en_US.UTF-8
sudo update-locale LC_ALL=en_US.UTF-8 LANG=en_US.UTF-8
export LANG=en_US.UTF-8
sudo apt install software-properties-common
sudo add-apt-repository universe
sudo apt update && sudo apt install curl -y

sudo curl -sSL https://raw.githubusercontent.com/ros/rosdistro/master/ros.key -o /usr/share/keyrings/ros-archive-keyring.gpg

echo "deb [arch=$(dpkg --print-architecture) signed-by=/usr/share/keyrings/ros-archive-keyring.gpg] http://packages.ros.org/ros2/ubuntu $(. /etc/os-release && echo $UBUNTU_CODENAME) main" | sudo tee /etc/apt/sources.list.d/ros2.list > /dev/null

sudo apt update && sudo apt upgrade -y
sudo apt install ros-humble-desktop
sudo apt install ros-dev-tools
source /opt/ros/humble/setup.bash && echo "source /opt/ros/humble/setup.bash" >> .bashrc
The instructions provided above are reproduced from the official installation guide:
https://docs.ros.org/en/humble/Installation/Ubuntu-Install-Debs.html
One may install either the desktop version (ros-humble-desktop), the minimalist version (ros-humble-ros-base), or the development tools (ros-dev-tools). Specific Python dependencies are also required to be installed (using pip or apt):
$ pip3 install --user -U empy==3.3.4 pyros-genmsg setuptools
A companion computer can connect to a PX4 autopilot operating on the FMU via various methods, including serial, UDP, TCP, or CAN FD. All of these connection methods are facilitated by a uXRCE-DDS middleware component, which consists of a client application deployed on the PX4 autopilot and an agent application running on the companion computer. Even when operating within a simulated environment, our ROS2 application must establish a connection to the PX4 autopilot via the uXRCE-DDS bridge.
The initial step involves installing the agent onto the companion computer or the Ubuntu system (such as in the case of a simulator) from the source. Therefore, in a terminal window, build and install the agent.
$ git clone https://github.com/eProsima/Micro-XRCE-DDS-Agent.git
$ cd Micro-XRCE-DDS-Agent
$ mkdir build
$ cd build
$ cmake ..
$ make
$ sudo make install
$ sudo ldconfig /usr/local/lib/
Use the following to find more information for executing and configuring the agent, and connect to PX4 (located on FMU) through the uXRCE-DDS client.
$ MicroXRCEAgent --help
Usage: 'MicroXRCEAgent <udp4|udp6|tcp4|tpc6|canfd|serial|multiserial|pseudoterminal> <<args>>'

Available arguments (per transport):
  * COMMON
    -h/--help.
    -m/--middleware <value> (ced, dds, rtps) [default: 'dds'].
    -r/--refs <value>.
    -v/--verbose <value> ( - ) [default: ''].
    -d/--discovery <value> [default: '7400'].
    -P/--p2p <value>.
  * IPvX (udp4, udp6, tcp4, tcp6)
    -p/--port <value>.
  * SERIAL (serial, multiserial, pseudoterminal)
    -b/--baudrate <value> [default: '115200'].
    -D/--dev <value>.  * CAN FD (canfd)
    -D/--dev <value>.
Now, initiate the agent with configurations designated for establishing a connection to the uXRCE-DDS component operating within the simulator.
$ MicroXRCEAgent udp4 -p 8888
The build system facilitates the process of constructing and initiating PX4 on SITL, launching a simulator, and establishing connections. The simplified syntax appears as follows:
$ make px4_sitl simulator[_vehicle-model]
Where simulator is _ gz _ (for Gazebo), _ gazebo-classic _, _ jmavsim _ or some other simulator, and vehicle-model is a particular vehicle type supported by that simulator. If you encounter issues loading Gazebo, please install the following packages:
$ pip3 install kconfiglib
$ pip install --user jsonschema
$ pip install --user jinja2
Several examples are presented below, with many additional instances available on the respective pages for each of the simulators.
# Start Gazebo with the x500 multicopter
make px4_sitl gz_x500
# Start Gazebo Classic with iris and optical flow
make px4_sitl gazebo-classic_iris_opt_flow
# Start JMavSim with iris (default vehicle model)
make px4_sitl jmavsim
Now, you can launch the simulated UAV by typing:
pxh> commander takeoff/land/arm
To take off, land, or supervise the drone, you can install and run QGroundControl (QGC). You can find the link here:
https://docs.ros.org/en/humble/Installation/Ubuntu-Install-Debs.html
It is now necessary to establish a workspace for ROS2 within your home directory. Consequently, in a newly opened terminal:
- Create a new workspace within your working directory:
$ mkdir -p /ros2_ws/src
$ cd ~/ros2__ws/src
- Clone the repositories _ px4_ros_com _ and _ px4_msgs _ into the _ /src _ directory:
$ git clone https://github.com/PX4/px4_msgs.git
$ git clone https://github.com/PX4/px4_ros_com.git
- Navigate to the root directory of your workspace (_ ~/ros2_ws _), source the ROS2 development environment into the current terminal, and compile the workspace using the following command:
$ source /opt/ros/humble/setup.bash
$ colcon build
These commands compile all the packages located within the _ /src _ directory. All applications developed by us need to be built in a workspace that uses the same uORB message definitions (located in the _ px4_msgs _ package) as those used by PX4.
To inspect the bridge, see if you can get new topics from the drone:
$ cd ~/ros2_ws
$ . install/setup.sh
     	or
$ . install/setup.bash
$ ros2 topic list
If the bridge is operational, a list of topics transmitted from the PX4 autopilot should be visible:
/fmu/in/obstacle_distance
/fmu/in/offboard_control_mode
/fmu/in/onboard_computer_status
/fmu/in/sensor_optical_flow
/fmu/in/telemetry_status
/fmu/in/trajectory_setpoint
/fmu/in/vehicle_attitude_setpoint
/fmu/in/vehicle_command
/fmu/in/vehicle_mocap_odometry
/fmu/in/vehicle_rates_setpoint
/fmu/in/vehicle_trajectory_bezier
/fmu/in/vehicle_trajectory_waypoint
/fmu/in/vehicle_visual_odometry
/fmu/out/failsafe_flags
/fmu/out/position_setpoint_triplet
/fmu/out/sensor_combined
/fmu/out/timesync_status
/fmu/out/vehicle_attitude
/fmu/out/vehicle_control_mode
/fmu/out/vehicle_gps_position
/fmu/out/vehicle_local_position
/fmu/out/vehicle_odometry
/fmu/out/vehicle_status
/parameter_events
/rosout
If the bridge isn’t functioning, you will receive the default ROS2 topics:
/parameter_events
/rosout
If you encounter issues, use: export _ ROS_DOMAIN_ID=0 _. This is considered the only option hardcoded in the _ AP_DDS _ library. Also, consider disconnecting from the internet while running.
Let's read a topic:
$ ros2 topic echo /fmu/out/sensor_combined
And you will obtain a similar result to this:
---
timestamp: 1721560868336910
gyro_rad:
- -0.01551580149680376
- -0.004595236387103796
- 0.0026286006905138493
gyro_integral_dt: 4989
accelerometer_timestamp_relative: 0
accelerometer_m_s2:
- -0.3143690228462219
- 0.021734124049544334
- -9.78078556060791
accelerometer_integral_dt: 5001
accelerometer_clipping: 0
gyro_clipping: 1
accel_calibration_count: 2
gyro_calibration_count: 1
---
If you are unable to use _ ros2 topic echo _ for a specific topic, it could be due to a version mismatch between the flight controller (FC) firmware and the branch of _ px4_msgs _ you are using. In this case, clone the specific _ px4_msgs _ :
$ git clone https://github.com/PX4/px4_msgs.git -b release/1.16
The most effective approach for debugging involves examining the topic definitions within the MAVLink console from QGC and comparing them with the message definitions available on the _ px4_msgs _ branch.
If you want to apply this knowledge to a real UAV, here are some additional steps to follow:
https://www.hackster.io/520087/an-autonomous-shielduav-to-protect-and-save-lives-99a722
Section “11. ROS2 (on Kria KR260 development board) – PX4 (running on HoverGames UAV) integration” covers all tasks that must be performed on the companion computer, originally executed on the Ubuntu 22.04 system, as was presented above.
Be sure you're in the _ /src _ directory of your workspace and then run:
git clone https://github.com/dmdobrea/ROS2_offboard_control.git
Source our ROS2 installation:
$ source /opt/ros/humble/setup.bash
Now build the application:
$ colcon build –packages-select offboard_control
Run all supported components: Inside the PX4-Autopilot folder:
$ make px4_sitl gz_x500
Run uXRCE-DDS client:
$ MicroXRCEAgent udp4 -p 8888
and the QGC application:
$ ./QGroundControl.AppImage
In the end, in two different terminals:
$ ros2 run offboard_control xbox
$ ros2 run offboard_control fly
Now, by using an Xbox controller, fly your drone.