-
Notifications
You must be signed in to change notification settings - Fork 125
java design
Following the DEVON4J conventions the Java My Thai Star back-end is going to be developed dividing the application in Components and using a three layers architecture.
Using the DEVON4J approach for the Java back-end project we will have a structure of a Maven project formed by three projects
-
api: Stores all the REST interfaces and corresponding Request/Response objects. -
core: Stores all the logic and functionality of the application.
-
server: Configures the packaging of the application.
We can automatically generate this project structure using the DEVON4J Maven archetype
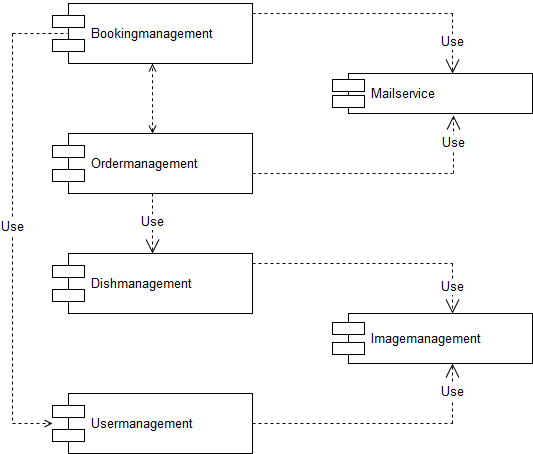
The application is going to be divided in different components to encapsulate the different domains of the application functionalities.
As main components we will find:
-
Bookingmanagement: Manages the bookings part of the application. With this component the users (anonymous/logged in) can create new bookings or cancel an existing booking. The users with waiter role can see all scheduled bookings. -
Ordermanagement: This component handles the process to order dishes (related to bookings). A user (as a host or as a guest) can create orders (that contain dishes) or cancel an existing one. The users with waiter role can see all ordered orders. -
Dishmanagement: This component groups the logic related to the menu (dishes) view. Its main feature is to provide the client with the data of the available dishes but also can be used by other components(Ordermanagement)as a data provider in some processes. -
Usermanagement: Takes care of the User Profile management, allowing to create and update the data profiles.
As common components (that don’t exactly represent an application’s area but provide functionalities that can be used by the main components):
-
Imagemanagement: Manages the images of the application. In a first approach the` Dishmanagement` component and theUsermanagementcomponent will have an image as part of its data. TheImagemanagementcomponent will expose the functionality to store and retrieve this kind of data. -
Mailservice: with this service we will provide the functionality for sending email notifications. This is a shared service between different app components such asbookingmanagementorordercomponent.
Other components:
-
Security (will manage the access to the private part of the application using a
jwtimplementation). -
Twitter integration: planned as a Microservice will provide the twitter integration needed for some specific functionalities of the application.
-
Service Layer: this layer will expose the REST API to exchange information with the client applications. -
Logic Layer: the layer in charge of hosting the business logic of the application. -
Data Access Layer: the layer to communicate with the data base.
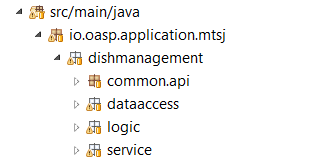
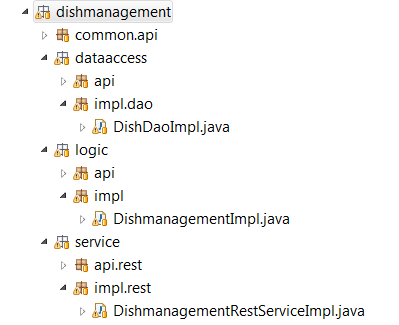
This architecture is going to be reflected dividing each component of the application in different packages to match those three layers.
Each one of the components defined previously are going to be structured using the three-layers architecture. In each case we will have a service package, a logic package and a dataaccess package to fit the layers definition.
As it is explained in the devonfw documentation we are going to implement the dependency injection pattern basing our solution on Spring and the Java standards: java.inject (JSR330) combined with JSR250.
-
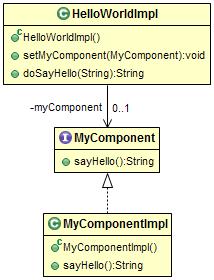
Separation of API and implementation: Inside each layer we will separate the elements in different packages:
apiandimpl. Theapiwill store theinterfacewith the methods definition and inside theimplwe will store the class that implements theinterface.
-
Usage of JSR330: The Java standard set of annotations for dependency injection (
@Named,@Inject,@PostConstruct,@PreDestroy, etc.) provides us with all the needed annotations to define our beans and inject them.
@Named
public class MyBeanImpl implements MyBean {
  @Inject
  private MyOtherBean myOtherBean;

  @PostConstruct
  public void init() {
    // initialization if required (otherwise omit this method)
  }

  @PreDestroy
  public void dispose() {
    // shutdown bean, free resources if required (otherwise omit this method)
  }
}The connection between layers, to access to the functionalities of each one, will be solved using the dependency injection and the JSR330 annotations.
Connection Service - Logic
@Named("DishmanagementRestService")
public class DishmanagementRestServiceImpl implements DishmanagementRestService {

  @Inject
  private Dishmanagement dishmanagement;

  // use the 'this.dishmanagement' object to access to the functionalities of the logic layer of the component

  ...

}
Connection Logic - Data Access
@Named
public class DishmanagementImpl extends AbstractComponentFacade implements Dishmanagement {

  @Inject
  private DishDao dishDao;

  // use the 'this.dishDao' to access to the functionalities of the data access layer of the component
  ...

}The services layer will be solved using REST services with the JAX-RS implementation.
To give service to the defined User Stories we will need to implement the following services:
-
provide all available dishes.
-
save a booking.
-
save an order.
-
provide a list of bookings (only for waiters) and allow filtering.
-
provide a list of orders (only for waiters) and allow filtering.
-
login service (see the Security section).
-
provide the current user data (see the Security section)
Following the naming conventions proposed for Devon4j applications we will define the following end points for the listed services.
-
(POST)
/mythaistar/services/rest/dishmanagement/v1/dish/search. -
(POST)
/mythaistar/services/rest/bookingmanagement/v1/booking. -
(POST)
/mythaistar/services/rest/ordermanagement/v1/order. -
(POST)
/mythaistar/services/rest/bookingmanagement/v1/booking/search. -
(POST)
/mythaistar/services/rest/ordermanagement/v1/order/search. -
(POST)
/mythaistar/services/rest/ordermanagement/v1/order/filter(to filter with fields that does not belong to the Order entity). -
(POST)
/mythaistar/login. -
(GET)
/mythaistar/services/rest/security/v1/currentuser/.
You can find all the details for the services implementation in the Swagger definition included in the My Thai Star project on Github.
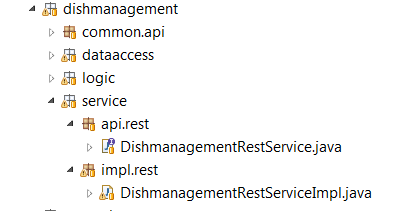
The api.rest package in the service layer of a component will store the definition of the service by a Java interface. In this definition of the service we will set-up the endpoints of the service, the type of data expected and returned, the HTTP method for each endpoint of the service and other configurations if needed.
@Path("/dishmanagement/v1")
@Consumes(MediaType.APPLICATION_JSON)
@Produces(MediaType.APPLICATION_JSON)
public interface DishmanagementRestService {

  @GET
  @Path("/dish/{id}/")
  public DishCto getDish(@PathParam("id") long id);

  ...

}Once the service api is defined we need to implement it using the Java interface as reference. We will add the service implementation class to the impl.rest package and implement the RestService interface.
@Named("DishmanagementRestService")
public class DishmanagementRestServiceImpl implements DishmanagementRestService {

  @Inject
  private Dishmanagement dishmanagement;

  @Override
  public DishCto getDish(long id) {
    return this.dishmanagement.findDish(id);
  }

  ...

}|
Note
|
You can see the Devon4j conventions for REST services here. And the My Thai Star services definition here as part of the My Thai Star project. |
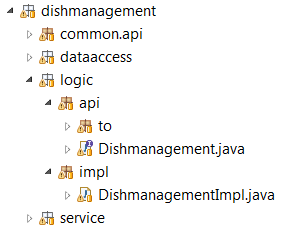
In the logic layer we will locate all the business logic of the application. We will keep the same schema as we have done for the service layer, having an api package with the definition of the methods and a impl package for the implementation.
Also, inside the api package, a to package will be the place to store the transfer objects needed to pass data through the layers of the component.
The logic api definition:
public interface Dishmanagement {

  DishCto findDish(Long id);

  ...
}
The logic impl class:
@Named
public class DishmanagementImpl extends AbstractComponentFacade implements Dishmanagement {

  @Inject
  private DishDao dishDao;


  @Override
  public DishCto findDish(Long id) {

    return getBeanMapper().map(this.dishDao.findOne(id), DishCto.class);
  }

  ...

}
The BeanMapper will provide the needed transformations between entity and transfer objects.
Also, the logic layer is the place to add validation for Authorization based on roles as we will see later.
The data-access layer is responsible for managing the connections to access and process data. The mapping between java objects to a relational database is done in Devon4j with the spring-data-jpa.
As in the previous layers, the data-access layer will have both api and impl packages. However, in this case, the implementation will be slightly different. The api package will store the component main entities and, inside the _api package, another api.repo package will store the Repositories. The repository interface will extend DefaultRepository interface (located in com.devonfw.module.jpa.dataaccess.api.data package of devon4j-starter-spring-data-jpa ).
For queries we will differentiate between static queries (that will be located in a mapped file) and dynamic queries (implemented with QueryDsl). You can find all the details about how to manage queries with Devon4j here.
The default data base included in the project will be the H2 instance included with the Devon4j projects.
To get more details about pagination, data base security, _concurrency control, inheritance or how to solve the different relationships between entities visit the official devon4j dataaccess documentation.
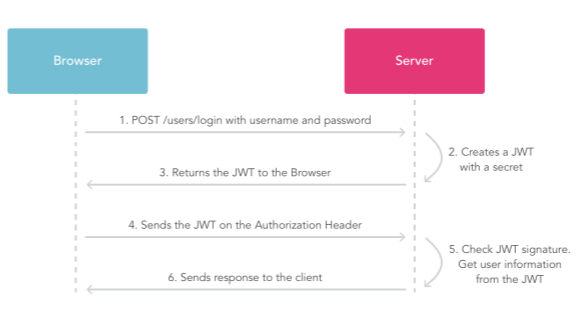
For the Authentication and Authorization the app will implement the json web token protocol.
-
A user will provide a username / password combination to our Auth server.
-
The Auth server will try to identify the user and, if the credentials match, will issue a token.
-
The user will send the token as the Authorization header to access resources on server protected by JWT Authentication.
The Json Web Token pattern will be implemented based on the Spring Security framework that is provided by default in the Devon4j projects.
Based on the Spring Security approach, we will implement a class extending WebSecurityConfigurerAdapter (Devon4j already provides the` BaseWebSecurityConfig` class) to define the security entry point and filters. Also, as My Thai Star is a mainly public application, we will define here the resources that won’t be secured.
List of unsecured resources:
-
/services/rest/dishmanagement/**: to allow anonymous users to see the dishes info in the menu section. -
/services/rest/ordermanagement/v1/order: to allow anonymous users to save an order. They will need a booking token but they won’t be authenticated to do this task. -
/services/rest/bookingmanagement/v1/booking: to allow anonymous users to create a booking. Only a booking token is necessary to accomplish this task. -
/services/rest/bookingmanagement/v1/booking/cancel/**: to allow canceling a booking from an email. Only the booking token is needed. -
/services/rest/bookingmanagement/v1/invitedguest/accept/**: to allow guests to accept an invite. Only a guest token is needed. -
/services/rest/bookingmanagement/v1/invitedguest/decline/**: to allow guests to reject an invite. Only a guest token is needed.
To configure the login we will set up the HttpSecurity object in the configure method of the class. We will define a JWTLoginFilter class that will handle the requests to the /login endpoint.
http.[...].antMatchers(HttpMethod.POST, "/login").permitAll().[...].addFilterBefore(new JWTLoginFilter("/login", authenticationManager()), UsernamePasswordAuthenticationFilter.class);In the same HttpSecurity object we will set up the filter for the rest of the requests, to check the presence of the JWT token in the header. First we will need to create a JWTAuthenticationFilter class extending the GenericFilterBean class. Then we can add the filter to the HttpSecurity object
http.[...].addFilterBefore(new `JWTAuthenticationFilter()`, UsernamePasswordAuthenticationFilter.class);Finally, as default users to start using the My Thai Star app we are going to define two profiles using the inMemoryAuthentication of the Spring Security framework. In the configure(AuthenticationManagerBuilder Auth) method we will create:
-
user: waiter
-
password: waiter
-
role: Waiter
-
user: user0
-
password: password
-
role: Customer
auth.inMemoryAuthentication().withUser("waiter").password("waiter").roles("Waiter").and().withUser("user0").password("password").roles("Customer");Following the official documentation the implementation details for the MyThaiStar’s JWT will be:
-
Secret: Used as part of the signature of the token, acting as a private key. For the showcase purposes we will use simply
"ThisIsASecret". -
Token Prefix schema: Bearer. The token will look like
Bearer <token> -
Header: Authorization. The response header where the token will be included. Also, in the requests, when checking the token it will be expected to be in the same header.
-
The Authorization header should be part of the
Access-Control-Expose-Headersheader to allow clients access to the Authorization header content (the token); -
The claims are the content of the payload of the token. The claims are statements about the user, so we will include the user info in this section.
-
subject: "sub". The username.
-
issuer:
"iss". Who creates the token. We could use theurlof our service but, as this is a showcase app, we simply will use"MyThaiStarApp" -
expiration date: "exp". Defines when the token expires.
-
creation date:
"iat". Defines when the token has been created. -
scope: "scope". Array of strings to store the user roles.
-
-
Signature Algorithm: To encrypt the token we will use the default algorithm HS512.
An example of a token claims before encryption would be:
{sub=waiter, scope=[ROLE_Waiter], iss=MyThaiStarApp, exp=1496920280, iat=1496916680}
To provide to the client with the current user data our application should expose a service to return the user details. In Devon4j applications the /general/service/impl/rest/SecurityRestServiceImpl.java class is ready to do that.
@Path("/security/v1")
@Named("SecurityRestService")
public class SecurityRestServiceImpl {

  @Produces(MediaType.APPLICATION_JSON)
  @GET
  @Path("/currentuser/")
  public UserDetailsClientTo getCurrentUserDetails(@Context HttpServletRequest request) {

  }
}
we only will need to implement the getCurrentUserDetails method.
We need to secure three services, that only should be accessible for users with role Waiter:
-
(POST)
/mythaistar/services/rest/bookingmanagement/v1/booking/search. -
(POST)
/mythaistar/services/rest/ordermanagement/v1/order/search. -
(POST)
/mythaistar/services/rest/ordermanagement/v1/order/filter.
As part of the token we are providing the user Role. So, when validating the token, we can obtain that same information and build a UsernamePasswordAuthenticationToken with username and the roles as collection of Granted Authorities.
Doing so, afterwards, in the implementation class of the logic layer we can set up the related methods with the java security '@RolesAllowed' annotation to block the access to the resource to users that does not match the expected roles.
`@RolesAllowed(Roles.WAITER)`
public PaginatedListTo<BookingEto> findBookings(BookingSearchCriteriaTo criteria) {
  return findBookings(criteria);
}-
-
Technical design
-
Data model
-
Server Side
-
Client Side
-
-
Security
-
Testing
-
Server Side
-
Client Side
-
End to end
-
-
UI design
-
CI/CD

