We read every piece of feedback, and take your input very seriously.
To see all available qualifiers, see our documentation.
Have a question about this project? Sign up for a free GitHub account to open an issue and contact its maintainers and the community.
By clicking “Sign up for GitHub”, you agree to our terms of service and privacy statement. We’ll occasionally send you account related emails.
Already on GitHub? Sign in to your account
由一个例子开始:
var app = new Vue({
  el: '#app',
  // 这里的 h 是 createElement 方法
  render: h => h(App)
})
可以看到,这里传入的App就是一个component。
一 组件生成流程:
createElement -> (createComponent -> 1 -> 2 ) -> vnode -> patch -> createElm -> createComponent -> 3 -> _init -> 4
1.上面的App其实就是一个描述性的json,如称为Ctor,调用Vue.extend(Ctor)得到Vue的一个子类SubVue(注意不是子类的实例)。extend大体实现如下:
const Sub = function VueComponent (options) {
  this._init(options)
}
Sub.prototype = Object.create(Super.prototype)
Sub.prototype.constructor = Sub
Sub.cid = cid++
Sub.options = mergeOptions(
  Super.options,
  extendOptions
)
Sub['super'] = Super
2.由上面的SubVue生成一个vnode,可以看到最后还是生成了一个vnode,只不过参数有所不同:
installComponentHooks(data) // 注意下这里会安装hooks到data.hook上,下面会用到
const vnode = new VNode(
    `vue-component-${Ctor.cid}${name ? `-${name}` : ''}`,
    data, undefined, undefined, undefined, context,
    { Ctor, propsData, listeners, tag, children }, // 重点是这行,就是Vnode类中的 componentOptions
    asyncFactory
  )
3.调用hook.init实例化上面的SubVue,即每次应用组件时,都是实例化一次该组件:
const child = vnode.componentInstance = createComponentInstanceForVnode(
	vnode,
	activeInstance
)
child.$mount(hydrating ? vnode.elm : undefined, hydrating)
而createComponentInstanceForVnode细节如下:
const options: InternalComponentOptions = {
    _isComponent: true,  // 注意这里
    _parentVnode: vnode,
    parent
}
// check inline-template render functions
const inlineTemplate = vnode.data.inlineTemplate
if (isDef(inlineTemplate)) {
	options.render = inlineTemplate.render
	options.staticRenderFns = inlineTemplate.staticRenderFns
}
return new vnode.componentOptions.Ctor(options)
可以看到,这里才是真的实例化的地方,也是需要提供render函数去处理。
4.初始化组件
if (options && options._isComponent) {
  initInternalComponent(vm, options)
}
initInternalComponent的作用就是把options合并到vm.$options上。 然后就回到了上面的挂载:
child.$mount(hydrating ? vnode.elm : undefined, hydrating)
然后又回到了数据驱动细节那章的故事:
mount->mountComponent -> _render -_update
之所以这里又要走一遍mountComponent,是因为前面的是new Vue的过程,是对Vue实例vm的Watcher监听,这里实例化了VueComponent实例child,也需要对该组件实例做一次Watcher监听,这样后续它变化时,就能纳入到响应系统了。
// main.js
import Vue from 'vue'
import App from './App.vue'
new Vue({
  el:'#app',
  data: {
    message: 'hello world'
  },
  render: h => h(App)
})

// App.vue
<template>
  <div id="app">
    <img alt="Vue logo" src="./assets/logo.png">
  </div>
</template>
<script>
/**
 * 这里相当于是返回了:
 * {
 *  render(h) {
 *      return h('div', h('img', { src: './assets/logo.png'}))
 *  }
 * }
 */
export default {
  name: 'App'
}
</script>
总结: 1.parent装的总是当前的vnode的父vnode 2._parentVnode是下一次深度遍历时的父占位vnode(用当前的vnode表示):
function createComponentInstanceForVnode (vnode, parent) {
  var options = {
    _isComponent: true,
    // 这里之所以将当前的vnode作为一个parentVnode,是因为下面是创建的组件的vnode实例,里面又会调用_init方法,
    // 然后一直深度遍历下去,这个方式是为了做映射父子vnode关系,最终形成一颗vnode树
    _parentVnode: vnode,
    parent: parent
  };
  // 这里就跟 new Vue一样
  return new vnode.componentOptions.Ctor(options)
}
3.这里的深度遍历是一个new Vue->new VueComponent->new VueComponent->...的过程,且不断调用每个阶段的render(tag...)的过程。例如上面的例子:
// 第一阶段:
new Vue -> render(App)
// 第二阶段
new VueComponent(App options) -> render('div', ...)
4.dom节点插入顺序(即子节点,如div#app的vnode先patch到子节点的el上,然后该el再patch到父节点上):
body <-- #app vnode dom <-- #App vueComponentVnode dom (div dom <-- img dom)
vm.$options = mergeOptions(
  resolveConstructorOptions(vm.constructor),
  options || {},
  vm
)
以如下例子为例:
import Vue from 'vue'

let childComp = {
  template: '<div>{{msg}}</div>',
  created() {
    console.log('child created')
  },
  mounted() {
    console.log('child mounted')
  },
  data() {
    return {
      msg: 'Hello Vue'
    }
  }
}

Vue.mixin({
  created() {
    console.log('parent created')
  }
})

let app = new Vue({
  el: '#app',
  render: h => h(childComp)
})
1、外部调用场景 得到的vm.$options:
vm.$options = {
  components: { },
  created: [
    function created() {
      console.log('parent created')
    }
  ],
  directives: { },
  filters: { },
  _base: function Vue(options) {
    // ...
  },
  el: "#app",
  render: function (h) {
    //...
  }
}
2.组件场景
vm.$options = {
  parent: Vue /*父Vue实例*/,
  propsData: undefined,
  _componentTag: undefined,
  _parentVnode: VNode /*父VNode实例*/,
  _renderChildren:undefined,
  __proto__: {
    components: { },
    directives: { },
    filters: { },
    _base: function Vue(options) {
        //...
    },
    _Ctor: {},
    created: [
      function created() {
        console.log('parent created')
      }, function created() {
        console.log('child created')
      }
    ],
    mounted: [
      function mounted() {
        console.log('child mounted')
      }
    ],
    data() {
       return {
         msg: 'Hello Vue'
       }
    },
    template: '<div>{{msg}}</div>'
  }
}
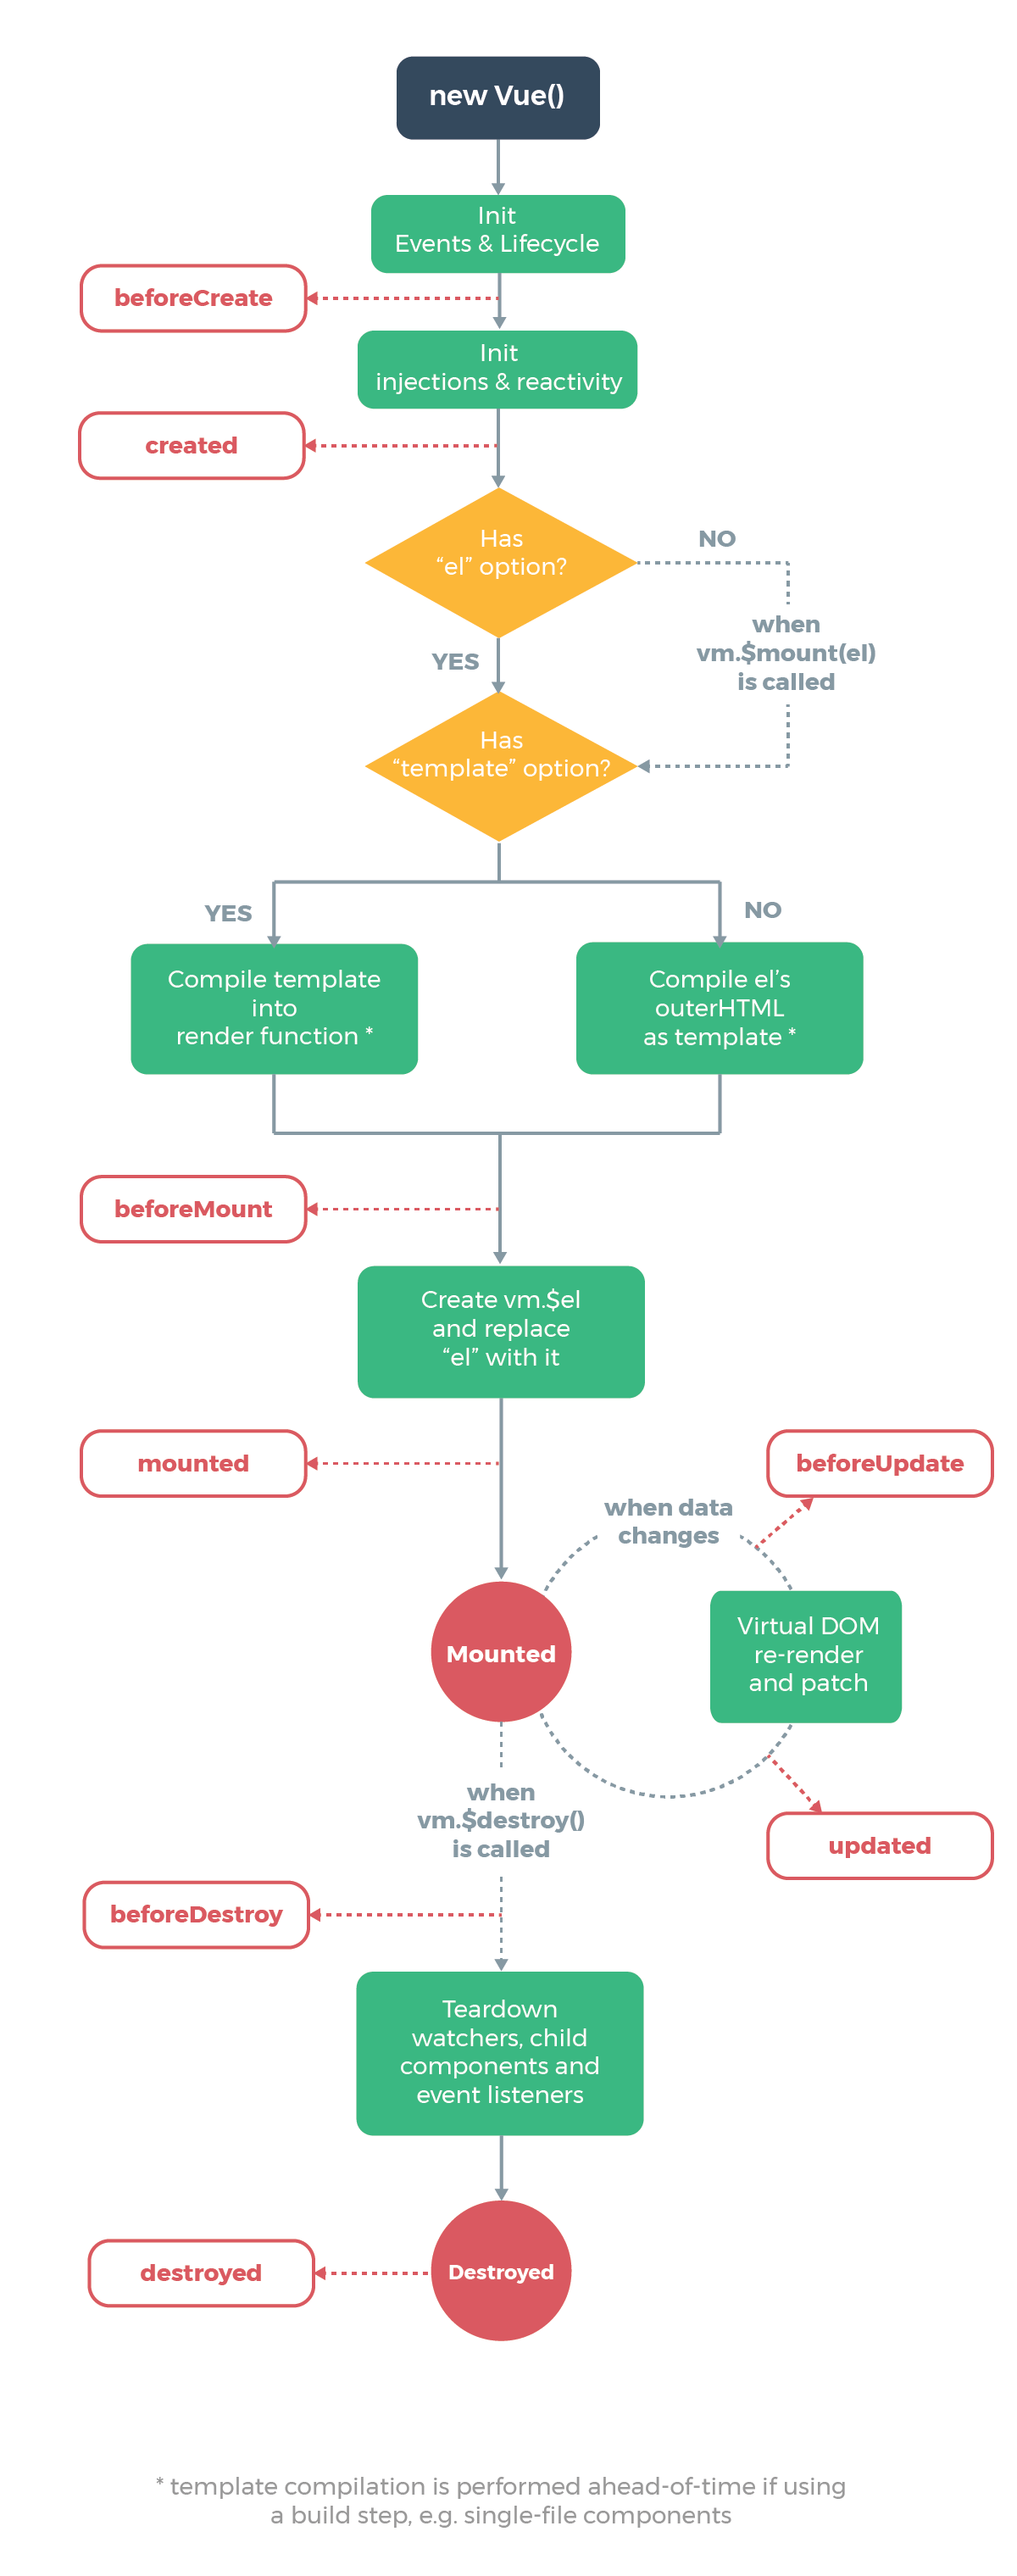
每个 Vue 实例在被创建之前都要经过一系列的初始化过程。例如需要设置数据监听、编译模板、挂载实例到 DOM、在数据变化时更新 DOM 等。同时在这个过程中也会运行一些叫做生命周期钩子的函数,给予用户机会在一些特定的场景下添加他们自己的代码。
组件库源码中这些写法你掌握了吗?
The text was updated successfully, but these errors were encountered:
No branches or pull requests
由一个例子开始:
可以看到,这里传入的App就是一个component。
一 组件生成流程:
1.上面的App其实就是一个描述性的json,如称为Ctor,调用Vue.extend(Ctor)得到Vue的一个子类SubVue(注意不是子类的实例)。extend大体实现如下:
2.由上面的SubVue生成一个vnode,可以看到最后还是生成了一个vnode,只不过参数有所不同:
3.调用hook.init实例化上面的SubVue,即每次应用组件时,都是实例化一次该组件:
而createComponentInstanceForVnode细节如下:
可以看到,这里才是真的实例化的地方,也是需要提供render函数去处理。
4.初始化组件
initInternalComponent的作用就是把options合并到vm.$options上。
然后就回到了上面的挂载:
然后又回到了数据驱动细节那章的故事:
之所以这里又要走一遍mountComponent,是因为前面的是new Vue的过程,是对Vue实例vm的Watcher监听,这里实例化了VueComponent实例child,也需要对该组件实例做一次Watcher监听,这样后续它变化时,就能纳入到响应系统了。
实例
总结:
1.parent装的总是当前的vnode的父vnode
2._parentVnode是下一次深度遍历时的父占位vnode(用当前的vnode表示):
3.这里的深度遍历是一个new Vue->new VueComponent->new VueComponent->...的过程,且不断调用每个阶段的render(tag...)的过程。例如上面的例子:
4.dom节点插入顺序(即子节点,如div#app的vnode先patch到子节点的el上,然后该el再patch到父节点上):
Vue的各种合并配置
以如下例子为例:
1、外部调用场景
得到的vm.$options:
2.组件场景
生命周期
每个 Vue 实例在被创建之前都要经过一系列的初始化过程。例如需要设置数据监听、编译模板、挂载实例到 DOM、在数据变化时更新 DOM 等。同时在这个过程中也会运行一些叫做生命周期钩子的函数,给予用户机会在一些特定的场景下添加他们自己的代码。

参考
组件库源码中这些写法你掌握了吗?
The text was updated successfully, but these errors were encountered: