While we continue to extend the capabilities of XAF’s ASP.NET Core Blazor UI, you can deliver intuitive user experiences for the ASP.NET Core Blazor platform today. This tutorial documents how to build an application to store contacts and other related objects using XAF’s ASP.NET Core Blazor UI.

If you are new to XAF, be sure to review our XAF product page for important background information on our award-winning application framework.
Before you start the tutorial, read this section and ensure that the following conditions are met:
- Visual Studio 2022 v17.0+ (with the ASP.NET and web development workload) is installed on your machine. You have basic experience of .NET framework development in this IDE.
- .NET 6 SDK is installed on your machine.
- A free 30-day trial version or a licensed version of DevExpress Universal Subscription is installed on your machine.
- You have basic knowledge of Object-relational mapping (ORM) concepts and the DevExpress XPO.
- Any RDBMS supported by the XPO ORM tool (see Database Systems Supported by XPO) is installed and accessible from your machine to store the application data (a LocalDB or SQL Server Express instance is recommended).
- You are familiar with XAF application architecture.
This tutorial is organized in the following manner:
- Business Model Design
This section explains how to implement classes that define the foundation of your application’s business model and its associated database structure.
- Extend Functionality
This section explains how to extend XAF’s autogenerated UI with custom commands.
- UI Customization
This section explains how to customize XAF’s autogenerated ASP.NET Core Blazor application UI.
This tutorial uses Microsoft’s SQL Server as its target database management system (DBMS). As you may already know, XAF supports multiple database management systems (see the list here). If you’d like to use a different DBMS, be sure to specify the appropriate connection string.
XAF apps create a database with a name that matches the name used for the solution itself. To change names, edit the connection string in the application configuration file (appsettings.json).
To recreate your database, drop it from the database server or remove the file. Your XAF application will recreate the database at next startup.
This section explains how to design a business model (database) for an application built with the eXpressApp Framework.
You will learn how to complete the following tasks:
- Create business classes mapped to database tables
- Specify relationships between classes
- Implement dependent properties
- Add property value validation
You can design a business model in any of the following ways:
-
Use the DevExpress Business Class Library
The Business Class Library includes frequently used business classes, such as Person, Event, Task, etc. You can use a class from this library as is, or inherit and extend it.
-
Build Custom Classes
If you use XPO, inherit your business objects from Base Persistent Classes.
TIP: For information on how to build an application based on an existing database, refer to the following topic: How to: Generate XPO Business Classes for Existing Data Tables.
Once you complete the tutorial, your basic ASP.NET Core Blazor CRUD application will look as shown in the image below.

This lesson creates a new XAF solution and guides you through the XAF Solution Wizard. In the Wizard, you will do the following:
- Add a Blazor UI project to the solution.
- Select an ORM tool to use for data management.
- Turn on user authentication.
- Review available built-in modules and enable the Validation module.
At the end of this lesson, you can run the application for the first time.
-
From Visual Studio’s main menu, select File | New | Project… to invoke the Create a new project dialog.
-
Select DevExpress v22.1 XAF Template Gallery and click Next. Specify the project’s name (“MySolution”) and click Create.

- In the invoked Template Gallery window, switch to the .NET Core section. Select XAF Solution Wizard (.NET Core) and click Run Wizard.

- On the first page of the Solution Wizard, you can select the target platform. Since this tutorial only demonstrates the Blazor UI, select the Web (ASP.NET Core Blazor) option and click Next.

- Choose the DevExpress eXpress Persistent Objects ORM library.

- Choose the authentication type for your application. In this tutorial, we use Standard. Click Next.

- Select the ready-to-use XAF modules you want to add to your application. This tutorial requires the Validation module. Click Finish.

The solution contains the following projects:
- **MySolution.Blazor.Server** - the ASP.NET Core Blazor application project that automatically generates the ASP.NET Core Blazor CRUD user interface. This project depends on the _MySolution.Module_.
- **MySolution.Module** - the [module](https://docs.devexpress.com/eXpressAppFramework/118046/application-shell-and-base-infrastructure/application-solution-components/modules?v=22.1) project that contains platform-independent code.
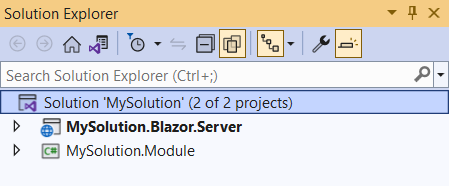
Refer to the [Application Solution Structure](https://docs.devexpress.com/eXpressAppFramework/118045/application-shell-and-base-infrastructure/application-solution-components/application-solution-structure?v=22.1) topic for information on the XAF solution structure.
-
You can now run the application. Click Start Debugging or press F5.
The following images show the resulting ASP.NET Core Blazor application. Log in as “Admin” and use an empty string as the password.


The wizard attempts to find the installed Microsoft SQL Server instance (LocalDB or Express) and sets the connection string accordingly.
Refer to the Connect an XAF Application to a Database Provider topic for details on how to connect to different database systems.
In this lesson, you will learn how to implement business classes for your application using the Business Class Library. This library contains the most typical ready-to-use business classes. You will implement a custom Contact class by deriving from the Person class available in this library, and implement several additional properties. You will also learn the basics of automatic user interface construction based on data.
-
Right-click the Business Objects folder in the MySolution.Module project, and choose Add Item | Class…, specify Contact.cs as the new class name and click Add.
-
Replace the generated class declaration with the following code.
using DevExpress.Persistent.Base;
using DevExpress.Persistent.BaseImpl;
using DevExpress.Persistent.Validation;
using DevExpress.Xpo;
using System;

namespace MySolution.Module.BusinessObjects {
    [DefaultClassOptions]
    public class Contact : Person {
        public Contact(Session session) : base(session) { }
        private string webPageAddress;
        public string WebPageAddress {
            get { return webPageAddress; }
            set { SetPropertyValue(nameof(WebPageAddress), ref webPageAddress, value); }
        }
        private string nickName;
        public string NickName {
            get { return nickName; }
            set { SetPropertyValue(nameof(NickName), ref nickName, value); }
        }
        private string spouseName;
        public string SpouseName {
            get { return spouseName; }
            set { SetPropertyValue(nameof(SpouseName), ref spouseName, value); }
        }
        private TitleOfCourtesy titleOfCourtesy;
        public TitleOfCourtesy TitleOfCourtesy {
            get { return titleOfCourtesy; }
            set { SetPropertyValue(nameof(TitleOfCourtesy), ref titleOfCourtesy, value); }
        }
        private DateTime anniversary;
        public DateTime Anniversary {
            get { return anniversary; }
            set { SetPropertyValue(nameof(Anniversary), ref anniversary, value); }
        }
        private string notes;
        [Size(4096)]
        public string Notes {
            get { return notes; }
            set { SetPropertyValue(nameof(Notes), ref notes, value); }
        }
    }
    public enum TitleOfCourtesy { Dr, Miss, Mr, Mrs, Ms };
}
-
Run the application.
XAF generates a user interface that is based on the specified data structures:
-
a List View
List View displays the Contact list. If users click the New button or click an existing record, the application shows a detail form (Detail View) filled with editors for each data field.

-
A Detail View

-
Typically, business classes do not depend on application UI and should be implemented in a platform-independent module project. Business objects can be shared with other XAF or non-XAF applications.
In this lesson, we derive the Contact object from the Person class. The Person class is one of the Business Class Library classes. This class already contains fields specific to entities of the Person type: first name, last name, birth date, etc.
The Person class (and the rest of the Business Class Library) derives from BaseObject. The BaseObject class derives from DevExpress.Xpo.XPCustomObject - one of the base classes in XPO. This means that the Contact business object is a persistent object.
XPO requires that you implement property setters and a parameterized constructor as follows:
[DefaultClassOptions]
public class Contact : Person {
    public Contact(Session session) : base(session) { }
    private string webPageAddress;
    public string WebPageAddress {
        get { return webPageAddress; }
        set { SetPropertyValue(nameof(WebPageAddress), ref webPageAddress, value); }
    }
    // ...
}
Refer to the following help topic for more information: Creating a Persistent Object.
For a general business class concept overview, refer to the following topic: Business Classes vs Database Tables.
NOTE
CodeRush includes a number of Code Templates that help generate business classes or their parts with a few keystrokes. To learn about the Code Templates for eXpress Persistent Objects, refer to the following help topic: XPO and XAF Templates.
In this tutorial the business objects class is decorated with the DefaultClassOptionsAttribute attribute. This attribute means that the following capabilities are available for the Contact business class.
- The Contact item is added to the main page’s navigation control. Users can click this item to access the associated List View.

- Contact objects can be used as a data source to generate reports (see Create a Report in Visual Studio).
To apply each of these options separately, use the NavigationItemAttribute and VisibleInReportsAttribute attributes.
XAF generates the appropriate editors for data fields in the List View and Detail View. For example, a date picker is generated for date-time values, a combo box editor is created for Title Of Courtesy (an enumerator).
XAF transforms captions from camel-case to space-separated strings, form titles are updated, etc.
You can use the grid features in a List View at runtime: rearrange columns, and sort and filter data:

NOTE: Before proceeding, take a moment to review the Inherit from the Business Class Library Class (XPO) lesson.
-
Open the Updater.cs file located in the MySolution.Module project’s Database Update folder. Add the following code to the ModuleUpdater.UpdateDatabaseAfterUpdateSchema method.
using MySolution.Module.BusinessObjects;
//...

public class Updater : DevExpress.ExpressApp.Updating.ModuleUpdater {
    //...
    public override void UpdateDatabaseAfterUpdateSchema() {
        base.UpdateDatabaseAfterUpdateSchema();

        Contact contactMary = ObjectSpace.FirstOrDefault<Contact>(contact => contact.FirstName == "Mary" && contact.LastName == "Tellitson");
        if (contactMary == null) {
            contactMary = ObjectSpace.CreateObject<Contact>();
            contactMary.FirstName = "Mary";
            contactMary.LastName = "Tellitson";
            contactMary.Email = "[email protected]";
            contactMary.Birthday = new DateTime(1980, 11, 27);
        }
        //...
        ObjectSpace.CommitChanges();
    }
}
-
Run the application. Select the Contact item in the navigation control. Notice that the new contact, “Mary Tellitson”, appears on the list to the right.

In step 1, you add a code that checks whether the contact list contains an entry that matches the name “Mary Tellitson”. If such a contact does not exist, the code creates and adds it to the database.
An XAF application checks application and database version compatibility on each start. The following checks are performed:
- The database exists.
- All required tables exist.
- All required columns exist.
The XafApplication.DatabaseVersionMismatch event occurs if any of these checks fails.
The ASP.NET Core Blazor application handles this event in a solution template. When the application runs in debug mode, this event handler uses the built-in Database Updater to update the application’s database. After the database schema is updated, the ModuleUpdater.UpdateDatabaseAfterUpdateSchema method is called. In this method, you can save the required business objects to the database.
As you can see in the code above, XAF uses an Object Space object to manipulate persistent objects (see Create, Read, Update and Delete Data).
This lesson explains the following concepts:
- How to implement business classes from scratch
- How to implement object references to existing classes
- How XAF generates UI for referenced objects
NOTE Before you proceed, take a moment to review the previous lesson: Inherit from the Business Class Library Class (XPO).
-
Add the following Department and Position persistent classes to the Contact.cs file.
namespace MySolution.Module.BusinessObjects {
    // ...
    [DefaultClassOptions]
    [System.ComponentModel.DefaultProperty(nameof(Title))]
    public class Department : BaseObject {
        public Department(Session session) : base(session) { }
        private string title;
        public string Title {
            get { return title; }
            set { SetPropertyValue(nameof(Title), ref title, value); }
        }
        private string office;
        public string Office {
            get { return office; }
            set { SetPropertyValue(nameof(Office), ref office, value); }
        }
    }
    [DefaultClassOptions]
    [System.ComponentModel.DefaultProperty(nameof(Title))]
    public class Position : BaseObject {
        public Position(Session session) : base(session) { }
        private string title;
        public string Title {
            get { return title; }
            set { SetPropertyValue(nameof(Title), ref title, value); }
        }
    }
}
-
Add the Department and Position properties to the Contact class:
[DefaultClassOptions]
public class Contact : Person {
    //...
    private Department department;
    public Department Department {
        get {return department;}
        set {SetPropertyValue(nameof(Department), ref department, value);}
    }
    private Position position;
    public Position Position {
        get {return position;}
        set {SetPropertyValue(nameof(Position), ref position, value);}
    }
    //...
}
The Contact class now exposes the Position and Department reference properties.
-
Run the application.
After you run the application you can see that the navigation control displays two new items: Department and Position. You can click the new items to access department and position lists.
- Department detail form:

- Department list:

In the Contact Detail View, XAF creates lookup editors for Department and Position. These editors use a special type of View - Lookup List View. Typically, this View includes a single column that displays values from the class’s default property. See additional information about default properties later in this topic.

Users can select **Department** or **Position** values from the dropdown lists. Note that Lookup editors support incremental filtering:

The Position and Department classes are decorated with the DefaultProperty attribute. This attribute specifies the default property of the class. You can specify the most descriptive property of your class in the DefaultProperty attribute, and its values will then be displayed in the following:
- Detail form captions
- The leftmost column of a List View
- Lookup List Views
Refer to the Data Annotations in Data Model topic for more information.
This lesson explains how to create a many-to-many relationship between business objects and how XAF generates the UI for such relationships.
NOTE Before you proceed, take a moment to review the previous lesson: Inherit from the Business Class Library Class (XPO).
-
Right-click the Business Objects folder in the MySolution.Module project, and choose Add | Class…. Change the file name to Task.cs and click Add. Replace the new file’s content with the following code:
using DevExpress.ExpressApp.Model;
using DevExpress.Persistent.Base;
using DevExpress.Persistent.BaseImpl;
using DevExpress.Xpo;

namespace MySolution.Module.BusinessObjects {
    [DefaultClassOptions]
    [ModelDefault("Caption", "Task")]
    public class DemoTask : Task {
        public DemoTask(Session session) : base(session) { }
        [Association("Contact-DemoTask")]
        public XPCollection<Contact> Contacts {
            get {
                return GetCollection<Contact>(nameof(Contacts));
            }
        }
    }
}
-
Add the Tasks property in the Contact class implementation.
[DefaultClassOptions]
public class Contact : Person {
    //...
    [Association("Contact-DemoTask")]
    public XPCollection<DemoTask> Tasks {
        get {
            return GetCollection<DemoTask>(nameof(Tasks));
        }
    }
}
-
Run the application.
In the Contact detail view, the application displays the following elements:
- A list of assigned tasks;
- The New button - allows users to add a new assigned task;
- The Link button - allows users to assign the current contact an existing task.

You can find the same UI in the **Tasks** detail view.

In the DemoTask class, AssociationAttribute is applied to the Contacts property of the XPCollection type. This property represents a collection of associated Contacts. XPO uses the Association attribute to set a relationship between objects. The Contacts property getter implementation - the GetCollection method - is used to return a collection.
[Association("Contact-DemoTask")]
public XPCollection<Contact> Contacts {
    get {
        return GetCollection<Contact>(nameof(Contacts));
    }
}
In the Contact class, the Tasks property is the second part of the Contact-DemoTask relationship. Note that the Association attribute must be applied to this property as well.
[DefaultClassOptions]
public class Contact : Person {
    //...
    [Association("Contact-DemoTask")]
    public XPCollection<DemoTask> Tasks {
        get {
            return GetCollection<DemoTask>(nameof(Tasks));
        }
    }
}
NOTE Do not modify the XPCollection property declaration demonstrated above. If you manipulate the collection or introduce any additional settings within the declaration, it may cause unpredictable behavior.
After you run the application, XPO will generate the intermediate tables and relationships.
The DemoTask class is decorated with the ModelDefaultAttribute attribute. The attribute parameters specify that the Caption property of the Application Model’s BOModel | DemoTask node is set to “Task”.
You can apply the ModelDefault attribute to a business class or its member to change any property of the Application Model’s BOModel | or BOModel | | OwnMembers | node.
This lesson explains how to create a one-to-many relationship between business objects and how XAF generates the UI for such a relationship.
NOTE Before you proceed, take a moment to review the previous lessons:
- Inherit from the Business Class Library Class (XPO)
- Implement Custom Business Classes and Reference Properties (XPO)
- Set a Many-to-Many Relationship (XPO)
-
To implement the “One” part of the Department-Contacts relationship, decorate the Contact class’ Department property with the AssociationAttribute.
[DefaultClassOptions]
public class Contact : Person {
    //...
    private Department department;
    [Association("Department-Contacts")]
    public Department Department {
        get {return department;}
        set {SetPropertyValue(nameof(Department), ref department, value);}
    }
    //...
}
Refer to the following help topic for information on the Association attribute: Set a Many-to-Many Relationship (XPO).
-
To implement the “Many” part of the Department-Contacts relationship, add the Contacts property to the Department class and decorate this property with the Association attribute.
public class Department : BaseObject {
    //...
    [Association("Department-Contacts")]
    public XPCollection<Contact> Contacts {
        get {
            return GetCollection<Contact>(nameof(Contacts));
        }
    }
}
-
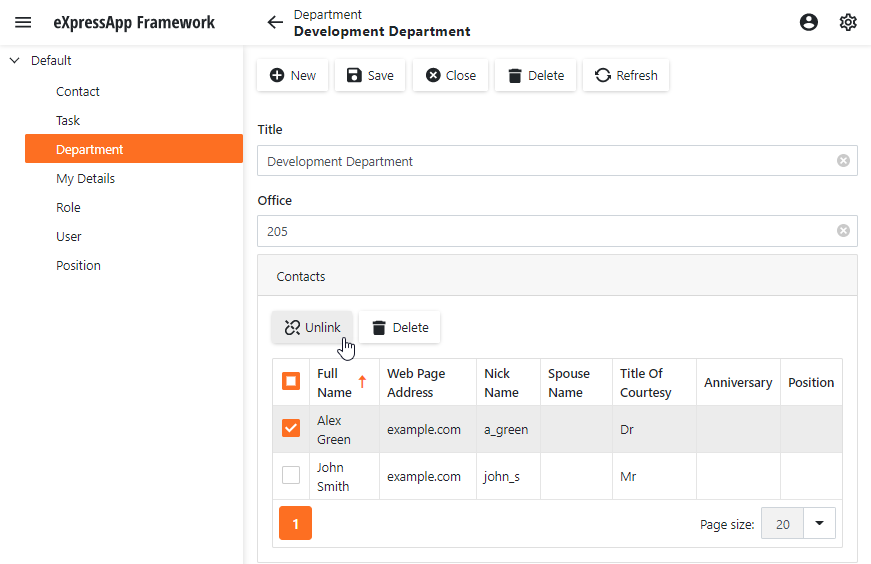
Run the application.
Open the Department detail view. You can see the Contacts group. To add objects to the Contacts collection, use the New or Link button in this tab. The Link button allows users to add references to existing Contact objects.

To remove a reference to an object from this collection, use the **Unlink** button.
TIP If you create a new Department and then create a new Contact in the Contacts collection, the associated Department is not immediately visible in the Detail View of the newly created Contact. The link between these objects is added later when you save the Contact. To change this behavior, use the XafApplication.LinkNewObjectToParentImmediately property. When the property value is
true, the application creates a link and saves it immediately after you click New.
This lesson explains how to initialize properties in newly created business objects.
For this purpose, you will add the Priority property to the DemoTask class created in the Set a Many-to-Many Relationship (XPO) lesson. Then you will override the AfterConstruction method to initialize the new property.
NOTE Before you proceed, take a moment to review the previous lessons:
-
Add the Priority property to the DemoTask class and declare the Priority enumeration, as shown below:
public class DemoTask : Task {
    // ...
    private Priority priority;
    public Priority Priority {
        get { return priority; }
        set {
            SetPropertyValue(nameof(Priority), ref priority, value);
        }
    }
    //...
}
public enum Priority {
    Low,
    Normal,
    High
}
-
To initialize the newly added Priority property when a DemoTask object is created, override the AfterConstruction method, as shown below:
[DefaultClassOptions]
[ModelDefault("Caption", "Task")]
public class DemoTask : Task {
    //...
    public override void AfterConstruction() {
        base.AfterConstruction();
        Priority = Priority.Normal;
    }
    //...
}
-
Run the application.
Create a new DemoTask object. In the Task detail view, the Priority property is set to
Priority.Normal, as declared in the code above.

Note that XAF generates a combo box for the Priority property. The combo box items are the enumeration values declared in the step 2.

The AfterConstruction method is executed when a new business object is created. In this tutorial, you override this method to set the Priority property to Priority.Normal when a new DemoTask object is created.
This lesson explains how to implement properties whose values can depend on other properties.
You will add a new Manager property to the Contact class. The editor for this property will display a list of managers who work in the same department.

NOTE Before you proceed, take a moment to review the following lessons:
-
Add a new Manager property of the Contact type to the Contact class.
[DefaultClassOptions] public class Contact : Person { //... private Contact manager; public Contact Manager { get { return manager; } set { SetPropertyValue(nameof(Manager), ref manager, value); } } //... } -
Apply the DataSourceProperty and DataSourceCriteria attributes to the newly added property.
[DefaultClassOptions]
public class Contact : Person {
    //...
    [DataSourceProperty("Department.Contacts", DataSourcePropertyIsNullMode.SelectAll)]
    [DataSourceCriteria("Position.Title = 'Manager' AND Oid != '@This.Oid'")]
    public Contact Manager {
        // ...
    }
    // ...
}
-
Run the application.
Add the following objects:
- a Department object (for example, “Developer Department”)
- multiple Contact objects with the Department property set to “Developer Department”
- multiple Position objects (for example, “Manager”, “Developer”).
For the newly added contacts, set the Position property to:
- “Manager” (for multiple Contact objects);
- “Developer” (for other Contact objects).

Create a new Contact object. In the Contact Detail View, specify the Department property and expand the Manager lookup editor. Notice the following:
- The Department property of the listed objects is the same as those you specified above.
- The Position property is set to “Manager” for each of the listed objects.

You can use integrated XAF designers to implement the same behavior without code. For details, refer to the following lesson: Filter Data Source for a Lookup Editor.
The DataSourceProperty attribute accepts two parameters. The first one specifies the path to the lookup list. The second parameter is optional. It specifies how the lookup items are populated if the application could not find any items from the path.
In this tutorial, the second parameter is set to SelectAll. You can also set the SelectNothing or CustomCriteria values. In the latter case, a third parameter is required to specify criteria.
With the DataSourceCriteria attribute applied, the Manager lookup editor contains Contact objects that satisfy the criteria specified in the attribute parameter.
This lesson explains how to set validation rules for business classes and their properties. XAF applies these rules when a user executes the specified operation (for example, saves an edited object).
In this lesson you will create a rule that requires that the Position.Title property must not be empty. The application will apply the rule when a user saves a Position object.
NOTE Before you proceed, take a moment to review the following lessons:
NOTE To use XAF Validation functionality, install the
DevExpress.ExpressApp.Validation.BlazorNuGet package and register the Validation module in your project.
The project wizard adds this package to all new applications with the enabled security options.
-
Apply the RuleRequiredFieldAttribute attribute to the Title property in the Position class. As a parameter, specify the context that triggers the rule (for example,
DefaultContexts.Save):using DevExpress.Persistent.Validation; //... [DefaultClassOptions] [System.ComponentModel.DefaultProperty(nameof(Title))] public class Position : BaseObject { //... private string title; [RuleRequiredField(DefaultContexts.Save)] public string Title { get { return title; } set { SetPropertyValue(nameof(Title), ref title, value); } } }
-
Run the application.
Click the New button to create a new Position object. Leave the Title property empty and click Save. The error message is displayed:

The RuleRequiredField attribute defines a validation rule that ensures that the Position.Title property has a value when the Position object is saved.
The Validation System offers a number of Rules and Contexts. For details, refer to the Validation Rules topic. The Application Model stores all rules so that an admin can add and edit Rules and Contexts with the Model Editor (see the Implement Property Value Validation in the Application Model topic).
This lesson explains how to filter data displayed in a lookup editor. This editor appears in a Detail View for reference properties and contains a list of objects of another related class.
NOTE Before you proceed, take a moment to review the following lessons:
-
Specify a Many-to-Many relationship between the
PositionandDepartmentclasses. For more information, refer to the following topic: Set a Many-to-Many Relationship (XPO).[DefaultClassOptions] [System.ComponentModel.DefaultProperty(nameof(Title))] public class Department : BaseObject { //... [Association("Departments-Positions")] public XPCollection<Position> Positions { get { return GetCollection<Position>(nameof(Positions)); } } } [DefaultClassOptions] [System.ComponentModel.DefaultProperty(nameof(Title))] public class Position : BaseObject { //... [Association("Departments-Positions")] public XPCollection<Department> Departments { get { return GetCollection<Department>(nameof(Departments)); } } }
-
Open the Model.DesignedDiffs.xafml file in the Model Editor. Navigate to the BOModel | MySolution.Module.BusinessObjects node. Expand the Contact child node and select the OwnMembers | Position child node.
Make the following changes to the node’s properties:
- Set the DataSourceProperty property to
Department.Positions. - Set the DataSourcePropertyIsNullMode property to
SelectAll.

- Set the DataSourceProperty property to
-
In the Contact class (BusinessObjects\Contact.cs), replace the
Departmentproperty declaration with the following code:[Association("Department-Contacts", typeof(Department)), ImmediatePostData] public Department Department { get {return department;} set { SetPropertyValue(nameof(Department), ref department, value); // Clear Position and Manager properties if the Department has changed. if(!IsLoading) { Position = null; if(Manager != null && Manager.Department != value) { Manager = null; } } } }
-
Run the application. Open a department’s Detail View and Link several Position items to this department.
-
Open the Detail View of a contact that belongs to this department. The Position editor dropdown lists the positions you linked in the previous step:

Before you proceed with this section of the tutorial, you should familiarize yourself with the following basic concepts of the eXpressApp Framework.
Action
Visually, Action is a toolbar item or another control that performs the associated code when an end user manipulates it. XAF has several predefined Action types. You can choose the appropriate type depending on how you want your Action to be displayed within the UI. All Actions expose the Execute event whose handler is executed when end users manipulate the corresponding element. For more details, refer to the Actions topic.
Controller
Controllers are classes inherited from the Controller class. This class has the following descendants that can also serve as base classes for controllers:
- ViewController and its generic versions: ViewController and ObjectViewController<ViewType, ObjectType>
- WindowController
Controllers implement business logic in your application. This logic is either executed automatically (for example, on activation of a View) or triggered when a user executes an Action declared within the Controller. XAF uses reflection to automatically collect controllers implemented within modules. Controller classes should be public. The Controller properties and base class determine a View or a Window where this controller is active. For more details, refer to the Controllers topic.
Controllers and Actions are instruments that implement custom features in an XAF application. In this tutorial section, you will learn how to add Actions of different types, implement Controllers without Actions, and modify the behavior of existing Controllers and Actions. It is recommended that you complete the lessons in the following order:
- Add a Simple Action
- Add a Parametrized Action
- Add an Action that Displays a Pop-up Window
- Add an Action with Option Selection
- Add a Simple Action using an Attribute
- Access Editor Settings
- Access Grid Control Settings
This lesson explains how to create a Simple Action.
A Simple Action is a button that executes custom code when a user clicks it.
The instructions below demonstrate how to add the Clear tasks button to the Contact Detail View. A click on this button clears all Tracked Tasks of the specific Contact.

NOTE Before you proceed, take a moment to review the previous lessons:
- Add a View Controller. In the Solution Explorer, right-click the Controllers folder in the MySolution.Module project and choose Add DevExpress Item | New Item… to invoke the Template Gallery. Select the XAF Controllers | View Controller Visual Studio template, specify ClearContactTasksController as the new item’s name and click Add Item.

-
Visual Studio displays an autogenerated ClearContactTasksController.cs file with a single View Controller declaration. In the controller constructor, specify the controller properties:
using DevExpress.ExpressApp;

//...
public partial class ClearContactTasksController : ViewController {
    public ClearContactTasksController() {
        InitializeComponent();
        //Activate the Controller only in the Detail View
        TargetViewType = ViewType.DetailView;
        //Specify the type of objects that can use the Controller
        TargetObjectType = typeof(Contact);
    }
// ...
If you do not specify the
TargetObjectTypeproperty, the application displays the controller’s actions for each detail form.
TIP You can also create a generic ViewController or ObjectViewController<ViewType, ObjectType> object and specify the target type as the
ViewTypeparameter. For more information on how to customize controller functionality, refer to the following topic: Define the Scope of Controllers and Actions.
-
Add a new action to the controller and a handler for the action’s
Executeevent:using DevExpress.ExpressApp; using DevExpress.ExpressApp.Actions; using DevExpress.Persistent.Base; using MySolution.Module.BusinessObjects; //... public partial class ClearContactTasksController : ViewController { public ClearContactTasksController() { InitializeComponent(); TargetViewType = ViewType.DetailView; TargetObjectType = typeof(Contact); SimpleAction clearTasksAction = new SimpleAction(this, "ClearTaskAction", PredefinedCategory.View) { //Specify the Action's button caption. Caption = "Clear tasks", //Specify the confirmation message that pops up when a user executes an Action. ConfirmationMessage = "Are you sure you want to clear the Tasks list?", //Specify the icon of the Action's button in the interface. ImageName = "Action_Clear" }; //This event fires when a user clicks the Simple Action control. clearTasksAction.Execute += ClearTasksAction_Execute; } private void ClearTasksAction_Execute(Object sender, SimpleActionExecuteEventArgs e) { while(((Contact)View.CurrentObject).Tasks.Count > 0) { ((Contact)View.CurrentObject).Tasks.Remove(((Contact)View.CurrentObject).Tasks[0]); ObjectSpace.SetModified(View.CurrentObject); } } // ...
You can use one of the standard images as the icon of the Action’s button or import your own.
The main entry point of a Simple Action is its Execute event. Handle this event to execute custom code.
-
Run the application.
Open a detail form for a Contact item. Link several tasks to this item and save it.
Click the Clear tasks button. A confirmation message appears. Click OK to remove all Tasks from the current Contact.

TIP You can display an action’s button in a Detail View layout instead of a toolbar: How to: Include an Action in a Detail View Layout.
This lesson explains how to add a Parametrized Action. The Parametrized Action displays an editor that allows users to type in a parameter value before running the action.
The instructions below demonstrate how to implement a new View Controller with a Parametrized Action. This Action searches for a DemoTask object by its Subject property value and displays the detail form of the found object.
NOTE Before you proceed, take a moment to review the previous lessons:
- Inherit from the Business Class Library Class (XPO/EF core)
- Initialize Business Object Properties (XPO/EF core)
- Add a Simple Action
-
Add a new View Controller to the MySolution.Module project, as described in the Add a Simple Action lesson. Name it FindBySubjectController.
-
In the MySolution.Module | Controllers | FindBySubjectController.cs file, specify the controller’s properties:
using DevExpress.ExpressApp;
// ...
public partial class FindBySubjectController : ViewController {
    public FindBySubjectController() {
        InitializeComponent();
        //Activate the controller only in the List View.
        TargetViewType = ViewType.ListView;
        //Activate the controller only for root Views.
        TargetViewNesting = Nesting.Root;
        //Specify the type of objects that can use the controller.
        TargetObjectType = typeof(DemoTask);
    }
    // ...
}
For more information about the root View, see the following topic: IsRoot.
-
Add a Parametrized Action to the Controller:
public partial class FindBySubjectController : ViewController {
    public FindBySubjectController() {
        InitializeComponent();
        TargetViewType = ViewType.ListView;
        TargetViewNesting = Nesting.Root;
        TargetObjectType = typeof(DemoTask);

        ParametrizedAction findBySubjectAction =
            new ParametrizedAction(this, "FindBySubjectAction", PredefinedCategory.View, typeof(string)) {
                ImageName= "Action_Search",
                NullValuePrompt = "Find task by subject..."
            };
        findBySubjectAction.Execute += FindBySubjectAction_Execute;
    }
// ...
}
A user submits a string in the Action’s editor. This raises the Action’s ParametrizedAction.Execute event.
-
Handle the Action’s
Executeevent:public partial class FindBySubjectController : ViewController { public FindBySubjectController() { // ... findBySubjectAction.Execute += FindBySubjectAction_Execute; } private void FindBySubjectAction_Execute(object sender, ParametrizedActionExecuteEventArgs e) { var objectType = ((ListView)View).ObjectTypeInfo.Type; IObjectSpace objectSpace = Application.CreateObjectSpace(objectType); string paramValue = e.ParameterCurrentValue as string; object obj = objectSpace.FindObject(objectType, CriteriaOperator.Parse("Contains([Subject], ?)", paramValue)); if(obj != null) { DetailView detailView = Application.CreateDetailView(objectSpace, obj); detailView.ViewEditMode = DevExpress.ExpressApp.Editors.ViewEditMode.Edit; e.ShowViewParameters.CreatedView = detailView; } } // ... }
For details on the event handler implementation, refer to the Detailed Explanation section.
-
Run the application.
Select the Task item in the navigation control (the Find Task by Subject editor is the Action you implemented). Type a word from an existing task’s Subject into this editor and press Enter. The application displays a detail form with this task.

In XAF, you use the Object Space to query and update persistent objects. Call the static XafApplication.CreateObjectSpace method to create an Object Space.
Use the IObjectSpace.FindObject method to find a DemoTask object. This method has the following parameters:
- The type of the objects displayed in the current List View. Use the View.ObjectTypeInfo.
- Search criteria. To generate a criteria, create a
BinaryOperatorobject and pass criteria components as the constructor’s parameters. For more information, refer to the following XPO documentation: Simplified Criteria Syntax.
To show the found object in a separate Detail View:
- Call the XafApplication.CreateDetailView method to create a View.
- Assign the View to the e.ShowViewParameters.CreatedView property of the event parameter.
TIP You can initialize the
ShowViewParametersproperty in theExecuteevent handler of any Action of any type. This allows you to always show a View after an Action is executed.
For more information on how to show a View in a separate window, refer to the following topic: Ways to Show a View.
The XafApplication object is useful when you need to create a List View, Detail View, Object Space, etc. A user can access an XafApplication object from many locations in an XAF application. In Controllers, use the Controller.Application to get such access.
This lesson explains how to create an Action that shows a pop-up window. This type of Action is useful when a user wants to input multiple parameters in a pop-up dialog before an Action is executed.
NOTE Before you proceed, take a moment to review the following lessons:
- Set a Many-to-Many Relationship (XPO/EF core)
- Add a Simple Action
In this tutorial, you will implement the ability to add notes from a predefined list to task descriptions.
-
Add the
Notebusiness object from the Business Class Library to your application. To do this, add the following code to the MySolution.Module | Module.cs file:using DevExpress.Persistent.BaseImpl.EF; // ... public sealed partial class MySolutionModule : ModuleBase { public MySolutionModule() { // Adds a business object AdditionalExportedTypes.Add(typeof(Note)); } // ... }
-
If you are working with EF Core, register the
Notetype inDbContext. Edit the BusinessObjects\MySolutionDbContext.cs file as shown below:public class MySolutionEFCoreDbContext : DbContext { //... public DbSet<Note> Notes { get; set; } }
-
If you are working with EF Core, add a migration and update the database. See the following section for details: Use a DBMS: Setup Migrations.
-
Add a new View Controller to the MySolution.Module project. Name it PopupNotesController.
-
In the PopupNotesController.cs file, specify the controller properties:
using DevExpress.ExpressApp;
using DevExpress.Persistent.BaseImpl.EF;
// ...
public partial class PopupNotesController : ViewController {
    // ...
    public PopupNotesController() {
        InitializeComponent();
        //Target the required Views and create their Actions
        TargetObjectType = typeof(DemoTask);
        TargetViewType = ViewType.DetailView;
    }
    // ...
}
-
Add the
ShowNotesActionaction and handle itsCustomizePopupWindowParamsevent:public partial class PopupNotesController : ViewController { public PopupNotesController() { InitializeComponent(); TargetObjectType = typeof(DemoTask); TargetViewType = ViewType.DetailView; /*Invoke a pop-up window with a specified View and execute custom code when a user clicks the OK or Cancel button*/ PopupWindowShowAction showNotesAction = new PopupWindowShowAction(this, "ShowNotesAction", PredefinedCategory.Edit) { Caption = "Show Notes" }; showNotesAction.CustomizePopupWindowParams += ShowNotesAction_CustomizePopupWindowParams; } private void ShowNotesAction_CustomizePopupWindowParams(object sender, CustomizePopupWindowParamsEventArgs e) { IObjectSpace objectSpace = Application.CreateObjectSpace(typeof(Note)); string noteListViewId = Application.FindLookupListViewId(typeof(Note)); CollectionSourceBase collectionSource = Application.CreateCollectionSource(objectSpace, typeof(Note), noteListViewId); e.View = Application.CreateListView(noteListViewId, collectionSource, true); } // ... }
In this step, you handle the PopupWindowShowAction.CustomizePopupWindowParams event and set the required View to the handler’s e.View parameter. This code creates the Notes List View when it generates the pop-up window.
-
Handle the
ShowNotesAction‘sExecuteevent:// ... public PopupNotesController() { // ... showNotesAction.Execute += ShowNotesAction_Execute; } private void ShowNotesAction_Execute(object sender, PopupWindowShowActionExecuteEventArgs e) { DemoTask task = (DemoTask)View.CurrentObject; foreach(Note note in e.PopupWindowViewSelectedObjects) { if(!string.IsNullOrEmpty(task.Description)) { task.Description += Environment.NewLine; } // Add selected notes' text to a Task's description task.Description += note.Text; } View.ObjectSpace.CommitChanges(); }
The
Executeevent occurs when a user clicks OK in the pop-up window. The event handler code appends theNote.Textproperty value to theTask.Descriptionproperty value.The event handler’s e.PopupWindowViewSelectedObjects parameter provides an object that a user selects in the pop-up window.
-
Run the application.
Open a Task item’s Detail View. The Detail View toolbar displays the Show Notes button. This is the action implemented in this lesson.

Click the button to open the popup window. The popup window displays a list view for the Note objects. Create several Note objects.


Select a Note object in the list and click OK. After that, the Task.Description property value changes.

TIP For an example of how to create and show a Detail View, refer to the How to: Create and Show a Detail View of the Selected Object in a Popup Window topic.
This lesson explains how to create an Action that supports option selection.
In this lesson, you will implement a new View Controller with a SingleChoiceAction. This action will allow users to select values for the Task.Priority and Task.Status properties.

NOTE Before you proceed, take a moment to review the following lessons:
-
Add a new View Controller to the MySolution.Module project. Name it TaskActionsController.
-
In the TaskActionsController.cs file, set the controller’s
TargetObjectType:using DevExpress.ExpressApp; // ... public partial class TaskActionsController : ViewController { public TaskActionsController() { InitializeComponent(); TargetObjectType = typeof(DemoTask); } // ... }
-
Add a
SingleChoiceActionand specify its properties:public partial class TaskActionsController : ViewController { public TaskActionsController() { InitializeComponent(); TargetObjectType = typeof(DemoTask); SingleChoiceAction SetTaskAction = new SingleChoiceAction(this, "SetTaskAction", PredefinedCategory.Edit) { Caption = "Set Task", //Specify the display mode for the Action's items. Here the items are operations that you perform against selected records. ItemType = SingleChoiceActionItemType.ItemIsOperation, //Set the Action to become available in the Task List View when a user selects one or more objects. SelectionDependencyType = SelectionDependencyType.RequireMultipleObjects }; } // ... }
-
To populate the Action with items, fill the Action’s ChoiceActionBase.Items collection in the Controller’s constructor:
public partial class TaskActionsController : ViewController {
   private ChoiceActionItem setPriorityItem;
   private ChoiceActionItem setStatusItem;
   public TaskActionsController() {
      // ...
      setPriorityItem =
         new ChoiceActionItem(CaptionHelper.GetMemberCaption(typeof(DemoTask), "Priority"), null);
      SetTaskAction.Items.Add(setPriorityItem);
      FillItemWithEnumValues(setPriorityItem, typeof(Priority));

      setStatusItem =
         new ChoiceActionItem(CaptionHelper.GetMemberCaption(typeof(DemoTask), "Status"), null);
      SetTaskAction.Items.Add(setStatusItem);
      FillItemWithEnumValues(setStatusItem, typeof(DevExpress.Persistent.Base.General.TaskStatus));

   }
   private void FillItemWithEnumValues(ChoiceActionItem parentItem, Type enumType) {
        EnumDescriptor ed = new EnumDescriptor(enumType);
        foreach(object current in ed.Values) {
            ChoiceActionItem item = new ChoiceActionItem(ed.GetCaption(current), current);
            item.ImageName = ImageLoader.Instance.GetEnumValueImageName(current);
            parentItem.Items.Add(item);
        }
    }
}
The code sample above organizes items from the Action’s
Itemscollection as a tree:- The root level contains items whose captions correspond to the
DemoTask.PriorityandDemoTask.Statusproperty names. The CaptionHelper object returns item captions. - The nested level contains the
PriorityandStatusenumeration values. The EnumDescriptor object returns item captions.

When you populate the ChoiceActionBase.Items collection in a Controller constructor as shown in the code above, you can use the Model Editor‘s ActionDesign | Actions | | ChoiceActionItems node to set an image name, a shortcut, and a localized caption for the added items.
If you populate the
Itemscollection in a Controller.Activated event handler, the Model Editor does not load items. - The root level contains items whose captions correspond to the
-
Open the Task.cs file and assign images to the
Priorityenumeration value as in the code sample below:public enum Priority { [ImageName("State_Priority_Low")] Low, [ImageName("State_Priority_Normal")] Normal, [ImageName("State_Priority_High")] High }
In this tutorial, the enumeration values have the ImageNameAttribute attributes to set images for these values in the UI.
XAF ships with the standard image library. The library includes the
State_Priority_Low,State_Priority_NormalandState_Priority_Highimages used in this lesson. -
Handle the SingleChoiceAction.Execute event that occurs when a user chooses the Action’s item:
public partial class TaskActionsController : ViewController {
    // ...
    public TaskActionsController() {
        // ...
        SetTaskAction.Execute += SetTaskAction_Execute;
    }
    private void SetTaskAction_Execute(object sender, SingleChoiceActionExecuteEventArgs e) {
        /*Create a new ObjectSpace if the Action is used in List View
          Use this ObjectSpace to manipulate the View's selected objects.*/
        IObjectSpace objectSpace = View is ListView ?
            Application.CreateObjectSpace(typeof(DemoTask)) : View.ObjectSpace;
        ArrayList objectsToProcess = new ArrayList(e.SelectedObjects);
        if(e.SelectedChoiceActionItem.ParentItem == setPriorityItem) {
            foreach(Object obj in objectsToProcess) {
                DemoTask objInNewObjectSpace = (DemoTask)objectSpace.GetObject(obj);
                objInNewObjectSpace.Priority = (Priority)e.SelectedChoiceActionItem.Data;
            }
        } else
            if(e.SelectedChoiceActionItem.ParentItem == setStatusItem) {
            foreach(Object obj in objectsToProcess) {
                DemoTask objInNewObjectSpace = (DemoTask)objectSpace.GetObject(obj);
                objInNewObjectSpace.Status = (DevExpress.Persistent.Base.General.TaskStatus)e.SelectedChoiceActionItem.Data;
            }
        }
        objectSpace.CommitChanges();
        View.ObjectSpace.Refresh();
    }
}
To access a selected action item, use the event handler’s e.SelectedChoiceActionItem parameter.
Create a separate
ObjectSpaceto edit multiple objects that are currently displayed. This approach improves performance, as each object change does not trigger the grid control’s events. -
Run the application. Select the Task item in the navigation control. After that, the Set Task Action becomes active.
To change the Priority or Status property of the selected Task objects, select an item in the Action’s drop-down list:


This lesson explains how to use methods of a business object to add a Simple Action.
The instructions below show how to add a new method with the ActionAttribute attribute to the DemoTask class.
NOTE Before you proceed, take a moment to review the following lessons:
- Set a Many-to-Many Relationship (XPO/EF core)
- Add a Simple Action
-
Add the
Postponemethod to theDemoTaskclass:namespace MySolution.Module.BusinessObjects [DefaultClassOptions] [ModelDefault("Caption", "Task")] public class DemoTask : DevExpress.Persistent.BaseImpl.EF.Task { //... /*Use this attribute to display the Postpone button in the UI and call the Postpone() method when a user clicks this button*/ [Action(ToolTip = "Postpone the task to the next day")] //Shift the task's due date forward by one day public void Postpone() { if(DueDate == DateTime.MinValue) { DueDate = DateTime.Now; } DueDate = DueDate + TimeSpan.FromDays(1); } }
TIP You can use the
Actionattribute to implement an action that asks a user to specify parameters in a popup dialog (for example, the number of days to postpone a Task). Refer to the following topic for an example: How to: Create an Action Using the Action Attribute. -
Display the Due Date column in the Task List View. Open the MySolution.Module | ModelDesignedDiffs.xafml file. In the Model Editor, do the following:
-
Go to Views | MySolution.Module.BusinessObjects | DemoTask | DemoTask_ListView | Columns.
-
Right-click the grid header and click the Column Chooser item.
-
Drag the Due Date column to the View and save the ModelDesignedDiffs.xafml file.
-
-
Run the application. Select the Task item in the navigation control.
Select one or more tasks in the Task List View. The Postpone Action button appears. Click this button. The due date of the selected tasks shifts forward by one day.

This lesson explains how to access editors in a Detail View and change their settings.
The instructions below show how to make the Birthday property editor display a scrollable date picker in its drop-down window.
NOTE Before you proceed, take a moment to review the following lessons:
- Inherit from the Business Class Library Class (XPO/EF core)
- Add a Simple Action
-
In the MySolution.Blazor.Server project, add a View Controller to the Controllers folder. Name the new controller “DateEditCalendarController“. Specify the controller ancestor class ObjectViewController<ViewType, ObjectType>:
using DevExpress.ExpressApp;
// ...

public partial class DateEditCalendarController : ObjectViewController<DetailView, Contact> {
    public DateEditCalendarController() {
        InitializeComponent();
    }
    // ...
}
The
DateEditCalendarControllerinherits from the ObjectViewController<ViewType, ObjectType> base class. The parameters of the base class enable the Controller only for Detail Views that display and editContactobjects. -
Override the
OnActivatedmethod. Use the DetailViewExtensions.CustomizeViewItemControl method to access theBirthdayproperty editor settings:namespace MySolution.Blazor.Server.Controllers { public partial class DateEditCalendarController : ObjectViewController<DetailView, Contact> { public DateEditCalendarController() { InitializeComponent(); } protected override void OnActivated() { base.OnActivated(); //Access the Birthday property editor settings View.CustomizeViewItemControl<DateTimePropertyEditor>(this, SetCalendarView, nameof(Contact.Birthday)); } private void SetCalendarView(DateTimePropertyEditor propertyEditor) { //Obtain the Component Adapter var dateEditAdapter = (DxDateEditAdapter)propertyEditor.Control; //Set the date picker display mode to scroll picker dateEditAdapter.ComponentModel.PickerDisplayMode = DevExpress.Blazor.DatePickerDisplayMode.ScrollPicker; } } }
Use the Component Adapter‘s
ComponentModelproperty to access the actual ASP.NET Core Blazor component properties.For general information on Property Editor architecture and UI Controls used by XAF, review the following articles:
-
Run the application and open the Contact Detail View. The Birthday editor shows a scrollable date picker in its drop-down window:

This lesson explains how to access the properties of a grid component displayed within a List View.
The instructions below describe the implementation of a new View Controller. This controller enables operations to resize columns.
NOTE Before you proceed, take a moment to review the following lesson:
-
In the MySolution.Blazor.Server project, add a View Controller to the Controllers folder. Name this controller ColumnResizeModeViewController.
-
Specify the controller’s ancestor class
ViewController<ListView>and override theOnViewControlsCreatedmethod:using DevExpress.ExpressApp; using DevExpress.ExpressApp.Blazor.Editors; namespace MySolution.Blazor.Server.Controllers { public partial class ColumnResizeModeViewController : ViewController<ListView> { public ColumnResizeModeViewController() { InitializeComponent(); } // ... protected override void OnViewControlsCreated() { base.OnViewControlsCreated(); if (View.Editor is DxGridListEditor gridListEditor) { //Obtain the Component Adapter IDxGridAdapter dataGridAdapter = gridListEditor.GetGridAdapter(); //Access grid component properties and specify how exactly a user can resize columns dataGridAdapter.GridModel.ColumnResizeMode = DevExpress.Blazor.GridColumnResizeMode.ColumnsContainer; } } // ... } }
-
Run the application. Try to resize a column in a grid component in any List View. The width of the grid container changes, while the other columns retain their width.

This tutorial section explains how to customize the automatically generated user interface.
Visual elements in your XAF application are based on the data classes that you declare and the information from the assemblies that your application references. All the received information is metadata - data that defines database structure and application features in a neutral format that you can adopt to any target platform. This metadata is called the Application Model. It is a powerful tool that allows you to make changes to your application.
To customize the Application Model at design time, use the Model Editor. It opens directly from Visual Studio.
The following lessons explain how to use the Model Editor:
- Place an Action in a Different Location
- Specify Action Settings
- Format a Business Object Caption
- Create a Calculated Property
- Format a Property Value
- Use a Multiline Editor for String Properties
- Add an Item to the Navigation Control
- Implement Property Value Validation in the Application Model
- Customize the View Items Layout
- Localize UI Elements
- Add an Editor to a Detail View
- Change Field Visibility in a List View
- Filter List Views
- Group List View Data
If the required option is not available in the Model Editor, you can directly access the options of controls used in the application. Review the following topics to learn more:
This lesson explains how to move an Action to a different Action Container.
An Action Container is a control that displays an action or a set of actions.
The instructions below explain how to move the ClearTasksAction from the View Action Container to the Edit Action Container.

NOTE Before you proceed, take a moment to review the following lessons:
-
Open the Model.DesignedDiffs.xafml file in the Model Editor.
-
In the Model Editor, navigate to the ActionDesign | ActionToContainerMapping node. Expand the View node that is the View Action Container. Drag the ClearTasksAction child node to the Edit node. Set the node’s Index to
0.
Child nodes of the ActionToContainerMapping node correspond to Action Containers of your application. The Actions are mapped to Action Containers according to the Category property values.
When you defined the
ClearTasksActionin the Add a Simple Action lesson, you set the Category property toView.Viewis a value from theDevExpress.Persistent.Base.PredefinedCategoryenumeration that corresponds to the View Action Container. -
Run the application. In the Contact detail view, the Clear Task button appears to the left of the Delete button.

TIP You can handle the ActionControlsSiteController.CustomizeContainerActions event to change an Action location in code.
This lesson explains how to modify Action properties.
The instructions below explain how to change the tooltip and confirmation message for ClearTasksAction. You defined this action in the Add a Simple Action lesson.
NOTE Before you proceed, take a moment to review the following lessons:
-
Open the Model.DesignedDiffs.xafml file in the Model Editor.
-
In the Model Editor, navigate to the ActionDesign | Actions node. Change the ClearTasksAction node’s property values as follows:
- Set the Tooltip property to
Clear the current Contact's tasks. - Set the ConfirmationMessage property to
Are you sure you want to clear all the tasks?.
- Set the Tooltip property to
-
Run the application and open the Contact Detail View. Hover the mouse pointer over the Clear Tasks button to see the tooltip.

-
Click the button to show the confirmation message.

This lesson explains how to format a caption of a business object’s detail form.

NOTE Before you proceed, take a moment to review the following lessons:
- Inherit from the Business Class Library Class (XPO/EF core)
- Place an Action in a Different Location
- Open the Model.DesignedDiffs.xafml file in the Model Editor.
- In the Model Editor, navigate to the BOModel | MySolution.Module.BusinessObjects node. Select the Contact node.
- Set the ObjectCaptionFormat property value to
{0:FullName} from {0:Department}in the class properties shown on the right.

- Run the application. Open the detail form for a Contact object. You can now see the custom caption:

This lesson explains how to create calculated properties.
The instructions below explain how to add a Payment class with the following properties:
- Rate (a persistent property)
- Hours (a persistent property)
- Amount (a non-persistent, calculated property:
Amount = Rate * Hours)
NOTE Before you proceed, take a moment to review the following lessons:
- Inherit from the Business Class Library Class (XPO/EF core)
- Place an Action in a Different Location
-
Create a
Paymentbusiness object in the MySolution.Module project. -
Replace the generated class declaration with the following code:
using DevExpress.Persistent.Base;
using DevExpress.Persistent.BaseImpl;
using DevExpress.Xpo;
// ...
[DefaultClassOptions]
public class Payment : BaseObject {
    public Payment(Session session) : base(session) { }
    private double rate;
    public double Rate {
        get {
            return rate;
        }
        set {
            if(SetPropertyValue(nameof(Rate), ref rate, value))
                OnChanged(nameof(Amount));
        }
    }
    private double hours;
    public double Hours {
        get {
            return hours;
        }
        set {
            if(SetPropertyValue(nameof(Hours), ref hours, value))
                OnChanged(nameof(Amount));
        }
    }
    /*Use this attribute to specify that the value of this property depends on the values of other fields.
      The expression that you pass as a parameter calculates the property value.*/
    [PersistentAlias("Rate * Hours")]
    public double Amount {
        get { return (double)(EvaluateAlias(nameof(Amount)) ?? 0); }
    }
}
The
Amountproperty has nosetaccessor. Its value calculation takes place in thegetaccessor. -
For EF Core-based applications, register the
Paymenttype in theDbContext:public class MySolutionEFCoreDbContext : DbContext { //... public DbSet<Payment> Payments { get; set; } }
-
For EF Core-based applications, add a migration and update the database. See the following section for details: Use a DBMS: Setup Migrations.
-
Run the application. Select the Payment item in the navigation control, and click “New”. In the Payment Detail View, change the Rate and Hours properties to see how this affects the Amount property.

This lesson explains how to format a business class property and specify its input mask settings.
In this lesson, you will customize the display format for the Task.StartDate, Task.DueDate, and Task.PercentCompleted properties in the Model Editor.
NOTE Before you proceed, take a moment to review the following lessons:
- Inherit from the Business Class Library Class (XPO/EF core)
- Place an Action in a Different Location
-
Open the Model.DesignedDiffs.xafml file in the Model Editor.
-
Navigate to the BOModel | DevExpress.Persistent.BaseImpl.EF | Task | OwnMembers node.
-
For the DueDate and StartDate child nodes, set the value of the DisplayFormat property to
D- a long date pattern.
Note that the value of the EditMask property is
d- a short day pattern. -
For the PercentCompleted child node, set the DisplayFormat property to
{0:N0}%.

-
Run the application. Invoke a Detail List for the DemoTask class.

Note how text format changes when StartDate and DueDate editors receive or lose focus. If you focus an editor, its EditMask takes effect (
d- short date pattern). If an editor loses input focus, its DisplayFormat takes over (D- long date pattern).The PercentCompleted display text includes the percentage sign: ‘%’.
NOTE In .NET 5, the libraries used for globalization functionality has been changed. Refer to the following topic for details: Globalization APIs use ICU libraries on Windows. If a current thread’s culture is set to a culture that includes only the language and not the country (for example, “de” or “en”), the currency symbol renders as an international currency symbol (
¤), for example:100,00 ¤. Refer to the following topics for details:
This lesson explains how to display a multiline editor for string properties.
The instructions below explain how to enable a multiline text box for the Web Page Address property editor in the Contact Detail View.
-
Open the Model.DesignedDiffs.xafml file in the Model Editor.
-
Navigate to the BOModel | MySolutuon.Module.BusinessObjects | Contact | OwnMembers node.
-
For the WebPageAddress child node, set the properties as follows:
-
Set the RowCount property to
2.This creates a two-line editor for the WebPageAddress property.
-
Set the Size property to
100.This allows a user to enter up to 100 symbols.
You can also apply the FieldSize attribute in code.
-
-
Run the application. Open a Detail List for a Contact object. The Web Page Address property uses a two-line text box editor.


This lesson explains how to add an item to the navigation control.
The instructions below describe how to add the Notes item to the navigation control. When a user clicks this item, the application displays a List View for the Note business class added in the following lesson: Add an Action that Displays a Pop-Up Window.

-
Open the Model.DesignedDiffs.xafml file in the Model Editor. In the tree view, navigate to the NavigationItems | Items | Default | Items node. To add a child item to a navigation item, right-click the Items node and select Add… | NavigationItem in the context menu:

-
Specify the following properties for the new item:
- Set the View property to
Note_ListView. - Set the Caption property to
Notes. - Set the Id property to
Note.

- Set the View property to
-
Run the application. You can see the new navigation item that allows you to add and edit plain text notes.

This lesson explains how to check whether a property value meets a predefined criteria. This functionality becomes available if you install the Validation Module.
The instructions below explain how to prevent a user from marking a task as completed before the task has started (DemoTask.Status is NotStarted).
NOTE Before you proceed, take a moment to review the following lesson:
-
Open the Model.DesignedDiffs.xafml file in the Model Editor. Navigate to the Validation | Rules node. Add a new validation rule: right-click the Rules node and select Add… | RuleCriteria.

-
Set the values of the following properties for the node:
- TargetType to “MySolution.Module.BusinessObjects.DemoTask”
- Criteria to
Status != 'NotStarted' - ID to
TaskStarted - TargetContextIDs to
MarkCompleted - CustomMessageTemplate to
Cannot set the task as completed because it has not started.

The Criteria property value must respect the Criteria Language Syntax. To set the criteria, click the ellipsis button (
) to the right of the Criteria value and invoke the Filter Builder dialog. In this dialog, you can visually design a criteria expression.
-
In the ActionDesign | Actions | Task.MarkCompleted node, set the ValidationContexts property to
MarkCompleted.
TIP You can use the Save or Delete contexts. The validation of Rules with these contexts occurs when a user saves or deletes an object (see Validation Rules).
-
Change the caption of the MarkCompleted Action to
Mark Completed. -
Run the application. Assign the “Not Started” value to the Status property of one of the existing DemoTask objects. Click the Mark Completed button. The following Validation Error dialog appears:


You can also add a rule to a class or property in code. For additional information, refer to the following topic: Implement Property Value Validation in Code (XPO).
The following topic lists all available rule types and their descriptions: Validation Rules.
This lesson explains how to customize the default editor layout in a Detail View. The instructions below use the Contact Detail View as an example.
-
Open the Model.DesignedDiffs.xafml file in the Model Editor.
-
Navigate to the Views | MySolution.Module.BusinessObjects | Contact | Contact_DetailView | Layout node.
-
The Model Editor displays a design surface that imitates the Contact Detail View. To change the editor layout, right-click the View’s empty space and choose Customize Layout.

The Customization form allows you to add, remove, and reorder items.
-
To remove an item, drag it from the Detail View to the Customization Form.
-
To add an item, drag it from the Customization Form to the Detail View.
-
To reorder items, drag editors to create a new layout and save changes.

For more information about the Customization form and the Layout Tree View tab and its context menu, refer to the Default Runtime Customization topic.
-
-
Explore additional layout customization options available in the context menu. Click the Layout Tree View tab on the Customization Form. Right-click a tree node to invoke a context menu.

-
Run the application to see the Contact Detail View’s new layout.

TIP To reset changes you made to the layout, right-click Contact_DetailView | Layout and choose Reset Differences.
This lesson explains how to localize an XAF ASP.NET Core Blazor application. It describes how to translate UI elements into German and create a multi-language application.
NOTE For more information on localization, review the following topics:
-
Add the DevExpress.ExpressApp.de, DevExpress.ExpressApp.Blazor.de, and DevExpress.ExpressApp.Security.de packages to the MySolution.Blazor.Server project.

The packages are available only for the following languages: German (de), Spanish (es), and Japanese (ja). For other languages, use the Localization Service to download satellite assemblies. See the Localize Standard XAF Modules and DevExpress Controls Used in an Application topic for more information on how to use this service to localize XAF modules.
-
In the MySolution.Blazor.Server project, open the appsettings.json file. Add the German language to the DevExpress:ExpressApp:Languages section and enable the runtime language switcher:
{
    // ...
    "DevExpress": {
        "ExpressApp": {
            "Languages": "en;de",
            "ShowLanguageSwitcher": true,
             // ...
        }
    }
}
See the Current Culture in XAF ASP.NET Core Blazor Applications help section for more information on how an XAF ASP.NET Core Blazor application determines the default language.
-
Open the Model.DesignedDiffs.xafml file in the Model Editor. Focus the MySolution node and click Languages Manager… in the Language combo box on the Model Editor Toolbar.

-
Add the target language in the invoked dialog and click OK.

-
Restart Visual Studio to load localized values from satellite assemblies.
-
In the Solution Explorer, right-click the Model.DesignedDiffs.Localization.de.xafml file and open its Properties window. Make sure that the Build Action field is set to Embedded resource.
-
Select the newly added language in the Language combo box.

-
The localization packages translate standard strings/messages used in XAF. You also need to translate the strings that are unique to your current application (such as object or property names). To do that, locate properties denoted by the “globe” glyph in all the nodes and child nodes and assign a German translation to them.

-
Run the application. Click the gear icon to display the settings menu and switch the language to German.

-
Check whether you translated all required items.

This lesson explains how to make a property (its editor) visible in a Detail View. The instructions below show how to locate the Department.Office nested property and make it visible in the Contact Detail View.
NOTE Before you proceed, take a moment to review the following lesson:
-
Open the Model.DesignedDiffs.xafml file in the Model Editor.
-
Navigate to the Views | MySolution.Module.BusinessObjects | Contact node. Expand the Contact_DetailView child node and click the Layout node.
-
The Model Editor displays a design surface that imitates the Contact Detail View. Right-click the View’s empty space and choose Customize Layout.

-
In the invoked Customization window, click the Add button.

-
In the Object Model dialog, expand the Department node, check the Office checkbox, and click OK.

-
The Office: item appears on the Hidden Items tab of the Customization window:

-
Drag the Office: item to the required position of the Contact Detail View.

-
Run the application, open the Contact Detail View, and find the Office editor:

This lesson explains how to select columns displayed in a List View. The steps below describe how to customize the Contact List View at design time.
NOTE Before you proceed, take a moment to review the following lesson:
-
Open the Model.DesignedDiffs.xafml file in the Model Editor.
-
Click the Views | MySolution.Module.BusinessObjects | Contact_ListView | Columns node to open the Grid List Editor Designer. Right-click the table header and select Column Chooser.

-
Drag items to and from the Customization window to display the following columns in the List View: FullName, Department, Position, and Email.
You can also resize and group columns in the Grid List Editor Designer. See the following help section for more information: Design-Time Customization.
To reset column settings, right-click the Views | MySolution.Module.BusinessObjects | Contact_ListView | Columns node and select Reset Differences.
-
Run the application. The Contact List View displays the FullName, Department, Position, and Email columns.

This lesson describes three techniques used to filter a List View. Filters will be applied to the Contact List View.
NOTE Before you proceed, take a moment to review the following lessons:
This technique allows end users to apply predefined filters to a List View.
-
Open the Model.DesignedDiffs.xafml file in the Model Editor. Navigate to the Views | MySolution.Module.BusinessObjects | Contact_ListView node. Right-click the Filters child node and select Add | ListViewFilterItem. For the new node, set the Id property to Development Department Contacts. Set the Criteria property to
[Department.Title] = 'Development Department'.
Criteria properties use Criteria Language Syntax.
You can also construct a filter criteria in the Filter Builder dialog. To open this dialog, click the ellipsis button (

-
Add another child node to the Filters node. Set the Id property to Developers and the Criteria property to
[Position.Title] = 'Developer'.
-
Add one more child node to the Filters node. Set the Id property to All Contacts and leave the Criteria property empty. This item will display all Contact objects in the List View.

-
For the Filters node, set the CurrentFilter property to Developers. The Developers filter will be initially applied to the Contact List View.

-
Run the application and check that the SetFilter Action is available.

The Model Editor also allows you to filter List View records without any indication in the UI.
-
In the MySolution.Module project, open the Model.DesignedDiffs.xafml file in the Model Editor. Navigate to the Views | MySolution.Module.BusinessObjects | Contact | Contact_ListView node. Set its Criteria property to
Position.Title = 'Developer'.
-
Run the application and check that the Contact List View displays only developers.

You can create filters that cannot be disabled in the application UI nor in the Model Editor.
-
In the Solution Explorer, right-click the Controllers folder in the MySolution.Module project, and choose Add DevExpress Item | New Item… to invoke the Template Gallery.
-
Select the XAF Controllers | View Controller Visual Studio template. Specify FilterListViewController as the new item’s name and click Add Item.
-
In the autogenerated FilterListViewController.cs file, inherit the controller from the ObjectViewController<ViewType, ObjectType>:
using DevExpress.Data.Filtering;
using DevExpress.ExpressApp;
using MySolution.Module.BusinessObjects;
// ...

public partial class FilterListViewController : ObjectViewController<DetailView, Contact> {
    public FilterListViewController() {
        InitializeComponent();
    }
    // ...
}
-
Override the
OnActivatedmethod:public partial class FilterListViewController : ObjectViewController<DetailView, Contact> { // ... protected override void OnActivated() { base.OnActivated(); //Specify a filter criteria. View.CollectionSource.Criteria["Developers"] = CriteriaOperator.FromLambda<Contact>(c => c.Position.Title == "Developer"); } // ... }
-
Run the application and check the filter in the Contact List View.
This topic explains how to group List View data and uses the Department and Position properties created in the previous steps to group the Contact List View data.
NOTE Before you proceed, take a moment to review the following lesson:
-
Open the Model.DesignedDiffs.xafml file in the Model Editor.
-
Click the Views | MySolution.Module.BusinessObjects | Contact | Contact_ListView | Columns node to open the Grid List Editor Designer. Right-click the table header and select the Show Group By Box item.

-
The Group Panel appears above the column headers.

-
Drag the Department and Position column headers to the Group Panel. Note that multiple columns in the group area create nested groups.
When you add a column to the Group Panel, the column’s
GroupIndexproperty value changes. You can also directly specify a column’sGroupIndexproperty to group List View data. See the following topic for more information: List View Columns Customization.You can hide the Group Panel to prevent users from changing groups. Navigate to the Views | MySolution.Module.BusinessObjects | Contact | Contact_ListView node and set its IsGroupPanelVisible property to
False. -
Run the application. The Contact List View is grouped by the Department and Position fields and the Group Panel is displayed.

-
Users can also drag columns to and from the Group Panel to group and ungroup List View Data.

The eXpressApp Framework supplies some features in separate assemblies called modules. For information on how to add and use these features in your applications, see the following lessons:
This lesson describes how to attach file collections to business objects. In this tutorial, we will add the File Attachment Module to an ASP.NET Core Blazor application, and implement new business classes: Resume to store a Contact’s resume information and PortfolioFileData to save file data collection items.
NOTE Before you proceed, take a moment to review the following lessons:
-
Add the DevExpress.ExpressApp.FileAttachment.Blazor NuGet package to the MySolution.Blazor.Server project. See the following topic for more information on how to install DevExpress NuGet packages: Install DevExpress Controls Using NuGet Packages.
-
In the Startup.cs file, call the AddFileAttachments(IModuleBuilder, Action) method to add the File Attachment Module to your application:
public class Startup {
// ...
    public void ConfigureServices(IServiceCollection services) {
        // ...
        services.AddXaf(Configuration, builder => {
            builder.UseApplication<MySolutionBlazorApplication>();
            builder.Modules
                .AddConditionalAppearance()
                // ...
                .AddFileAttachments()
            // ...
        });
        // ...
    }
}
If you add the File Attachment Module when you create an XAF application, the Solution Wizard generates the code used to add the File Attachment Module automatically.
-
Right-click the Business Objects folder in the MySolution.Module project and choose Add Item | Class… Specify Resume.cs as the new file name and click Add.
-
Replace the generated class declaration with the following code:
using DevExpress.Persistent.Base;
using DevExpress.Persistent.BaseImpl;
using DevExpress.Xpo;
using MySolution.Module.BusinessObjects;

namespace MySolution.Module.BusinessObjects {
    [DefaultClassOptions]
    [ImageName("BO_Resume")]
    public class Resume : BaseObject {
        public Resume(Session session) : base(session) {}
        private Contact contact;
        [Association("Contact-Resumes")]
        public Contact Contact {
            get { return contact; }
            set { SetPropertyValue(nameof(Contact), ref contact, value); }
        }
        [Aggregated, Association("Resume-PortfolioFileData")]
        public XPCollection<PortfolioFileData> Portfolio {
            get { return GetCollection<PortfolioFileData>(nameof(Portfolio)); }
        }
    }
}
-
Add the
Resumeproperty to theContactclass:namespace MySolution.Module.BusinessObjects { [DefaultClassOptions] public class Contact : Person { // ... [Association("Contact-Resumes")] public XPCollection<Resume> Resumes { get { return GetCollection<Resume>(nameof(Resumes)); } } } }
-
Add another class to the MySolution.Module project and name it PortfolioFileData. Replace the generated class declaration with the following code:
using DevExpress.Persistent.BaseImpl;
using DevExpress.Xpo;

namespace MySolution.Module.BusinessObjects {
    public class PortfolioFileData : FileAttachmentBase {
        public PortfolioFileData(Session session) : base(session) { }
        private Resume resume;
        [Association("Resume-PortfolioFileData")]
        public Resume Resume {
            get { return resume; }
            set { SetPropertyValue(nameof(Resume), ref resume, value); }
        }
        public override void AfterConstruction() {
            base.AfterConstruction();
            documentType = DocumentType.Unknown;
        }
        private DocumentType documentType;
        public DocumentType DocumentType {
            get { return documentType; }
            set { SetPropertyValue(nameof(DocumentType), ref documentType, value); }
        }
    }
    public enum DocumentType {
        SourceCode = 1, Tests = 2, Documentation = 3,
        Diagrams = 4, ScreenShots = 5, Unknown = 6
    };
}
In this lesson, we derive
PortfolioFileDatafrom theFileAttachmentBaseclass in the XPO-based application and from theFileAttachmentclass in the EF Core-based application.FileAttachmentBaseandFileAttachmentare Business Class Library classes. These classes can store files in the database. For more information about file attachment properties, see the following topics: File Attachment Properties in XPO/EF Core.In the XPO-based application, we initialize the
PortfolioFileData.DocumentTypeproperty in the AfterConstruction() method that is called after the corresponding object’s creation. See the following topic for details: How to: Initialize Business Objects with Default Property Values in XPO. -
In EF Core-based applications, add the Required attribute to the
Resumeproperty in thePortfolioFileDataclass.using DevExpress.Persistent.BaseImpl.EF; namespace MySolution.Module.BusinessObjects { [ImageName("BO_FileAttachment")] public class PortfolioFileData : FileAttachment { public PortfolioFileData() : base() { DocumentType = DocumentType.Unknown; } //.. [Required] public virtual Resume Resume { get; set; } //... } } //... }
The
ResumeandPortfolioFileDataclasses are connected with a One-to-Many relationship. For more information on how to create a one-to-many relationship between business objects, see the following topics: Set a One-to-Many Relationship (XPO/EF Core).In the EF Core-based application, a deletion of a master object does not delete the related objects. In this lesson, we use the Required attribute to configure the associations between classes. This way you can delete the referenced objects with the master object and avoid integrity violation.
Alternatively, you can use the Fluent API and specify the OnDelete method for the
Portfolio-Resumerelationship as described in the following topic: The Fluent API OnDelete Method. -
Add the RuleRequiredFieldAttribute attribute to the
Resumeproperty to implement property value validation:using DevExpress.Persistent.BaseImpl; using DevExpress.Xpo; namespace MySolution.Module.BusinessObjects { public class PortfolioFileData : FileAttachmentBase { public PortfolioFileData(Session session) : base(session) { } private Resume resume; [Association("Resume-PortfolioFileData")] [RuleRequiredField(DefaultContexts.Save)] public Resume Resume { get { return resume; } set { SetPropertyValue(nameof(Resume), ref resume, value); } } //... } //.. }
For additional information on validation, refer to the following article: Validation (Prevent Data Errors).
-
In EF Core-based applications, open the MySolution.Module.BusinessObjects\MySolutionDbContext.cs file and add the properties of
Resume,PortfolioFileData, andFileAttachmentstypes to theDbContext:public class MySolutionDbContext : DbContext { //... public DbSet<Resume> Resumes { get; set; } public DbSet<PortfolioFileData> PortfolioFileData { get; set; } public DbSet<FileAttachment> FileAttachments { get; set; } }
-
Add a migration and update the database. See the following section for details: Use a DBMS: Setup Migrations.
-
Run the application. Open the Resume List View and create a new Resume object. Fill the Contact field and add a new Portfolio File Data object. In the Portfolio File Data window, specify the Document Type and select the file that you wish to attach.

Users can click the file link to download the resume file.
To get a file stored within a PortfolioFileData object in code, use the IFileData.SaveToStream method of its File property.
This lesson explains how to create multiple customized variants of the same View, and allow a user to choose the desired View variant at runtime.
Variants are available for List Views and Detail Views. In this lesson, we create two variants of the Contact List View in the Model Editor. We reference the View Variants Module and add the Change Variant Action to switch between these View variants.
NOTE
Before you proceed, take a moment to review the following lessons:
- Inherit from the Business Class Library Class (XPO/EF)
- Change Field Layout and Visibility in a List View
-
Add the DevExpress.ExpressApp.ViewVariantsModule NuGet package to the MySolution.Module project. See the following topic for more information on how to install DevExpress NuGet packages: Install DevExpress Controls Using NuGet Packages.
-
In the MySolution.Module\Module.cs file, add the View Variants Module to the ModuleBase.RequiredModuleTypes list:
using DevExpress.ExpressApp.ViewVariantsModule;

namespace MySolution.Module {
    public sealed partial class MySolutionModule : ModuleBase {
        public MySolutionModule() {
            // ...
            RequiredModuleTypes.Add(typeof(ViewVariantsModule));
        }
        // ...
    }
}
-
Build the project.
-
Invoke the Model Editor for the MySolution.Module project. Right-click the Views node and select Add… | ListView.
-
For the new node, set the Id property to Contact_ListView_AllColumns and the ModelClass property to MySolution.Module.BusinessObjects.Contact.
-
Right-click the newly created node and select Generate Content. The Model Editor uses information from the Contact class (the BOModel | Contact node) and its ancestors to generate columns. As a result, Contact_ListView_AllColumns contains all Contact columns.
-
Right-click the Views node and select Add… | ListView. For the new node, set the Id property to Contact_ListView_Varied and the ModelClass property to MySolution.Module.BusinessObjects.Contact. Do not generate content for this node.
-
Expand the newly added Contact_ListView_Varied node, right-click the Variants child node, and select Add… | Variant.
-
Set the View property to
Contact_ListViewand the Id and Caption properties toMultiple columns. -
Right-click the Variants node and select Add… | Variant. For the new node, set the View property to
Contact_ListView_AllColumns, and the Id and Caption properties toAll columns. -
Navigate to the NavigationItems | Items | Default | Items | Contact node. Set its View property to
Contact_ListView_Varied. -
Run the Blazor Application. Select the Contact item. The Contact List View contains the Change Variant Action. The Change Variant Action includes items specified in the Model Editor.
You can use the Index property to specify the sort order of variants in the Change Variant Action drop-down list. Additionally, you can set the Current property of the Variants node to specify the default variant.
Invoke the Model Editor and set the GenerateRelatedViewVariantsGroup property of the NavigationItems node to true to add View variants to the navigation control.
As a result, the Contact navigation item exposes child items for each View variant.