Team
Don - Leading Man
Brian
Tom
Kimo
Vibha
The goal was to create a Check-in App that balanced data privacy and ease of use. In addition, administration capabilities in a separate App/Portal.
This App has the capability to operate independently of the ERM API. Specific tech details will be discussed by Don shortly.
To achieve this in the:
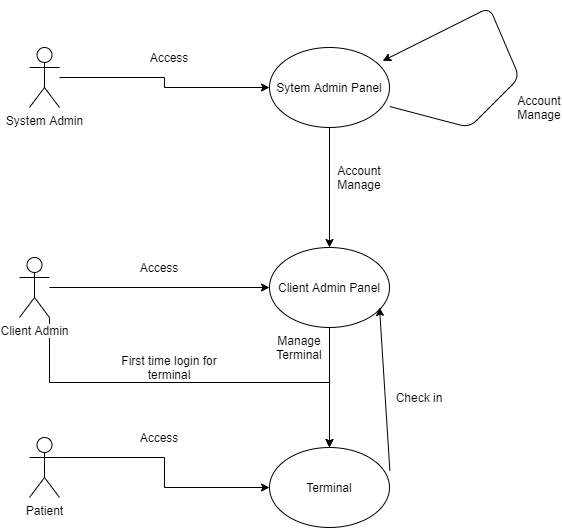
- Front-End Portals
- Check-in
- Client-admin
- System-admin
- Terminal view
- Back-End
- Mongo Databases
- Swagger interface
- Report API
Secure Check-In (Terminal Front-End)
Each terminal has a security check prior to startup to ensure no unwanted terminal log-ins.
Landing page for Patient check-in
- provides only generic information, protecting any data which may be seen as sensitive, until patient identity is confirmed.
- Only appointments within 15min +/- with pending status show
- Current default setting of max per page is 5 (this can be customized)
Checkin-Verification fields
- can be enabled/disabled and overall what verification is required can be customized.
- Swagger interface
- Report API
Confirmation Details
- Once a patient has passed check-in, details are revealed to confirm and incorrect details can be addressed.
Client-Admin Portal Client Admin has access to appointments and check-in terminals.
Appointments
- Search by Name
- Sort by Name
- Sort by Time
- Sort by Doctor
- Sort by Status
- Pagination feature (max 10 per page)
- Appointment Action
- Provides details of appointment
- Allows staff to add appointment comments
- Allows for appointment status override
Terminals
- Search by Name
- Sort by Name
- Sort by Status
- Token field provides Terminal startup login token (security PIN)
- Terminal Info/Settings
- Toggle Terminal Enable/Disable
- DELETE Terminal (preserves data in Database)
- Toggle Security verifications on Terminal *Only if Terminal is Enabled
System-Admin Portal System Admin portal is meant for an overall System Administration and has limited access to appointment data. This is to create segregation of duties and data. As a System Admin may be an IT technician and not be medical staff. However, if required System Admin can create a Client Admin account for maintenance.
Create Account
- Search by Name
- Sort by Name
- Report
- Sort by Status
- Token field provides Terminal startup login token (security PIN)
- Terminal Info/Settings
- Toggle Terminal Enable/Disable
- DELETE Terminal (preserves data in Database)
- Toggle Security verifications on Terminal *Only if Terminal is Enabled
Account List
- Search by First Name
- Search by Last Name
- Search by Email
- Sort by First Name
- Sort by Last Name
- Sort by Role
- Client Info/Settings
- Account User Details
- Reset Password
- Toggle Enable/Disable
If you want to connent to a different backend URL, please change the URL in App.js to
to
For Managing Appointments and Terminals:
For Login into Terminals:
email: [email protected]
password: 123456
email: [email protected]
password: password
email: [email protected]
password: 1234567
This project was bootstrapped with Create React App.
In the project directory, you can run:
Runs the app in the development mode.
Open http://localhost:3000 to view it in the browser.
The page will reload if you make edits.
You will also see any lint errors in the console.
Launches the test runner in the interactive watch mode.
See the section about running tests for more information.
Builds the app for production to the build folder.
It correctly bundles React in production mode and optimizes the build for the best performance.
The build is minified and the filenames include the hashes.
Your app is ready to be deployed!
See the section about deployment for more information.
Note: this is a one-way operation. Once you eject, you can’t go back!
If you aren’t satisfied with the build tool and configuration choices, you can eject at any time. This command will remove the single build dependency from your project.
Instead, it will copy all the configuration files and the transitive dependencies (webpack, Babel, ESLint, etc) right into your project so you have full control over them. All of the commands except eject will still work, but they will point to the copied scripts so you can tweak them. At this point you’re on your own.
You don’t have to ever use eject. The curated feature set is suitable for small and middle deployments, and you shouldn’t feel obligated to use this feature. However we understand that this tool wouldn’t be useful if you couldn’t customize it when you are ready for it.
You can learn more in the Create React App documentation.
To learn React, check out the React documentation.
This section has moved here: https://facebook.github.io/create-react-app/docs/code-splitting
This section has moved here: https://facebook.github.io/create-react-app/docs/analyzing-the-bundle-size
This section has moved here: https://facebook.github.io/create-react-app/docs/making-a-progressive-web-app
This section has moved here: https://facebook.github.io/create-react-app/docs/advanced-configuration
This section has moved here: https://facebook.github.io/create-react-app/docs/deployment
This section has moved here: https://facebook.github.io/create-react-app/docs/troubleshooting#npm-run-build-fails-to-minify
