Stateful HTTP mocking service built on top of HAPI. Easily add routes and different scenarios for each route including the ability to maintain state with an admin interface to control everything.
With smocks you can
- create route definitions (with dynamic tokens)
- define multiple route handlers (variants) for for any route (selectable through an admin panel)
- add input configuration components for routes and variants (accessable through an admin panel)
- define actions which can manipulate the current state and be executed from the admin pnael
- use route request handlers that can keep a state for true dynamic mocking capabilities
- define global request handlers (variants) which can be selected for any route
- use plugins which can intercept all requests to perform actions
- use a RESTful API to make configuration changes programatically
- Replay exports from HAR files
- be able to use as a direct proxy to real service endpoints
After you define your fixtures, you will want to start the server (or you can actually refer to your fixtures with an API if you want to use with unit tests).
There are 2 ways to start the server:
Starting the server directly
require('smocks/hapi').start({
  // options provided to Hapi.Server.start
  port: 8080,
  host: 'localhost'
}, {
  // smocks core options
});
Or, you can just export a Hapi plugin to be included elsewhere
var plugin = require('smocks/hapi').toPlugin({
  // hapi plugin options
  onRegister: function (server, options, next) {
    // this is optional but "next" must be called if used
  }
}, {
  // smocks core options
});
plugin.attributes = {
  pkg: require('/path/to/package.json')
};
module.exports = plugin;
The different smocks core options are discussed in detail below.
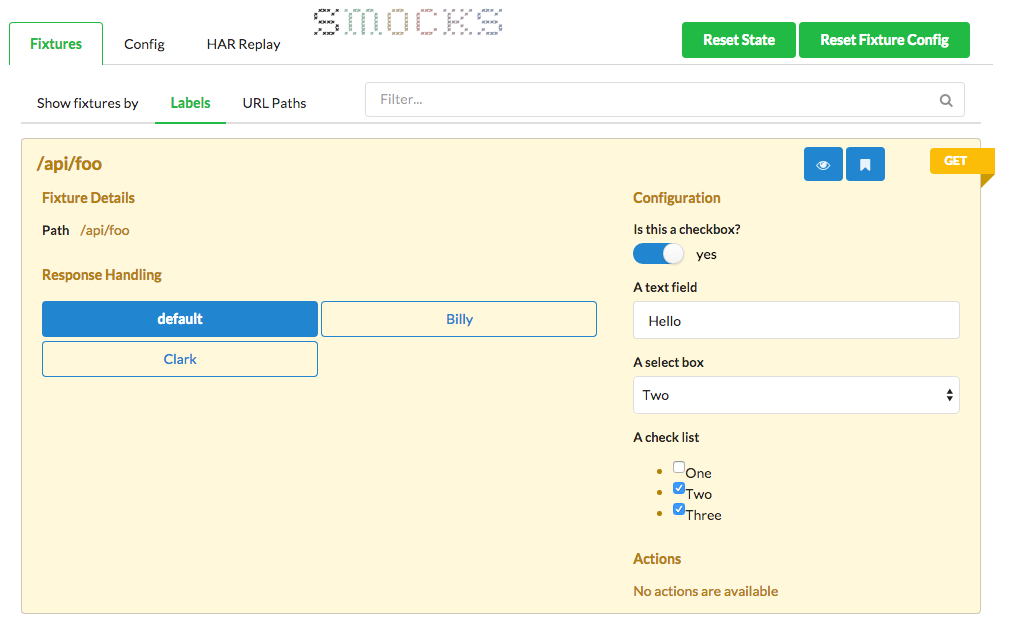
Whenever the mock server is running, you can view an admin panel at {host}:{port}/_admin. Using this, you can
- Select what type of response your routes should have (see Variants)
- Execute route specific actions (see Actions)
- View all available routes by label or path
- Set route specific or global input fields (see Route / Variant Input)
- Save all current settings as a profile (selected route variant and input values) to be applied at a later time (see Profiles)
Throughout these docs, you will see different screenshots to understand how different route configurations are represented in the admin panel.
A route by itself is really nothing more than a HAPI route. The route definition has a handler attribute which is called when the endpoint is hit. This handler is nothing more than a HAPI route handler.
Routes are defined using the route method on the smocks object. An object parameter is provided with the following attributes
- id: (optional) the route id - used for the RESTful admin API and profile settings
- label: (optional) the route label - used for display on the admin panel
- path: the route path
- method: (optional) the route method - defaults to
GET - handler: (optional) the HAPI route handler which provides the route response. This is optional because you could use multiple vairants to handle the response. (see Variants).
- input: An object contain input values which should be shown in the admin panel (see Input)
- display: A function which can return markdown where the contents are exposed when viewing the route information on the amin panel
- actions: An object containing a set of actions associated with this route (see Actions)
- config: HAPI route options
- connection: optional connection label for route to be added to. allows for smocks endpoint to run on port of choice, for instance.
In more detail, you can...
Add input parameters that are exposed through the admin panel
var smocks = require('smocks');
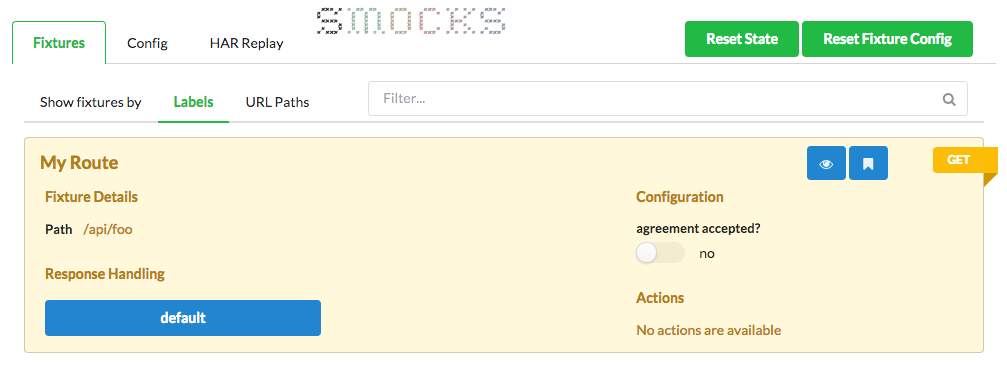
smocks.route({
// labels aren't required but make things easier to view in the admin panel for non-technical people
id: 'my_route',
label: 'My Route',
path: '/api/foo',
method: 'GET',
input: {
// more about config later
agreementAccepted: {
label: 'agreement accepted?',
type: 'boolean',
defaultValue: false
}
},
handler: function(request, reply) {
// you can control this value through the admin panel
var agreementAccepted = this.input('agreementAccepted');
reply({accepted: agreementAccepted});
}
})
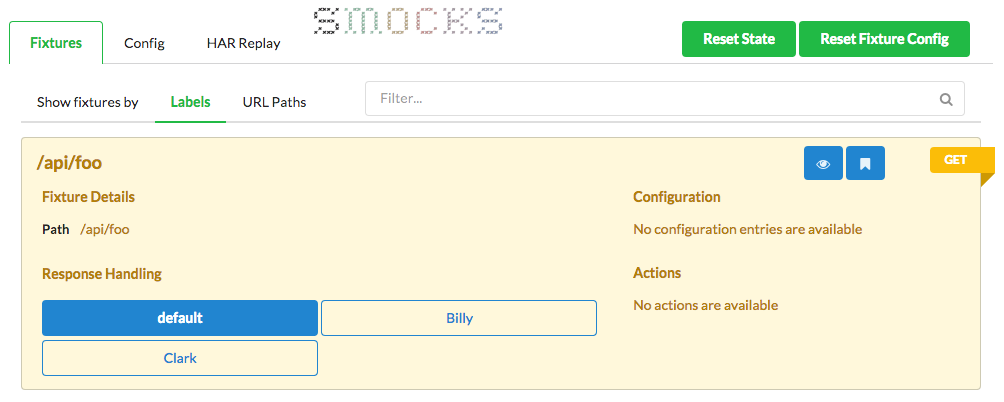
Provide multiple response types for each route (called Variants). With the variants below, you can select which type of response the /api/foo route should respond with in the admin panel. More about variants later...
    var smocks = require('smocks');
    smocks.route({
      id: 'my_route',
      path: '/api/foo',
      handler: function(request, reply) {
        // this is essentially the same as the "default" variant
        reply({firstName: 'John'});
      }
    })
    .variant({
      // in this case the label really isn't necesary since it would be the same as the id
      id: 'Billy',
      handler: function(request, reply) {
        reply({firstName: 'Billy'});
      }
    })
    .variant({
      // in this case the label really isn't necesary since it would be the same as the id
      id: 'Clark',
      handler: function(request, reply) {
        reply({firstName: 'Billy'});
      }
    })
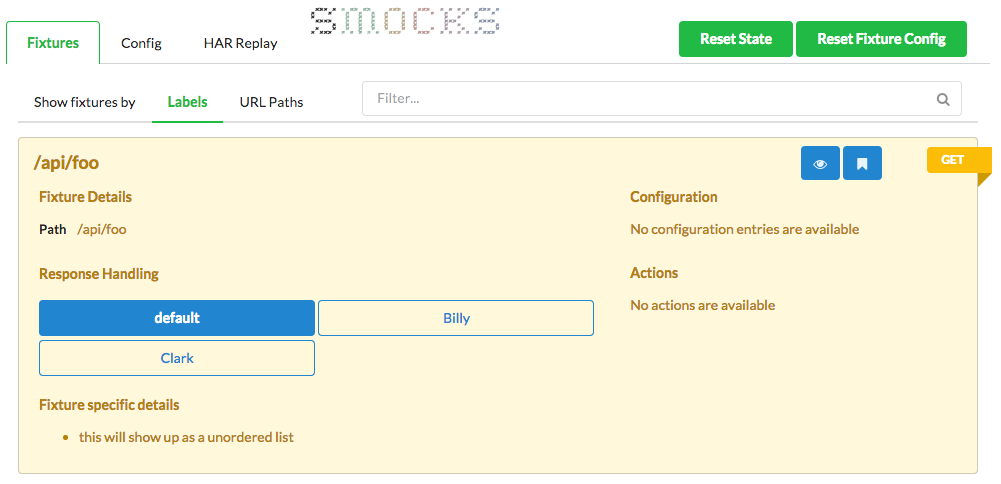
You can provide a display value which will be used when viewing the route details in the admin panel. We haven't discussed state yet but this is meaningful to represent the current state of things for quick glance in the admin panel. The admin panel supports markdown for your display response.
    var smocks = require('smocks');
    smocks.route({
      // ...
      display: function() {
        return '* this will show up as a unordered list';
      }
    })
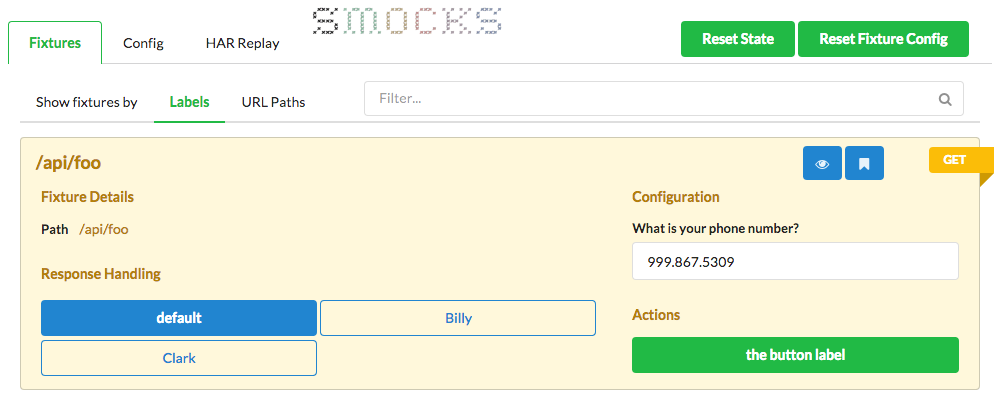
You can expose "actions" which are represented as buttons. These are meaningful to quickly make changes to the state of things. Actions, like routes and variants, can accept config parameters which will allow you to input data required to perform the action.
    var smocks = require('smocks');
    smocks.route({
      // ...
      input: {
        yourPhoneNumber: {
          label: 'What is your phone number?',
          type: 'text',
          defaultValue: '999.867.5309'
        }
      },

      // now define our action for the previous route
      actions: {
        'the_action_id': {
          label: 'the button label',
          input: {
            yourName: {
              label: 'What is your name?',
              type: 'text',
              defaultValue: 'John Doe'
            }
          },
          handler: function(config) {
            // this is how you access action specific user input
            var yourName = config.yourName;
            // this is how you access user input created for the route
            var phoneNumber = this.input('yourPhoneNumber');
            // now I would perform whatever action needs to be taken
            // I would make changes to "state" most likely (more about state later)
          }
        }

      }
    })
You can use dynamic parameters in the route path, get access to query parameters and the body payload. See path parameters for more details.
    var smocks = require('smocks');
    smocks.route({
      path: '/api/customer/{id}'
      handler: function(config) {
        // would be "123" if the endpiont hit was "/api/customer/123"
        var id = request.params.id;

        // would be "bar" if the endpoint hit was "/api/customer/123?foo=bar"
        var foo = request.query.foo;

        // would be "bar" if the posted body content (as JSON) was {"foo": "bar"}
        var foo = request.payload.foo;
      }
})We briefly touch on variants when discussing routes but variants are route handlers that can be selected by you in the admin panel (or with a RESTful API) to determine what type of response a route should have.
Routes are defined using the variant method on the Route object (returned by calling the route method. An object parameter is provided with the following attributes
- id: (optional) the route id - used for the RESTful admin API and profile settings
- label: (optional) the route label - used for display on the admin panel
- input: An object contain input configuration data to be shown in the admin panel (see Input)
- handler: (optional) the HAPI route handler which provides the route response
Variants are useful because they allow yout test multiple scenarios that can happen with your route. Say, for example, you have a route exposing the ability to update a password. You might have several exceptional scenarios that you would want to test out (each could be a vairant that you simply select to tell the route handler to use the appropriate response)
- the password was reset successfully
- the password didn't pass validation
- the old password wasn't entered correctly
- the username doesn't exist
- and so on...
In more detail, you can...
Have multiple variants associated with a single route
    var smocks = require('smocks');
    smocks.route({...})

      .variant(...)

      .variant(...)

      .variant(...)
Add variant specific config parameters (only visible if the variant is selected as the active variant) that are exposed through the admin panel
    var smocks = require('smocks');
    smocks.route({...})

      .variant({
        id: 'invalid_password',
        label: 'invalid password',
        handler: function(request, reply) {
          // the input value is retrieved using this.input('varName');
          var typeOfValidationError = this.input('typeOfValidationError')
          reply({error: 'field', message: typeOfValidationError}).code(400);
        },
        input: {
          // the key is the identifier used to retrieve the value
          typeOfValidationError: {
            // the input field label
            label: 'What type of validation error?',
            // type can be "boolean", "text", "select", "multiselect"
            type: 'text',
            // the value shown if no selection has been made
            defaultValue: 'password too short'
          }
        }
})Different types of input fields can be defined for routes or variants including boolean, text, select, multiselect. Through the admin panel, you can modify these input values and they can be accessed in your route handler.
Routes and Variants when defined can provide an optional input attribute which defines any input fields that should be shown in the admin panel. This input attribute is an object with each attribute relating to a single input field and the associated key as the input field id.
The attributes for each input field setting are
- label: the input field label
- type: the input field type (
boolean|text|select|multiselect) - defaultValue: the value for the input field when the user has not yet made a selection in the admin panel
- options: (specific to
selectandmultiselect) an array of options for the input field. Each element in the array is an object with avalueandlabelattribute.
Input values are referenced using this.input('varName') where varName is the specific input attribute key.
    smock.route({
      ...
      input: {
        aBooleanField: {
          label: 'Is this a checkbox?',
          type: 'boolean',
          defaultValue: true
        },
        someTextField: {
          label: 'A text field',
          type: 'text',
          defaultValue: 'Hello'
        },
        someSelectBox: {
          label: 'A select box',
          type: 'select',
          options: [{label: 'One', value: 1}, {label: 'Two', value: 2}, {label: 'Three', value: 3}],
          defaultValue: 2
        },
        someMultiSelect: {
          label: 'A check list',
          type: 'multiselect',
          options: [{label: 'One', value: 1}, {label: 'Two', value: 2}, {label: 'Three', value: 3}],
          defaultValue: [2, 3]
        }
      },
      handler: function(request, response) {
        var aBooleanField = this.input('aBooleanField'); // boolean
        var someTextField = this.input('someTextField'); // string
        var someSelectBox = this.input('someSelectBox'); // integer (because the values are integers)
        var someMultiSelect = this.input('someMultiSelect'); // array of integer (because the values are integers)
        // ...
      });
The same config values can be applied at the variant level as well.
This is similar to Route / variant input except that these values are not exposed within the admin console. They are accessable within the route handlers though.
This is mostly useful for global plugins (see Plugins).
Within the route handler, the options values can be accessed by using this.meta('varName').
    var smocks = require('smocks');

    smocks.route({
      ...
      meta: {
        requiresLogin: true
      },
      handler: function(request, reply) {
        // this doesn't make a lot of sense because the value is defined here
        // but would actually make more sense as a plugin... this is just showing
        // how you would (and could) get the meta value in a route handler
        var value = this.meta('requiresLogin');
        ...
      }
);The real benefit to using smocks is that state can be maintained. Within any response handler, use this.state('varName') to access an object stored in the state and this.state('varName', 'varValue') where varValue can be any type of object you want. There is a button on the admin panel which allows you to reset the state and start over.
    var smocks = require('smocks');

    smocks.route({
      route: '/api/login',
      method: 'POST',
      handler: function(request, reply) {
        // now you can use this.state('loggedIn') in any route handler to see if the user has logged in
        this.state('loggedIn', true);
        reply().code(204);
      }
});There are 3 different ways of introducting dynamic behavior into your responses but each serve a different purpose.
input
Input values are exposed as input fields in the admin panel so you have the ability to change the value at runtime.
These are accessed using this.input('varName') in any route handler.
state
State is used to, obviously, maintain state. For example, if you expose a route that adds a new piece of data, you should store it in state. The user can reset the state with a button on the admin panel.
State values can be accessed using this.state('varName').
State values can be set using this.state('varName', 'value').
meta
Meta settings are like config but are not exposed in the admin panel. These are most useful to expose metadata for a global pugin. For example, you could have a plugin that examined all requests and, if the user hasn't signed in yet, respond with a 401 error. The routes could expose a meta value that indicated whether they were routes that required authentication.
These are accessed using this.meta('varName').
Plugins can be used to perform an action on all requests or just to encapsulate a set of route handlers. Plugins can have config values just like Routes or Variants.
Plugins are just simple objects that have the following attributes
-
plugin: (optional) if exists, will simply be called with a single parameter (the smocks object) so you can add new routes.
-
input: (optional) input definitions to allow the user with different types of input fields in the admin panel. See the next section (Input types) for more details
-
onRequest: Called before the route handler (variant) executes for every request. It is similar to the (request, reply) of the route handlers (Variants) but has an additional callback method that should be executed when the plugin has finished doing what it needs to do.
-
onResponse: Called after the route handler (variant) executes for every request. Parameters are similar to
onRequestexcept the 2nd parameter is the return value from the reply method (see response object).
The following plugin will add simulated latency (which can be controlled by the user) to all requests.
    var smocks = require('smocks');
    smocks.plugin({
      // define the input field for the admin panel allowing the user to adjust the delay
        input: {
          delay: {
            label: 'Add delay to all responses',
            type: 'select',
            options: [{label: 'no delay', value: 0}, {label: '1 sec', value: 1000}, {label: '5 sec', value: 5000}],
            defaultValue: 0
          }
        },

        // call "next" after a timeout if the user requested a delay
        onRequest: function(request, reply, next) {
          // get the delay value from config
          var delay = this.input('delay');
          if (delay > 0) {
            // if there is a delay, call next after a timeout
            setTimeout(next, delay);
          } else {
            next();
          }
        },

        onResponse: function(request, response) {
          // I can do things to the response here
          response.code(404);
        }
      })
Or, check to see if the use has logged in (assuming the route exposed a requiresLogin option; see Route Options). We are using state (see State) to track if the login endpoing has been hit prior to the current route.
    var smocks = require('smocks');
    smocks.plugin({
      onRequest: function(request, reply, next) {
        // only do this check if the route exposed a "requiresLogin" option
        if (this.meta('requiresLogin')) {
          // now, see if we have previously logged in (the login route would have set this state value)
          if (!this.state('loggedIn')) {
            // if we haven't logged respond with a 401 and bypass calling "next"
            return reply({error: 'auth', message: 'Not logged in'}).code(401);
          }
        }

        next();
      }
});Smocks can use one or more connections for where to set endpoints. The main
endpoints are set using smocks.connection('label') where label is the name
of the connection.
This is useful for where smocks is setup as a plugin.
Example:
var hapi = require('hapi');
var smocks = require('smocks');
var server = new hapi.Server();
server.connection({ port: 8080, labels: 'main' });
server.connection({ port: 8088, labels: 'smocks' });
server.connection({ port: 8089, labels: 'mockhost1' });

smocks.id('example'); // must set
smocks.connection('smocks');

var plugin = require('smocks/hapi').toPlugin({
    onRegister: (server, options, next) => {

         smocks.route({
            id: 'counter',
            connection: 'mockhost1',
            method: 'GET',
            path: '/',
            label: 'Simple get',
            handler: function (request, reply) {
                return reply('you got!');
            }
         });
        return next();
    }
});

server.register({ register: plugin, options: {} }, function (err) {
    server.start(function () {
        // ..
    });
});
This way the main server is not affected by the smocks routes, and there is no risk of endpoint collision. Here all the admin connections are on the admin connection, and the mocked host is on it's own. This is useful when mocking external hosts that the code may rely on.
When a connection is not explicitly defined, the smocks routes will show up on ALL connections.
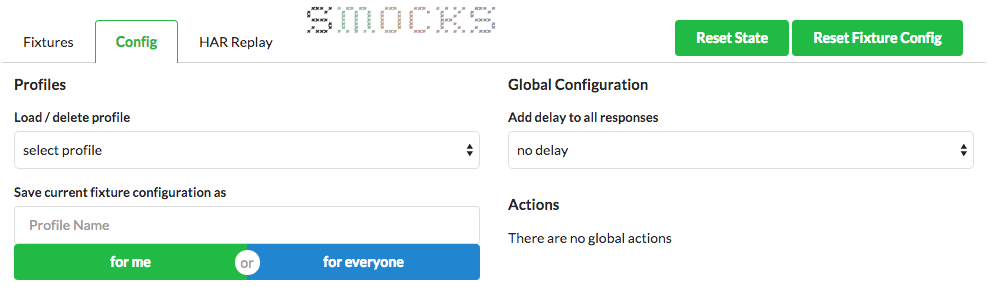
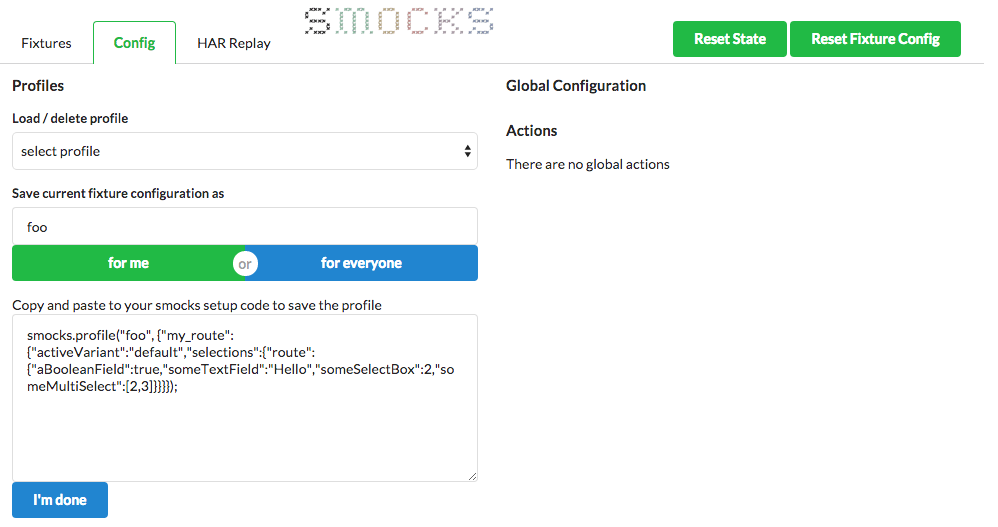
Using the Admin Panel, you can save all route, variant and input settings as a "profile". Profiles can either be saved locally (using localStorage) or remotely by providing the code to update in your project.
The profiles can also be changed using an admin endpoint (for example, to use this with an automated testing solution). To do so, simply POST to {host}:{port}/_admin/api/profile/{profile name}.
Global profiles can be set applied to the smocks object. The easiest way to do this is to make your changes in the admin panel, enter the Profile Name in the settings header, and click the for everyone button. You will be provided with the code that is necessary for the provide to be loaded globally.
reset the state
POST to {host}:{port}/_admin/api/state/reset
set an active route variant POST to ```{host}:{port}/_admin/api/route/{routeId}/variant/{variantId}
select a profile
POST to /_admin/api/profile/{profile name}
Using Google Chrome and other browsers, you can create a HAR file which is basically a recording of the network activity during your session.
The smocks server has the ability to upload a HAR file and reply the exact payloads as seen in the browsing session. This is intended to only be used with a RESTful API and has the following caviats
- Only the
.jsonresponses will be recorded - The HAR response will be rendered as long as the path and method match (query parameters and request payload are not evaluated)
- Network calls defined in the HAR but are not defined with the Smocks server will return a 404
Click the Har Reply tab to upload a HAR file
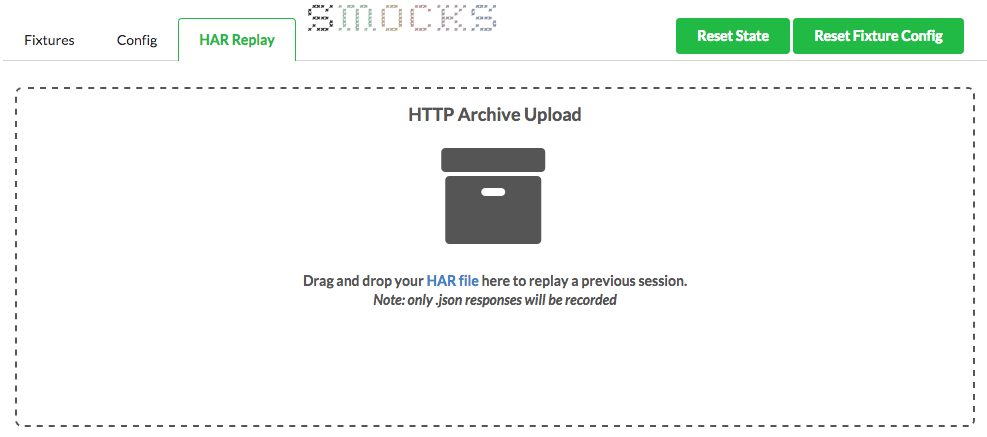
Drag and drop your HAR file into the HTTP Archive Upload box

There may be cases where you need to alter the URL of what is in the .har file to match what the
mock server will respond to. These can be set as pathMapper in the har options when starting the smocks server
require('smocks/hapi').start({
  // hapi options
}, {
  // smocks options
  har: {
    pathMapper: function (path) {
      if (pathFromHarShouldBeReturned) {
        return convertPathInSomeWay(path); // or leave as-is
      }
      // if nothing is returned, the mock server will just respond
      // normally to what would represent this path
    }
  },
You can use smocks to be a straight proxy to another server. To do so, you must provide the proxy details in the hapi start options. n
require('smocks/hapi').start({
  // hapi options
  port: 8000,
  host: 'localhost',
}, {
  // smocks options
  proxy: {
    '{key shown in admin panel}': '{fully qualified endpoint prefix before the request path}',
    // example
    'google': 'http://www.google.com'
    // or, using a function
    'google': function (request) {
      return ...
    }
  }
});
View the Config tab on the admin panel to make any proxy setting changes.
- options: object containing the following values
- path: the route path (must start with
/). Ex:/api/customer/{id} - label: An optional human readable label that can be seen in the admin panel for this route
- method: optional method (GET is default)
- handler: optional default route handler (same as the first variant applied to this route)
Register a route handler to enable setting the method, adding variants or config properties.
To see how variables can be used in the path, refer to the HAPI routing guide.
Return the associated Route object.
    var smocks = require('smocks');
    smocks.route({
      method: 'POST', // optional if method is 'GET'
      path: '/api/customer/{customerId}',
      handler: function(request, reply) {
        // route handler but we would use replyWith if we have
        // multiple variants
      }
    })
    .replyWith(function(request, reply) {
      // another way of definiting route handlers
    })
...- plugin: the plugin object
Register the plugin. See the plugin object type for details. Return the global object.
- options: either object {host, port} or a HAPI server instance
Start a HAPI server with the defined mock configuration.
Both the host and port are optional and will default to localhost and 8080.
If a HAPI server instance is provided, the routes will be bound to the HAPI server provided but the start method will not be called.
Refer to global:route
- attributes: The input attributes
Set any input attributes that will be available for modification on the admin panel.
See config example for details.
Return the same route object for chaining.
    var smocks = require('smocks');
    smocks.route({
      ...
      input: {
        myVar: {
          label: 'Input label',
          type: 'boolean|text|select|multiselect',
          defaultValue: ...
        }
      })
.respondWith(...)- id: the variant id
Set up a new route variant with the provided id. The id is meaningful when selecting the active variant from the admin panel.
A variant is basically a single request handler for a defined route. This is useful to test out different scenarios for a single route definition.
Return the Variant object.
    var smocks = require('smocks');
    smocks.route(...)
    .variant('respond like this').respondWith(...)
.variant('respond like that').respondWith(...)Refer to global:plugin
- requestHandler: The RequestHandler
Convienance method for creating a default variant (id of "default") and then calling Variant:respondWith on the variant.
Convienance method for creating a default variant (id of "default") and then calling Variant:respondWithFile on the variant.
Refer to global:route
- attributes: The input attributes
Set any variant-scoped input attributes that will be available for modification on the admin panel.
See input example for details.
Return the same Variant object for chaining.
Refer to Route:variant
Refer to global:plugin
- requestHandler: The RequestHandler
Associate a request handler with the current route/method/variant combination.
Return the same Variant object for chaining.
    var smocks = require('smocks');
    smocks.route(...).respondWith(function(request, reply) {
      var theMessage = request.params.message;
      var aQueryStringValue = request.query.theQueryStringKey;
      reply({message: theMessage}); // reply with a JSON payload
      // or reply with something else
      reply({error: {message: 'Some unknown error'}}).code(500);
});- options: options to override the default values. (These options can also be globally provided in the smocks core options when starting the server, see (Starting the server)
- mockDir: The base directory where the mocking data exists.
- default value set to
./mocked-data
- default value set to
- fileName: The file name smocks will search for in the mockDir directory structure and then set as the response.
- default value set to
response.json
- default value set to
- statusCode: The status code of the response.
- Default value set to
200
- Default value set to
- mockDir: The base directory where the mocking data exists.
This method enables you to have your json files in a route similar directory structure as follows.
Remember that using ./ will refer to the top level module directory (the directory where node_modules exists regardless of the location of the file that is referring to a file location with ./);
Example 1
    var smocks = require('smocks');
    smocks.route({path: '/customer/{id}'}).respondWithFile()
    .start(...)
This would cause a request to /customer/123 to return the file ./mocked-data/customer/default/response.json where defaultis the variant id, the dynamic {id} in the path will not be used here.
Example 2
    var smocks = require('smocks');
    smocks.route({path: '/customer/{id}'}).variant({id: 'invalid_customerid'}).respondWithFile({mockDir: './mocks, fileName: 'variantfile.json', statusCode: 422})
    .start(...)
This would cause a request to /customer/123 on the variant invalid_customerid to return the file ./mocked-data/customer/invalid_customerid/response.json where defaultis the variant id, the dynamic {id} in the path will not be used here.
If the response.json file doesn't exist in the variant directory, smocks will search for it in the parent directory (i.e. ./mocked-data/customer/response.json) and use it for both example 1 and example 2 above. This is useful if you want to respond with the same file for all your variants on the same path.