Archived and looking for active maintainers. Check out
@wordpress/create-block.
create-guten-block is zero configuration dev-toolkit (#0CJS) to develop WordPress Gutenberg blocks in a matter of minutes without configuring React, webpack, ES6/7/8/Next, ESLint, Babel, etc.
create-guten-blockis zero configuration dev-toolkit (#0CJS) to develop WordPress Gutenberg blocks in a matter of minutes without configuringReact,webpack,ES6/7/8/Next,ESLint,Babel, etc.
Create Guten Block is not like other starter-kits or boilerplates. It's a developer's toolbox which is continuously updated. Since it has zero-configuration, you can always update it without any changes in your code.
create-guten-block is:
- 🥞 Versioned ✓
- 🤠 Updatable ✓
- 🗃 Set of sane-defaults ✓
- 🐎 ONE single
cgb-scriptsdependency ✓ - 💯 100s of WordPress plugins built with
create-guten-block✓
Let's create a WordPress block plugin...
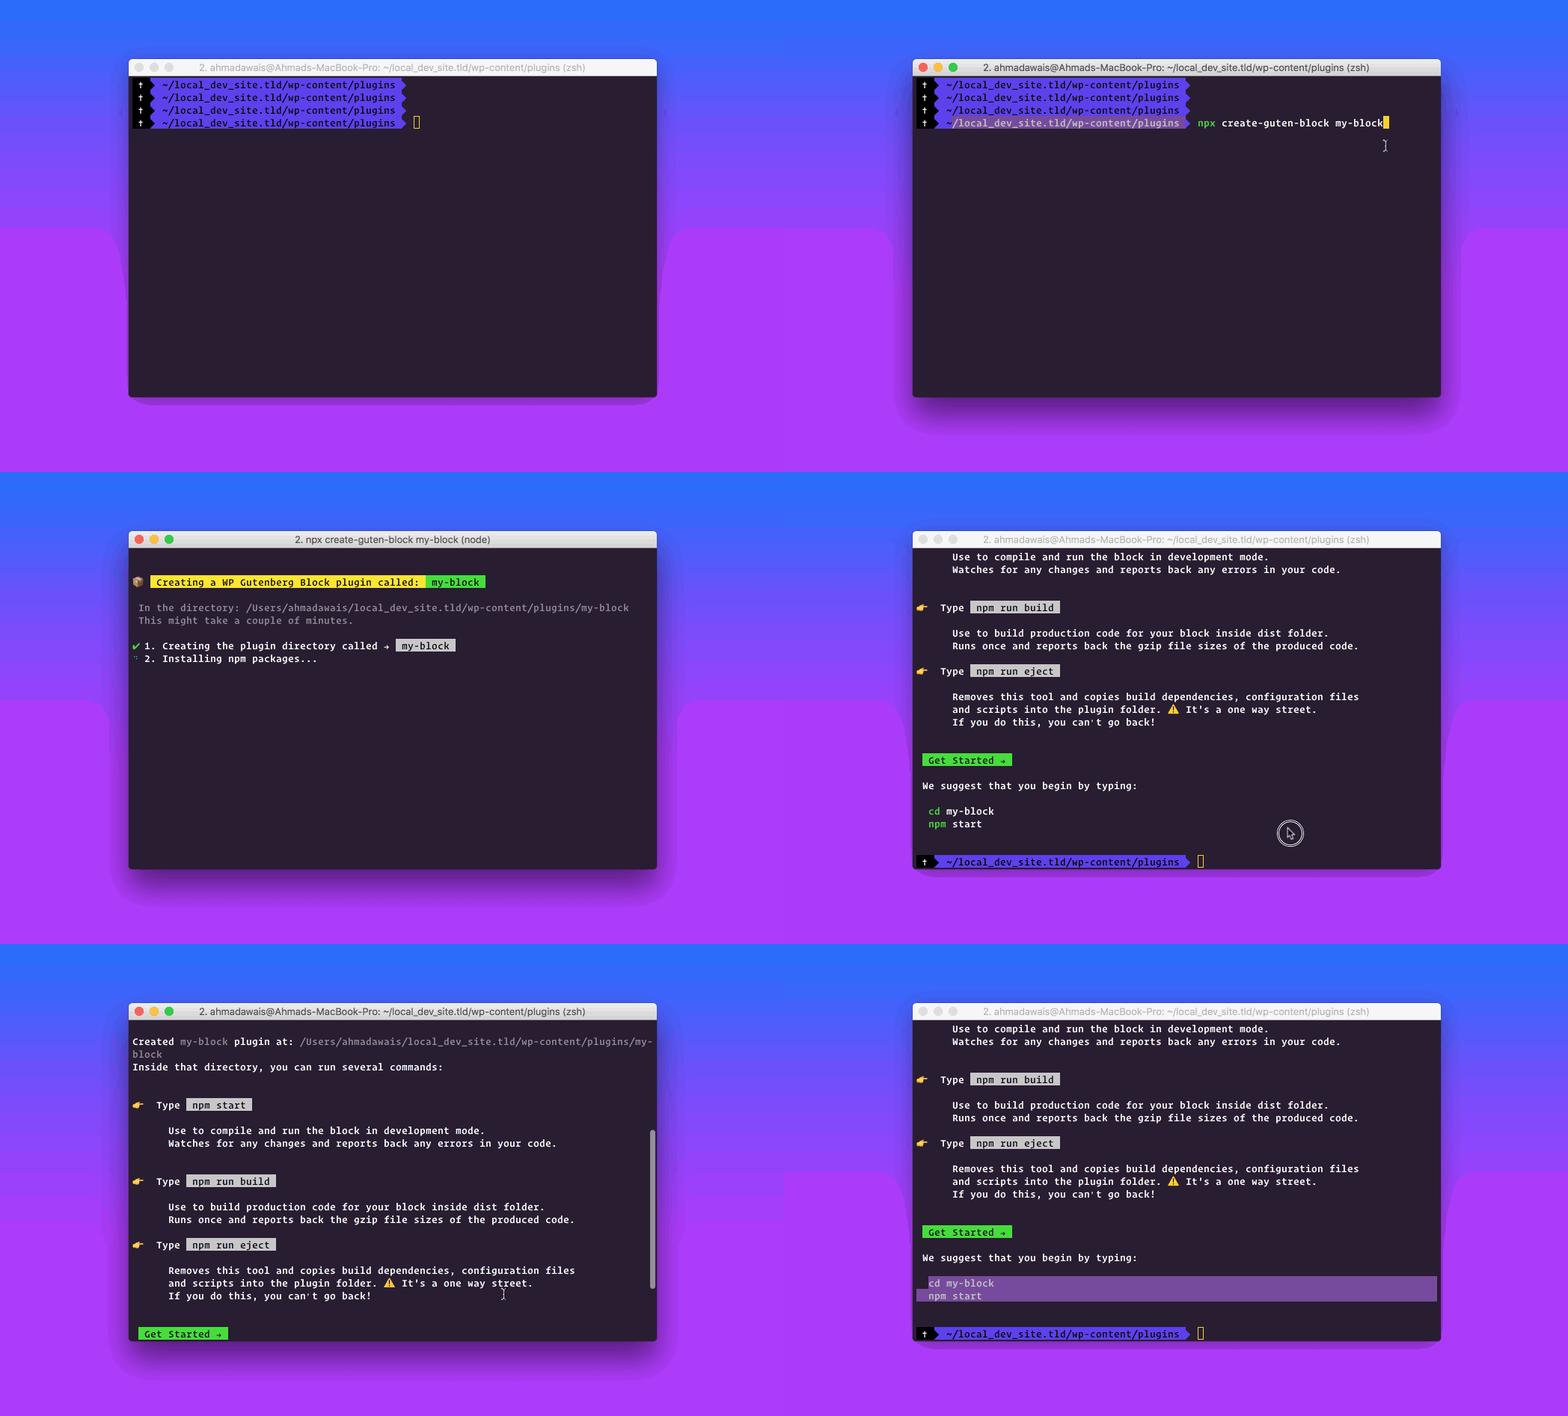
Run step #1 and #2 quickly in one go — Run inside local WP install E.g. /wp.local/wp-content/plugins/ directory.
npx create-guten-block my-block
cd my-block
npm start(npx comes with npm 5.2+ and higher, see instructions for older npm versions)
🎛 If you want to study the detailed installation of step
#1and#2— then take a look at the steps below.
STEP #0 — Don't have Node.js + npm installed? Read this. (CLICK TO EXPAND!)
In case you are an absolute beginner to the world of Node.js, JavaScript, and npm packages — all you need to do is go to the Node's site download + install Node on your system. This will install both Node.js and npm, i.e., node package manager — the command line interface of Node.js.
You can verify the install by opening your terminal app and typing...
node -v
# Results into v9.1.0 — make sure you have Node >= 8 installed.

npm -v
# Results into 5.6.0 — make sure you have npm >= 5.3 installed.All you have to do is run the following command and it will create a WordPress block plugin. It's done by installing and running the create-guten-block command and providing it with a unique name for a WordPress plugin that will get created.
⚠️ Make sure run this command in your local WordPress install's plugins folder i.e./local_dev_site.tld/wp-content/plugins/folder — since this command will produce a WordPress plugin that you can go toWP Admin▶︎Pluginsto activate.
npx create-guten-block my-block(npx comes with npm 5.2+ and higher, see instructions for older npm versions)
It'll take a couple of minutes to install.
You’ll need to have Node >= 8 and npm >= 5.3 on your local development machine (but it’s not required on the server). You can use nvm (macOS/Linux) or nvm-windows to easily switch Node versions between different projects.
It will create a directory called my-block inside the current folder.
Inside that directory, it will generate the initial project structure and install the transitive dependencies:
INSIDE: /local_dev_site.tld/wp-content/plugins/my-block

├── .gitignore
├── plugin.php
├── package.json
├── readme.md
|
├── dist
|  ├── blocks.build.js
|  ├── blocks.editor.build.css
|  └── blocks.style.build.css
|
└── src
   ├── block
   |  ├── block.js
   |  ├── editor.scss
   |  └── style.scss
   |
   ├── blocks.js
   ├── common.scss
   └── init.php
No configuration or complicated folder structures, just the files you need to build your app.
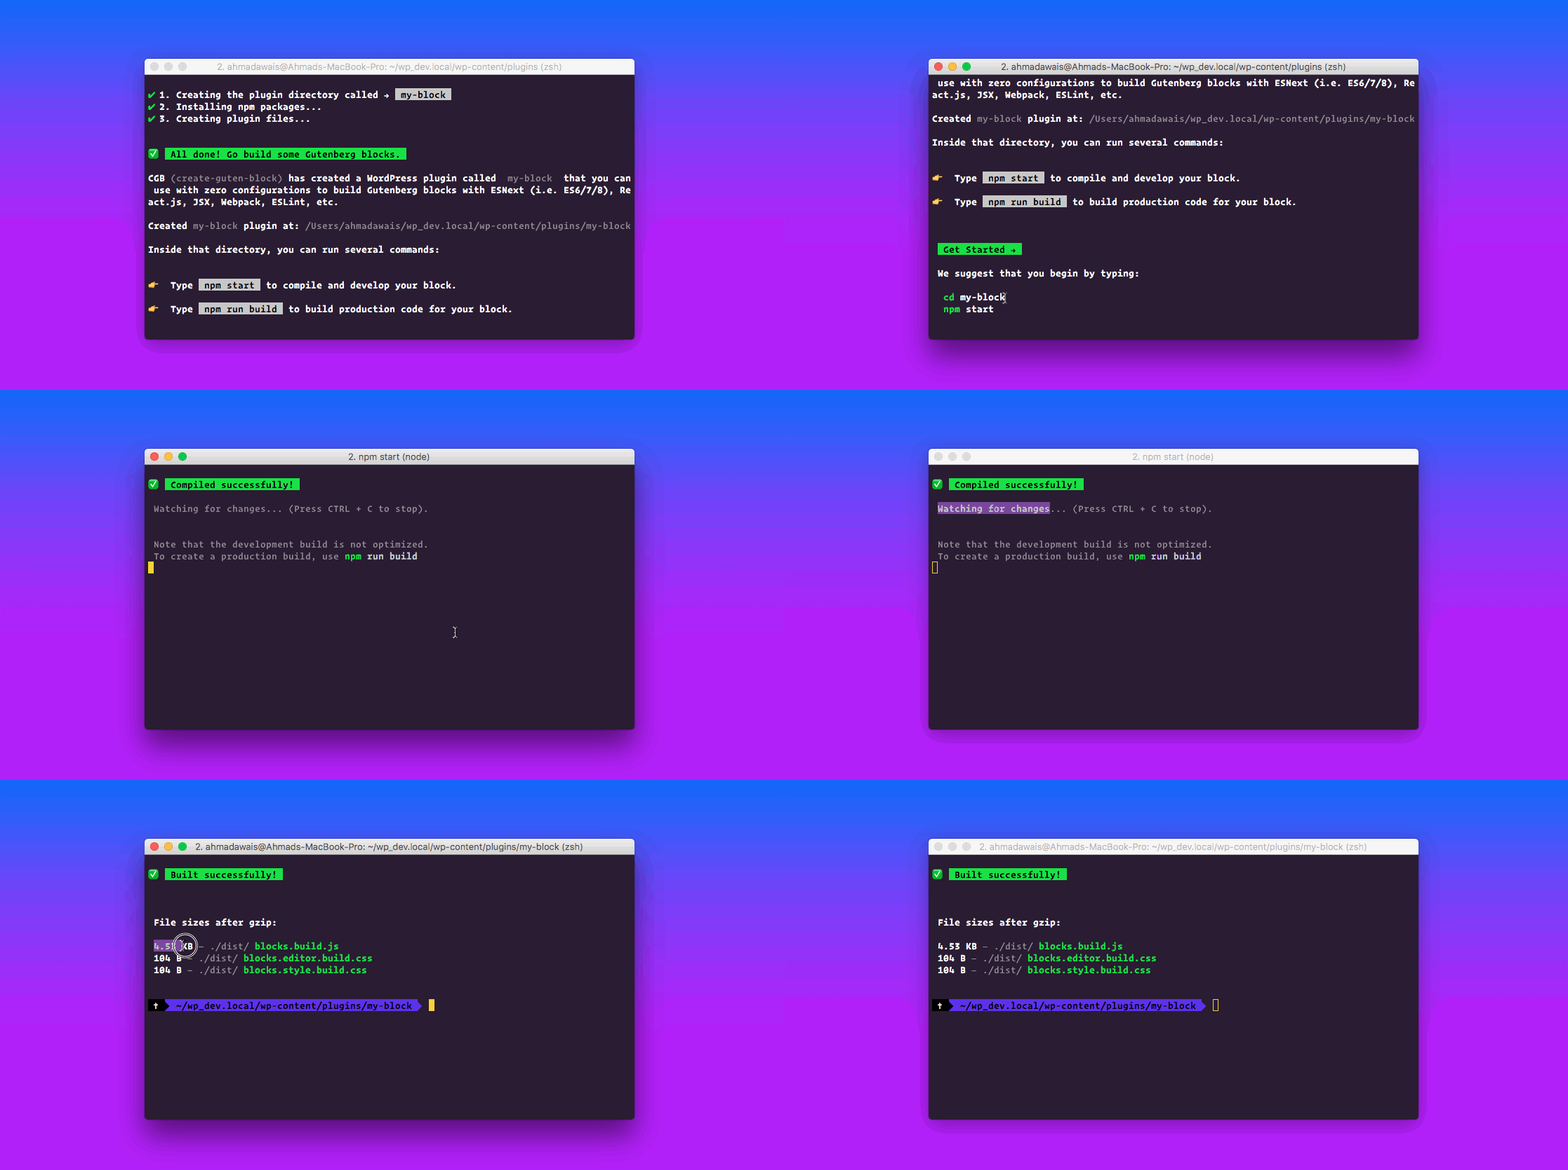
Once the installation is done, you can open your project folder and run the start script.
Let's do that.
cd my-block
npm start
You can also use yarn start if that's your jam.
This runs the plugin in development mode. To produce production code run npm run build.
You will see the build messages, errors, and lint warnings in the console.
And just like that, you're building your next WordPress plugin with Gutenberg, React.js, ES 6/7/8/Next, transpiled with Babel, which also has ESLint configurations for your code editor to pick up and use automatically.
There are just three scripts that you can use in your create-guten-block workflow. With these three scripts, you can develop, build, and eject your plugin.
- Use to compile and run the block in development mode.
- Watches for any changes and reports back any errors in your code.
- Use to build production code for your block inside
distfolder. - Runs once and reports back the gzip file sizes of the produced code.
- Use to eject your plugin out of
create-guten-block. - Provides all the configurations so you can customize the project as you want.
- It's a one-way street,
ejectand you have to maintain everything yourself. - You don't normally have to
ejecta project because by ejecting you lose the connection withcreate-guten-blockand from there onwards you have to update and maintain all the dependencies on your own.
That's about it.
Your environment will have everything you need to build a modern next-gen WordPress Gutenberg plugin:
- React, JSX, and ES6 syntax support.
- webpack dev/production build process behind the scene.
- Language extras beyond ES6 like the object spread operator.
- Auto-prefixed CSS, so you don’t need
-webkitor other prefixes. - A build script to bundle JS, CSS, and images for production with source-maps.
- Hassle-free updates for the above tools with a single dependency
cgb-scripts.
The tradeoff is that these tools are preconfigured to work in a specific way. If your project needs more customization, you can "eject" and customize it, but then you will need to maintain this configuration.
-
One Dependency: There is just one build dependency. It uses webpack, Babel, ESLint, and other amazing projects, but provides a cohesive curated experience on top of them.
-
No Configuration Required: You don't need to configure anything. A reasonably good configuration of both development and production builds is handled for you so you can focus on writing code.
-
No Lock-In: You can
ejectto a custom setup at any time. Run a single command, and all the configuration and build dependencies will be moved directly into your project, so you can pick up right where you left off.
Well, it's really hard to configure things like webpack, React, ES 6/7/8/Next, ESLint, Babel, etc. before you even start writing a Hello World Gutenberg block. Then there's the fact that you have to maintain and constantly update your configuration with all the new tools and growth in the JavaScript community.
create-guten-block hides all this configuration away in an optimized package that we call cgb-scripts. This package is the only dependency in your projects. We keep cgb-scripts up to date while you go ahead and create the next best WordPress themes and plugins.
Too long, didn't read? Here's a shorter version.
Open the terminal app and run the following commands.
- 🔰 Install/Create:
npx create-guten-block my-block— Run inside local WP install E.g./wp.local/wp-content/plugins/directory. - 📂 Browse:
cd my-block— Open the newly created plugin directory. - ♻️ Run:
npm start— For development. - 📦 Run:
npm run build— For production build. - ⏏ Run:
npm run eject— To customize, update, and maintain all by yourself.
Create-Guten-Block has been tested to work on macOS, but must also work on Windows, and Linux. If something doesn’t work, kindly file an issue →
Create Guten Block is divided into two packages:
create-guten-blockis a command-line utility that you use to create new WP Gutenberg plugins.cgb-scriptsis a development dependency in the generated plugin projects.
You never need to update create-guten-block itself as it's run via npx and it delegates all the setup to cgb-scripts.
When you run create-guten-block, it always creates the project with the latest version of cgb-scripts so you’ll get all the new features and improvements in newly created plugins automatically.
To update an existing project to a new version of cgb-scripts, open the changelog, find the version you’re currently on (check package.json in your plugin's folder if you’re not sure), and apply the migration instructions for the newer versions.
In most cases bumping the cgb-scripts version in package.json and running npm install in this folder should be enough, but it’s good to consult the changelog for potential breaking changes.
We commit to keeping the breaking changes minimal so you can upgrade cgb-scripts painlessly.
Read what's 📦 new, 👌 improved, 🐛 fixed, and if 📖 docs got updated.
👉 Go read the entire changelog at this link — CGB Changelog →
Nothing's ever complete, so bear with us while we keep iterating towards a better future.
'Coz every night I lie in bed
The brightest colors fill my head
A million dreams are keeping me awake
I think of what the world could be
A vision of the one I see
A million dreams is all it's gonna take
A million dreams for the world we're gonna make ...
... listen to → A million dreams!
Hello, we're The Dev Couple!
Me (Ahmad Awais) and my incredible wife (Maedah Batool) are two engineers who fell in love with open source and then with each other. You can read more about me here. If you or your company use any of my projects or like what I’m doing then consider backing me. I'm in this for the long run. An open-source developer advocate.
NodeCLI.com — Learn to build Node.js CLI Automation
This repository is part of the NodeCLI.com course.
After building hundreds of developer automation tools used by millions of developers, I am sharing exactly how you can do it yourself with minimum effective effort. Learn to build Node.js & JavaScript based CLI (Command Line Interface) apps. Automate the grunt work, do more in less time, impress your manager, and help the community. → I'm sharing it all in this online video course. Node CLI Automation without wasting a 1,000 hours →
Project Backers & TheDevCouple Partners ⚡️
This FOSS (free and open source software) project is updated and maintained with the help of awesome businesses listed below. Without the support from these amazing companies/individuals, this project would not have been possible.
— What/How? Read more about it →
 |
 |
- MIT © Ahmad Awais.
- Code of Conduct.


This project is inspired by the work of more people than I could mention here. But thank you, Dan Abramov for Create React App, Andrew Clark, and Christopher Chedeau, Sophie Alpert from React.js team, Kent C. Dodds for his open source evangelism, WordPress Core Contributors, Gary for keeping everyone sane, Gutenberg developers Matias, Riad, Andrew, Ella, Joen, Tammie, Greg and contributors, and other WordPress community members like Zac for his course on Gutenberg, and also my friend Morten for all the #Guten-motivation, Icons8 for the awesome icons, Maedah for managing this project, and to everyone I forgot.
Follow me 👋 on Twitter for more updates and questions →
For anything else, tweet at @MrAhmadAwais
I have released a video course to help you learn how to create projects just like this one. Node.js and JavaScript based automation dev-tools and Command-line CLIs — Learn to build Node.js CLIS →

VSCode
I have released a video course to help you become a better developer — Become a VSCode Power User →

VSCode


