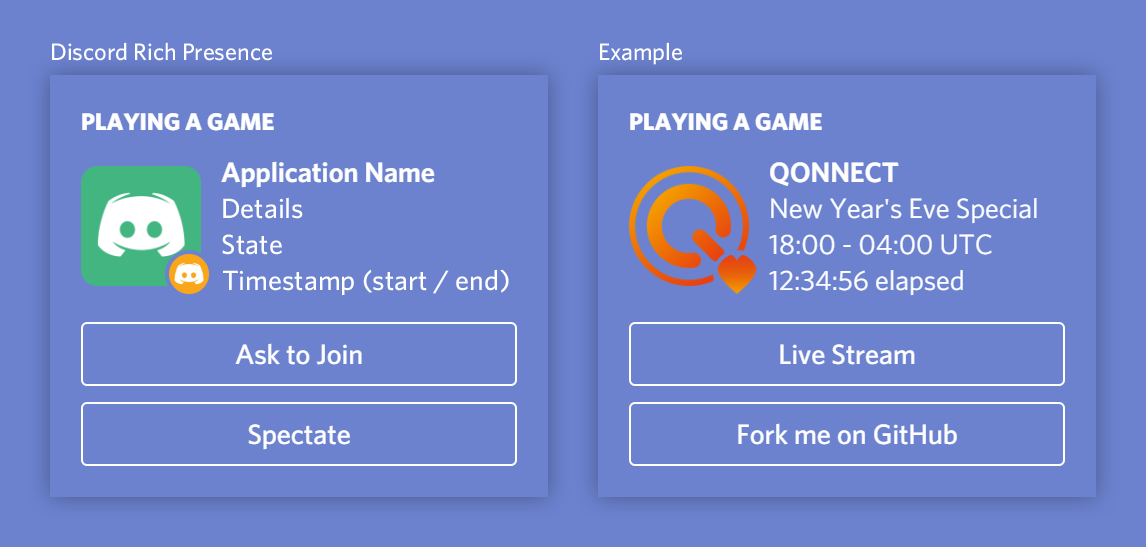
Beautify your Discord profile with a fully customizable Discord Rich Presence, now with buttons.
YOU NEED TO BE USING THE DESKTOP APPLICATION IN ORDER FOR THIS TO WORK. BOTH APPLICATIONS NEED TO BE RUNNING ON THE SAME DESKTOP PC.
Requirements
Usage Instructions
Configuration
Timestamps
Example
-
Download and install NodeJS.
-
Download the latest .ZIP from the Releases section from this repo. (feel free to clone/fork for further tweaking/development)
-
Run
npm ifrom inside of the directory to install all of the node_module required packages for the project. -
Open the
config.json.examplefile, modify the contents, and then save it asconfig.json. (see below for a few examples) -
Run
node .ornode index.jsto start the application. (ensuring you followed Step 4 beforehand)
{
    "clientId": "Your_developer_application_client_id_goes_here",
    "rich_presence": {
        "details": "First_row_below_title",
        "state": "Second_row_below_title",
        "assets": {
            "largeImageText": "Text_shown_on_large_image_hover",
            "largeImageKey": "Large_image_to_the_left_of_content",
            "smallImageText": "Text_shown_on_small_image_hover",
            "smallImageKey": "Small_image_to_the_left_of_content"
        },
        "buttons": {
            "primary": {
                "label": "Primary Button Text",
                "url": "http://example.com/"
            },
            "secondary": {
                "label": "Secondary Button Text",
                "url": "https://example.com/"
            }
        },
        "timestamps": {
            "startTimestamp": "Optional_epoch_start_timestamp_without_quotes",
            "endTimestamp": "Optional_epoch_end_timestamp_without_quotes",
            "useTimer": "True_or_false_without_quotes"
        }
    }
}| Location | Configuration | Notes |
|---|---|---|
| First row below title | details | |
| Second row below title | state | |
| Third row below title | timestamps.startTimestamp | Converted to a format such as 12:34:56 elapsed |
| timestamps.endTimestamp | Converted to a format such as 12:34:56 remaining |
|
| First button at the bottom | buttons.primary | Button can display any text, and have a link/url assigned |
| Second button at the bottom | buttons.secondary | Button can display any text, and have a link/url assigned |
| Text shown on large image:hover | assets.largeImageText | |
| Large image to the left of content | assets.largeImageKey | Four rows high, includes the title but not the bottom buttons |
| Text shown on small image:hover | assets.smallImageText | |
| Small image to the left of content | assets.smallImageKey | Small icon inset on the bottom right of the largeImageKey |
Sending endTimestamp will always have the time displayed as "remaining" until the given time. Sending startTimestamp will show "elapsed" as long as there is no endTimestamp sent.
The useTimer setting accepts either true or false. If you want to enable the timer, set it to true. Otherwise, set it to false.
Setting startTimestamp and endTimestamp to null whilst useTimer is true will display the time elapsed since the RPC was started.
"timestamps": {
    "startTimestamp": null,
    "endTimestamp": null,
    "useTimer": true
}
For example, if I started the RPC at Sat, 23 Oct 2021 09:00:00 UTC it will display 00:00 elapsed and from there, it will increase.
Setting startTimestamp to an Epoch value and endTimestamp to null will display the time elapsed since the start Epoch time/date.
"timestamps": {
    "startTimestamp": 1634981400,
    "endTimestamp": null,
    "useTimer": true
}
For example, the startTimestamp is equal to Sat, 23 Oct 2021 09:30:00 UTC whilst the endTimestamp is equal to null.
- If I started the RPC at
Sat, 23 Oct 2021 09:45:00 UTCit will display15:00 elapsed.
Setting startTimestamp and endTimestamp to an Epoch value, with the endTimestamp being greater, will display the time left.
"timestamps": {
    "startTimestamp": 1634982600,
    "endTimestamp": 1634983200,
    "useTimer": true
}
For example, the startTimestamp is equal to Sat, 23 Oct 2021 09:50:00 UTC whilst the endTimestamp is equal to 10:00:00 UTC.
- If I started the RPC anywhere between
09:50:00 UTC - 10:00:00 UTCit will display the time left until10:00:00 UTC.
Setting startTimestamp to null and endTimestamp to an Epoch value will display the time left until the end Epoch time/date is met.
"timestamps": {
    "startTimestamp": null,
    "endTimestamp": 1634984400,
    "useTimer": true
}
For example, the startTimestamp is equal to null whilst the endTimestamp is equal to Sat, 23 Oct 2021 10:20:00 UTC.
- If I started the RPC at
10:00:00 UTCit will display20:00 left.
- For example, if you set the startTimestamp to
Sat, 23 Oct 2021 10:45:00 UTCand the endTimestamp toSat 24 Oct 2021 10:50:00 UTCthe timer will display05:00 leftinstead of24:05:00 left.
{
    "clientId": "792839335723663411",
    "rich_presence": {
        "details": "New Year's Eve Special",
        "state": "18:00 - 04:00 UTC",
        "assets": {
            "largeImageText": "Q-dance",
            "largeImageKey": "q-dance",
            "smallImageText": "🧡",
            "smallImageKey": "orange-heart"
        },
        "buttons": {
            "primary": {
                "label": "Live Stream",
                "url": "https://live.q-dance.com/"
            },
            "secondary": {
                "label": "Fork me on GitHub",
                "url": "https://jayme.dev/r/discord-rpc"
            }
        },
        "timestamps": {
            "startTimestamp": 1609437650,
            "endTimestamp": 1612065650,
            "useTimer": true
        }
    }
}
