Home
The page is divided into 2 sections, GUI options and then Item options. GUI options are what comes first in the configuration, and the Item options are for any items defined underneath the "items:" section of the GUI config.
- Placeholders
- Materials
- Enchantments (Be aware that some enchantments are not available on some items.)
- Dye Colors
- Pattern Types
- Sound Types
| TEXT | Replace this with any text. Check the description to find out if you can use color/formatting codes. |
| BOOLEAN | Replace this with true or false (If used with PlaceholderAPI for view_requirements this may be yes/no instead of true/false [This is the default configuration for PlaceholderAPI]). |
| EXPRESSION | A java/placeholder expression/comparison. See this page for more information. |
| # | Replace this with a number. Check the description to see if there are limits. |
| SOUND | Replace this with the sound name. |
| COMMAND | Replace this with the command you want without slash "/" |
gui_menus:
  menuname:
    menu_title: 'TEXT'
    open_command: TEXT
    open_requirement: EXPRESSION
    open_commands:
    - '[player] COMMAND'
    - '[console] COMMAND'
    - '[commandevent] COMMAND'
    - '[message] TEXT'
    - '[openguimenu] MenuName'
    - '[connect] ServerName'
    - '[json] {"text":"message"}'
    - '[refresh]'
    - '[broadcastsound] SOUND'
    - '[sound] SOUND'
    - '[takemoney] #'
    size: #
    update_interval: #
    items:
Note: If you're using an external reference to a gui .yml file your configuration will start at the menu_title: option!
menu_title: 'TEXT'
This is the menu title that is shown at the top of the open GUI. You can use color and formatting codes in this area. You can also use Placeholders in this title (Like %player_name%).
open_command: COMMAND
This defines the command used to open the GUI. This needs to be ONE word.
open_command:
- COMMAND
- COMMAND
This defines the command(s) used to open the GUI. It may contain more than one word.
open_requirement:
 requirements:
   <TEXT>:
     type: <type>
This will give you able to open the menu if you have for example a specific permission, amount of money, etc See this page for more information about it.
open_commands:
- '[player] COMMAND'
- '[console] COMMAND'
- '[commandevent] COMMAND'
- '[message] TEXT'
- '[openguimenu] MenuName'
- '[connect] ServerName'
- '[json] {"text":"message"}'
- '[refresh]'
- '[broadcastsound] SOUND'
- '[sound] SOUND'
- '[takemoney] #'
This will run the command(s) you set when player open the the menu.
size: #
This option tells the plugin how large the inventory should be. 9, 18, 27, 36, 45, 54 are the only acceptable numbers here. Each one adds another line to the GUI.
update_interval: #
This is for any items that use the update: tag (See Item options). The number defines the amount of seconds between each refresh of the placeholders in an item lore/display name.
items:
This line should be left as is. It is merely telling the plugin you are about to begin defining items.
As a reminder, Here is what your syntax should look like with items. Be aware this varies depending on the amount of items and options:
   items:
    'ItemName':
      material: TEXT
      slot: #
Note: Be aware that the 'ItemName': can be anything you want, and does not effect the configuration at all. It is for you to have identifiers. It could be a simple number (like in the default config) or it could be a random string of text.
material: TEXT
This option tells what material should be used for the item (The list of valid materials is available at the top of this page). This corresponds directly with the "data" tag (If you have something like potions or wool that have data). It can also interact with the "banner-meta" tag if you use a banner material. You can also use a player head by doing "head;username". The default config shows how you can use a player placeholder to create a dynamic item (head;%player_name%).
data: #
This corresponds with the material tag. It simply defines the data for any block or item. Wool is the most common example. You will need to find the data number using a page like this. However, Doing a simple google search, you should easily find data values for anything you need.
amount: #
This tag shows the number that will display beside an item (Like with a stack). This is useful for doing things like a lobby selector.
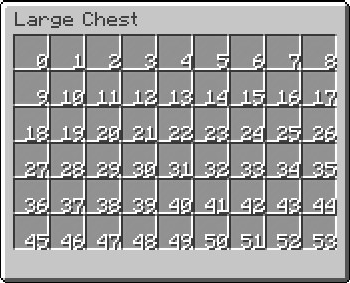
slot: #
This tag tells which slot of the inventory the item should be in. Items can be put in the same slot, but you will need to use the priority and view_requirement tags to make them work properly. Remember that an inventory can have up to 54 slots, but the first position (from the top left) starts at 0. So, The 9th slot is actually slot 8. This is how minecraft has things setup, and we can not change it. Here is an image to help explain it:
priority: #
This tag tells which item should have priority when in the same slot as another item (Corresponds with the slot and view_requirement tag). The larger the number...the lower the priority. So, an item with a priority of 5 will not show if another item has a priority of 2, and both would be covered up by an item with a priority of 1.
view_requirement: 'EXPRESSION'
This tag corresponds with the priority and slot tag. This feature give you able to view the item if player have for example a specific permission, amount of money, etc. See this page for more information about it.
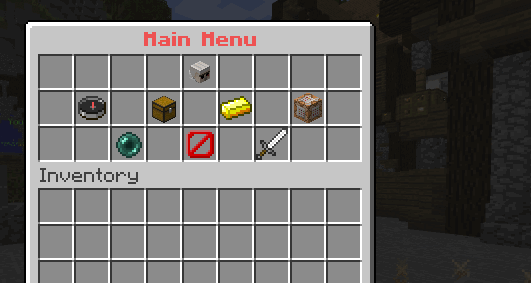
update: BOOLEAN # true or false
If this is set to true it will update any placeholders in the item display name and lore. The frequency of updates is determined by the GUI Option "update_interval". This is especially useful with statistics and cooldowns. Here is an example image showing how the update works in placeholders:
banner_meta:
- <dyecolor>;<patterntype>
- <dyecolor>;<patterntype>
This tag will only be used if the material tag is set as a banner. It allows you to create your own patterns using the dye colors and pattern types. You can stack them to create unique designs. It is very important that you use a semi-colon and not a regular colon as the divider in these lines.
enchantments:
- enchantmentid;level
- enchantmentid;level
This tag is used to define enchantments on the item. Be aware that some items/blocks can not be enchanted, and others can only use certain enchantments. If you wish to hide the text and just have the effect you can use the **hide_enchantments: ** tag.
hide_enchantments: BOOLEAN # true or false
This tag corresponds with the enchantments tag. If set to true it will hide the enchantment list on an item. This is useful for if you want an item to have the enchanted effect, but not the annoying text that is added.
hide_attributes: BOOLEAN # true or false
This tag will hide any vanilla attributes of an item. All tools (Swords, Picks, Axes, ETC.) show things like "+5 Attack" on them. This tag (when set to true) will hide those things.
hide_effects: BOOLEAN # true or false
Very similar to the hide_attributes tag, Except that it works with things like potions which have an effect listed beneath the name. Useful when you need a potion (rather than just a bottle of water), but none of the added text.
display_name: TEXT
This tag will be the display name for the item. You can use placeholders and color/format codes.
lore:
- 'TEXT'
- 'TEXT'
This tag defines what will be shown in the lore area of the item. You can use placeholders and color/format codes in this area. You can add as many lines as minecraft allows.
left_click_commands: # or right_click_commands:
- '[player] COMMAND'
- '[console] COMMAND'
- '[commandevent] COMMAND'
- '[message] TEXT'
- '[openguimenu] MenuName'
- '[connect] ServerName'
- '[json] {"text":"message"}'
- '[refresh]'
- '[broadcastsound] SOUND'
- '[sound] SOUND'
- '[takemoney] #'
- '[close]'
These tags are fairly self explanatory. Left_click_commands controls what happens if a player left clicks an item, and right_click_commands controls what happens if they right click the item. You can have as many lines as you want. Commands execute in order from top to bottom. There are several available types of commands. Here they are listed below (Be aware that all tags should have a space before the text or commands):
| TAG | DESCRIPTION | EXAMPLE |
|---|---|---|
| [player] | Executes a command as a player | [player] spawn |
| [console] | Executes a command as the console | [console] say Hello |
| [commandevent] | Executes a special command event like the ones used by MyCommand Aliases or DeluxeCommands | [commandevent] test |
| [message] | Sends a message to the player. You can use placeholders and color/format codes here | [message] Hello |
| [openguimenu] | Opens another GUI. Just add the correct menu title | [openguimenu] MenuName |
| [connect] | Connects the player to a bungee server. Just add the correct server name | [connect] Prison |
| [close] | Closes the currently open GUI | [close] |
| [json] | Send a json message to the menu viewer | [json] |
| [refresh] | Refresh items in the current menu view | [refresh] |
| [broadcastsound] | Broadcast a sound to the server | [broadcastsound] NOTE_PLING |
| [sound] | Play a sound for a the specific player | [sound] NOTE_PLING |
| [takemoney] | Take amount of money from player (vault requirement) | [takemoney] 1377 |
| <delay=(TIME IN TICKS)> | Sets a delay that the command event will be ran at (1 sec = 20 ticks) | [message] 10 seconds delay<delay=200> |
| <chance=(CHANCE)> | set a chance to run the command | [message] The chance to get this message is 80% <chance=80.0> |
left_click_requirement: # or right_click_requirement:
  requirements: 'EXPRESSION'
  deny_commands:
  - '[player] COMMAND'
  - '[console] COMMAND'
  - '[commandevent] COMMAND'
  - '[message] TEXT'
  - '[openguimenu] MenuName'
  - '[connect] ServerName'
  - '[json] {"text":"message"}'
  - '[refresh]'
  - '[broadcastsound] SOUND'
  - '[sound] SOUND'
  - '[takemoney] #'
  - '[close]'
Checks a requirement using a java/placeholder expression/comparison using the same format as the view_requirement tag. Except in this case the player can see the item, but it checks if he can left or right click it. Deny commands are completely optional, but if you use them they work exactly the same as the normal left_click_commands tag and right_click_commands tag. If the requirement is met they will execute the commands defined under the left/right_click_commands. If the requirement is not met it will instead execute the deny commands (or no commands if you did not define any).
Here I show a ranks example that was created by @clip and I am now bringing it live (with a few modest changes). This mines gui requires EZRanksPro in order to function properly, of course you can still edit what you need to. Hope you enjoy.
To make this work fine you have to download PlaceholdersAPI and download the Player, EzRanksPro expansions using:
/papi ecloud download Player
/papi ecloud download EzRanksPro
/papi reload